Step 1 :
To add a Chatbase chatbot to our WordPress website, we will need to first sign into our Chatbase account to create and set up a chatbot.
Create A Chat Bot
- Decide What You Want to Do with the Chatbot
To create your first AI chatbot, you need to nail down exactly what you want to do with it and the day-to-day tasks the chatbot will complete.
- Decide Which Chatbot Platform to Use
With a clear understanding of our chatbot’s capabilities, we can now select the ideal platform that will enable us to build it. There are numerous chatbot platforms available, each with its own set of features and functionalities. When evaluating the options, we should match the platforms’ strengths to our chatbot’s intended purpose and required functionality. The core day-to-day functions of our chatbot will be to answer common application and enrolment questions. Considering this, we need a chatbot platform that:
- Should have a way to train it with our data, this will help the chatbot about the university and the application process
- Understand and respond to questions asked in a natural conversational manner
- Track and analyze how people interact with the chatbot–the platform should have tools to understand chatbot usage patterns and performance.
- Work seamlessly as a chatbot interface on websites–it should also allow deploying the same chatbot on channels like mobile apps and messaging platforms so we can reach potential users
Setting Up the AI Chatbot
1. Sign up for an account.
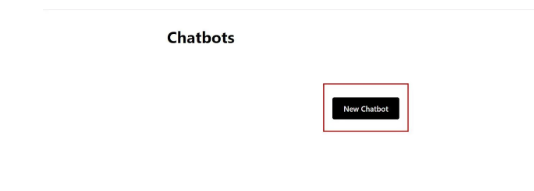
2. Once you’ve signed up and logged in, you should be redirected to the chatbot creation page.
3. Click on New Chatbot to create a new chatbot.
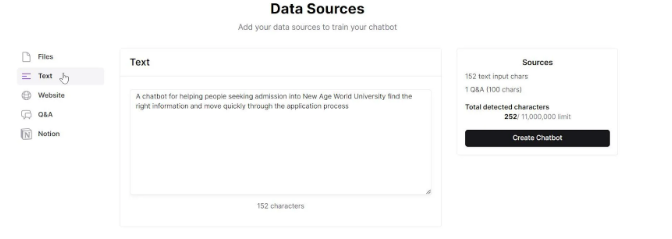
4. Now, on the next page, you’ll find an option to upload files to train your chatbot with, skip this for now. Instead, click on Text on the left sidebar and type in a placeholder text. You can type in a description of what your chatbot does. We will come back to this later.
5. Once you’re done, click on Create Chatbot on the right side of the page.
6. A live preview page for your chatbot should come up. Tap the Settings tab on the top of the page and provide a name for your chatbot in the Name field and click Save.
7. Now, on the Settings page, click on Model on the left sidebar, scroll down, and edit the instruction field. Remove the default instructions and add your own instructions. For this example, we used: “Your name is NawBot and you’ll answer questions on any subject.”
8. Now, click Chatbot on the top of the page to return to the live preview of your chatbot.
Install Chatbase on Your WordPress Website
1. Log in to your WordPress admin dashboard:
2. Install and activate the Chatbase plugin:
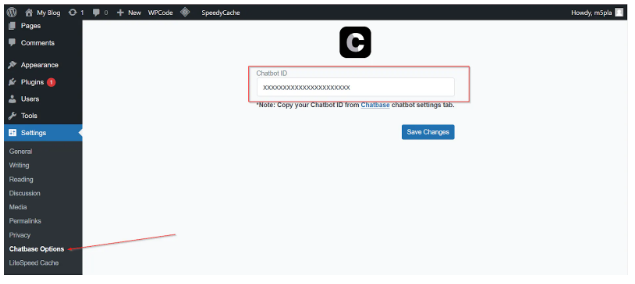
3. Copy and paste your Chatbot ID:
- Go to your Chatbase account and navigate to My Chatbots.
- Select the chatbot you want to embed.
- Click on the chatbot, then go to the “Settings” tab. At the top of the next page, you’ll find the Chatbot ID. Copy it.
- Paste the copied Chatbot ID into the text box in your WordPress settings.