What is Meta Pixel?
Meta Pixel (formerly called Facebook Pixel) is a snippet of JavaScript code that, when created and installed on your FB Ads manager account and website, can help you track your customers’ journey between Facebook, Instagram and your website. If you’ve been wondering what the Facebook Pixel ID is, that little piece of code is it.
What Does the Meta Pixel Do?
It tracks activity on your website as it relates to users who also use Facebook and/or Instagram. This can add a whole platform of data to your targeting arsenal, providing a more complete picture of your customers’ journey and where potential gaps may exist .
Meta Pixel gathers information using Facebook cookies. This is invaluable data that can help you match up visitors to your site with those you should be targeting on FB. You can gather metrics that show how the consumer’s journey progresses so you can initiate targeting and retargeting campaigns when needed, with the right audiences. The ability to make your sales funnel connected between your website and social media accounts is awesome!
The Meta Pixel automatically tracks:
- URLs and domains visited
- Devices used
- Predefined conversions
How to Install Your Facebook Meta Pixel On Your Site
1. Copy the Pixel code shared by facebook ads team.
Here is the example meta pixel code.
<!– Facebook Pixel Code –>
<script>
!function(f,b,e,v,n,t,s){if(f.fbq)return;n=f.fbq=function(){n.callMethod?
n.callMethod.apply(n,arguments):n.queue.push(arguments)};if(!f._fbq)f._fbq=n;
n.push=n;n.loaded=!0;n.version=’2.0′;n.queue=[];t=b.createElement(e);t.async=!0;
t.src=v;s=b.getElementsByTagName(e)[0];s.parentNode.insertBefore(t,s)}(window,
document,’script’,’//connect.facebook.net/en_US/fbevents.js’);
fbq(‘init’, ‘989654164447753’);
fbq(‘track’, “PageView”);
fbq(‘track’, ‘ViewContent’);
</script>
<noscript><img height=”1″ width=”1″ style=”display:none”
src=”https://www.facebook.com/tr?id=989654164447753&ev=PageView&noscript=1″
/></noscript>
<!– End Facebook Pixel Code →
2. Paste the code inside the <head> tag of your header.php file.
3. Add the purchase event to your order confirmation page.
Example Purchase event tracking code.
fbq(‘track’, ‘Purchase’, {currency: ‘CAD’, value: ‘10.00’ });
Check if it is woocommerce order confirmation by adding below script to your header.php file.
<?php
if ( is_checkout() && !empty( is_wc_endpoint_url(‘order-received’) ) ) {
global $woocommerce, $post;
$order = new WC_Order($post->ID);
$value = $order->get_total(); ?>
<script>
fbq(‘track’, ‘Purchase’, {currency: ‘CAD’, value: ‘<?php echo $value; ?> ‘ });
</scr
<?php
} ?>
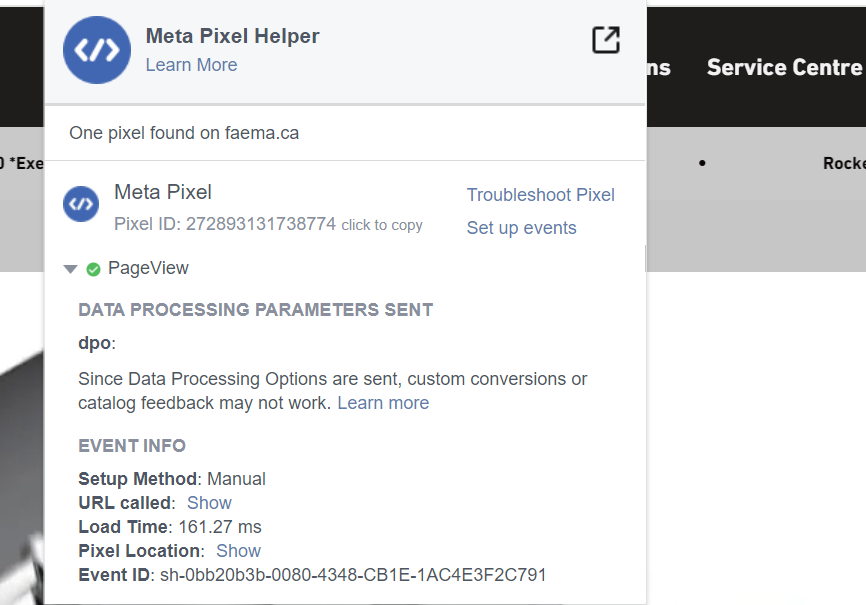
4. Ensure events are triggering properly using Meta Pixel Helper extension for chrome.
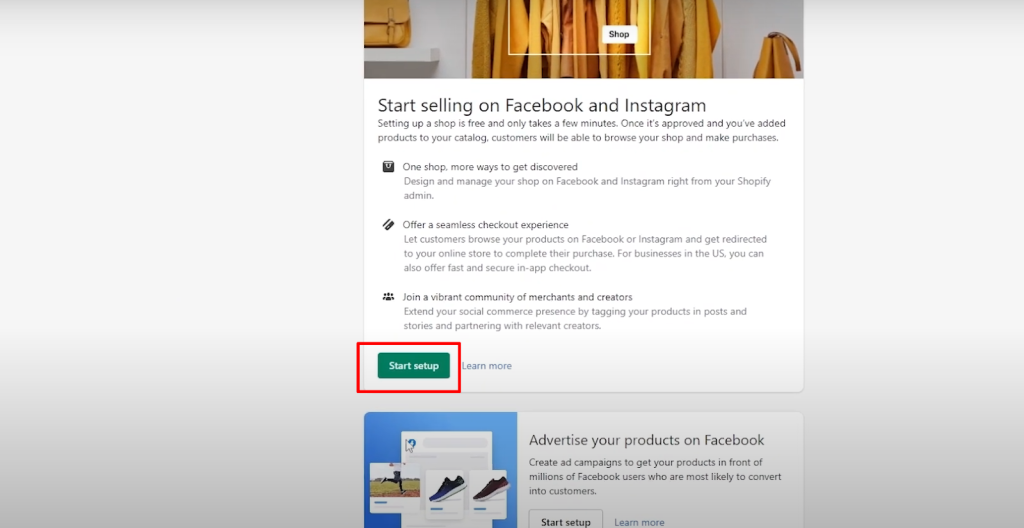
Facebook Ads Integration in Shopify Sites
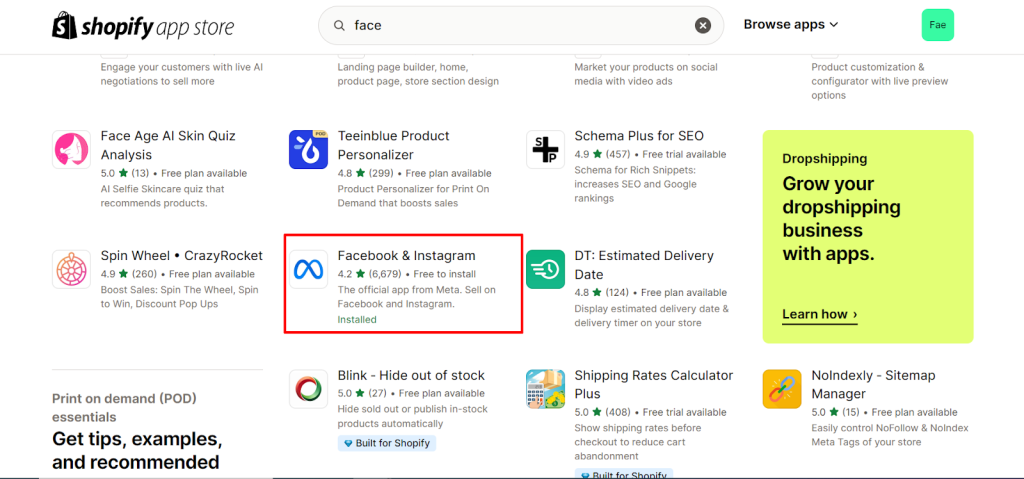
Step 1 : search for Facebook & Instagram app in shopify app store .
Step 2 : After installing app on your shopify account, Let’s proceed with the account setup.
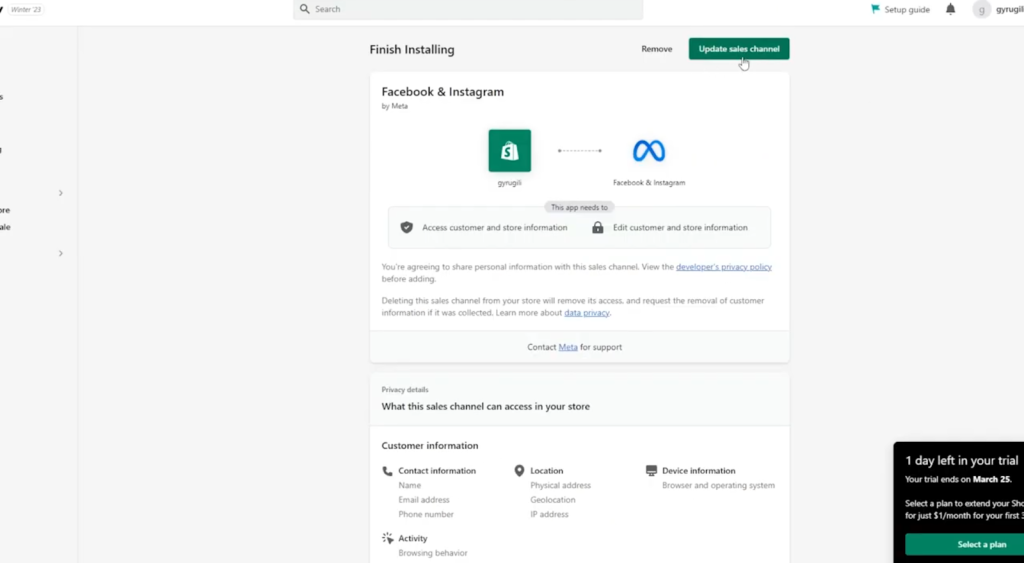
Step 3: please click on the Update sales channel button and wait for a few seconds , it will automatically redirect to the account connection page. And press the start setup button in the below screenshot.
Step 4 : Then simply click on the connect account button here.
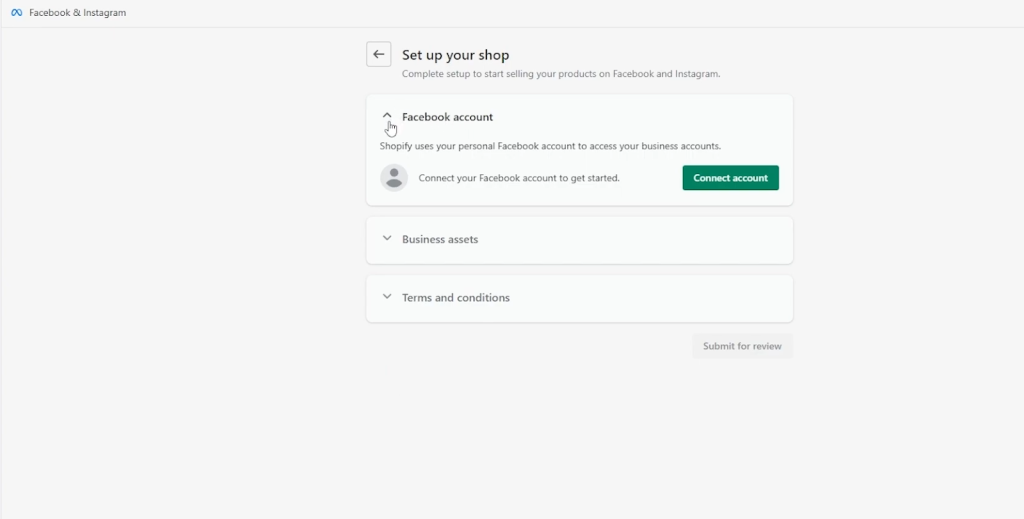
Step 5 : please provide the account details and connect with the facebook account the ads are running on.

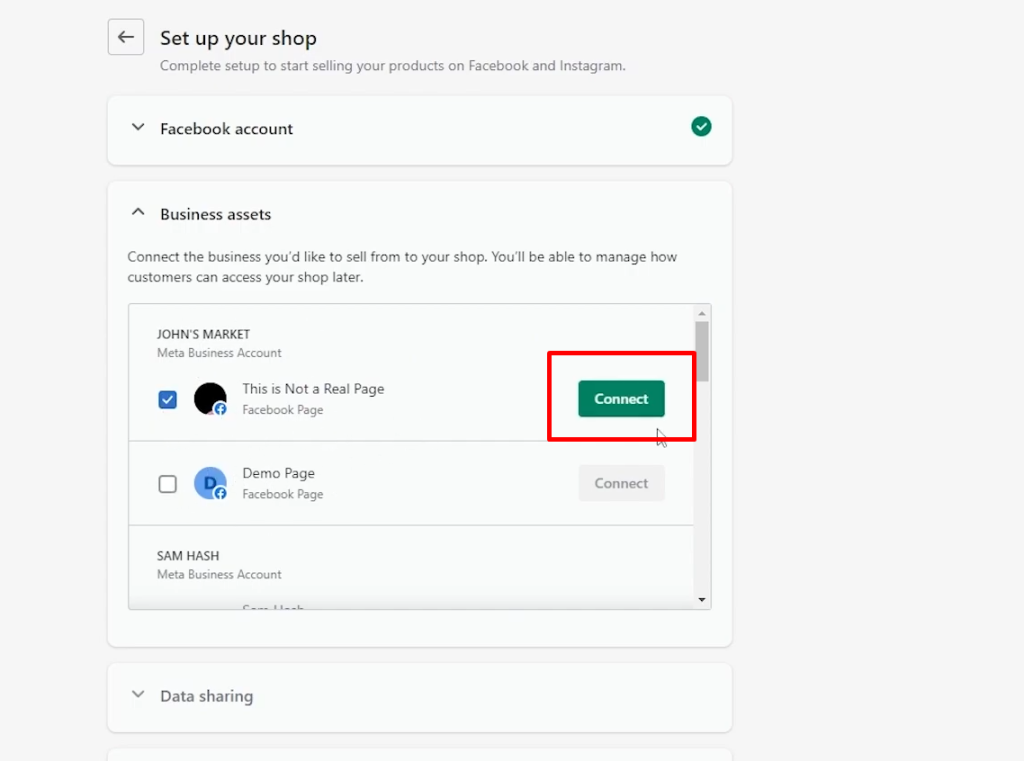
Step 6: after connecting the required account with the facebook and instagram app , simply choose the preferred business account in the Business assets section here.
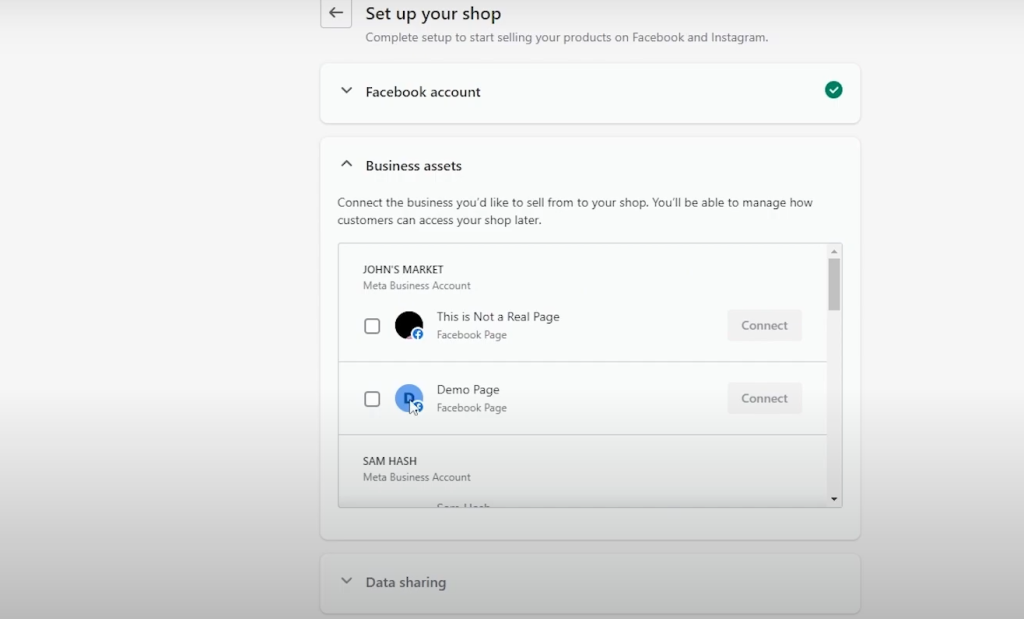
Step 7 : After selecting proper account options please click the connect button here
Step 8. After clicking the connect button it will automatically redirect to Data sharing settings like screenshot below.
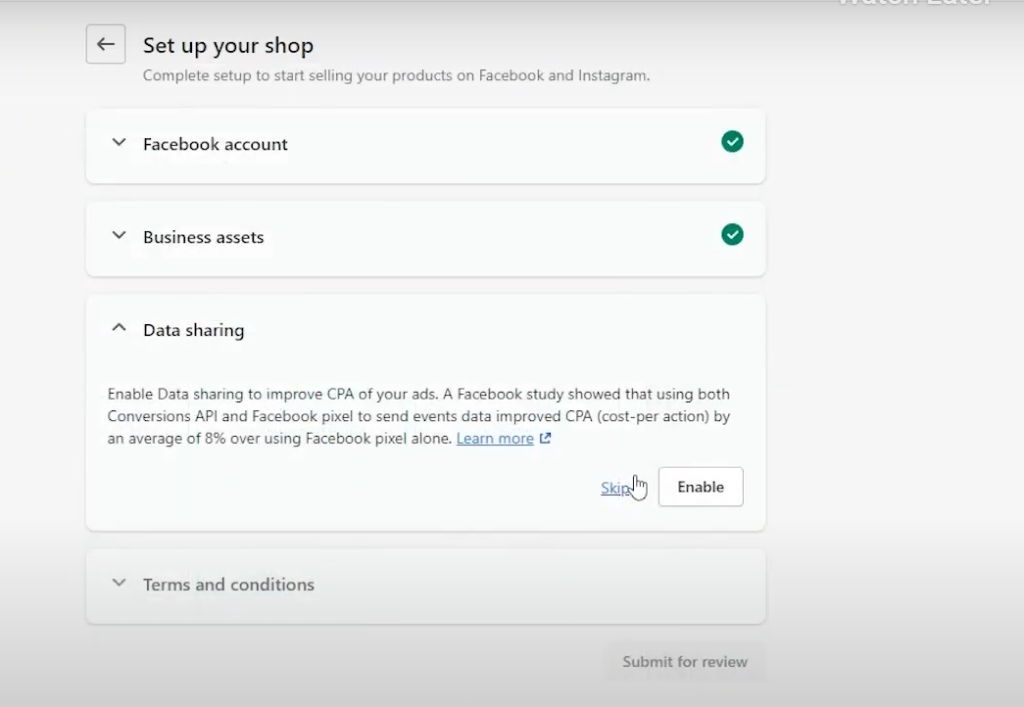
Step 9 : After clicking the Enable Button it will popup a window with data sharing options. Please go with maximum option here.
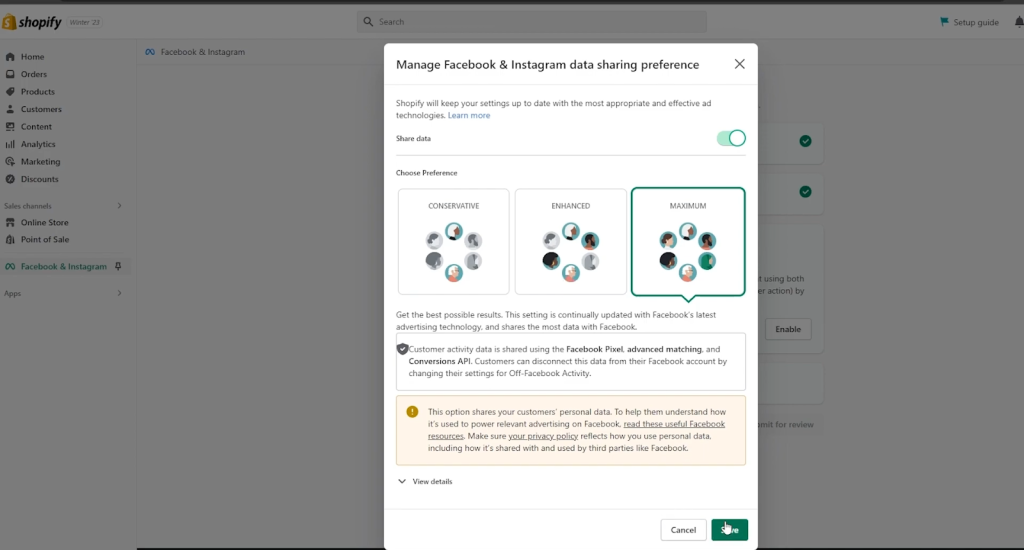
Step 10 : please click the save button to continue with setup.
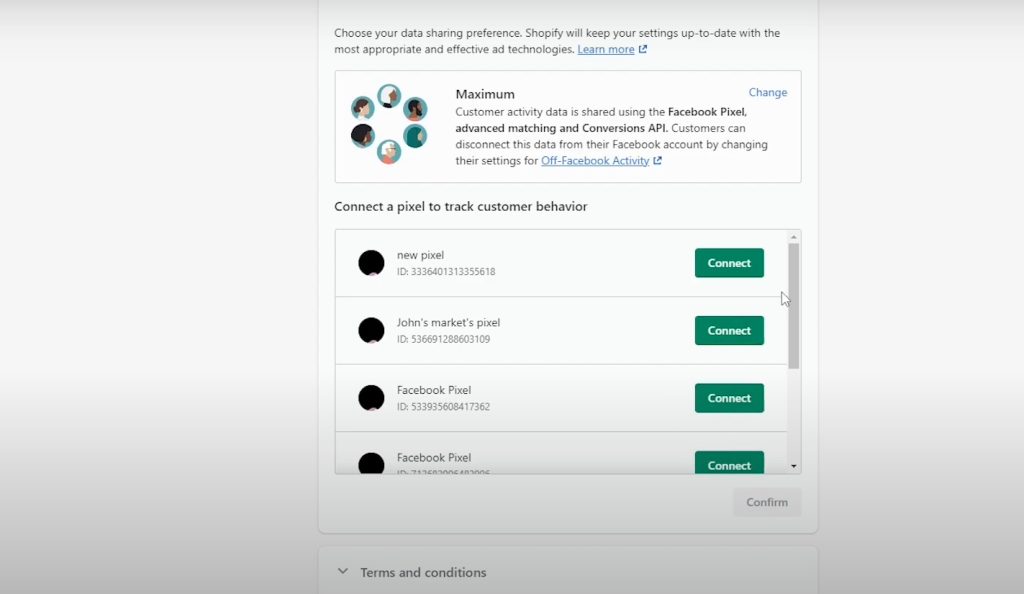
Step 11 : please select a proper pixel below account listing and simply click on connect button to proceed.
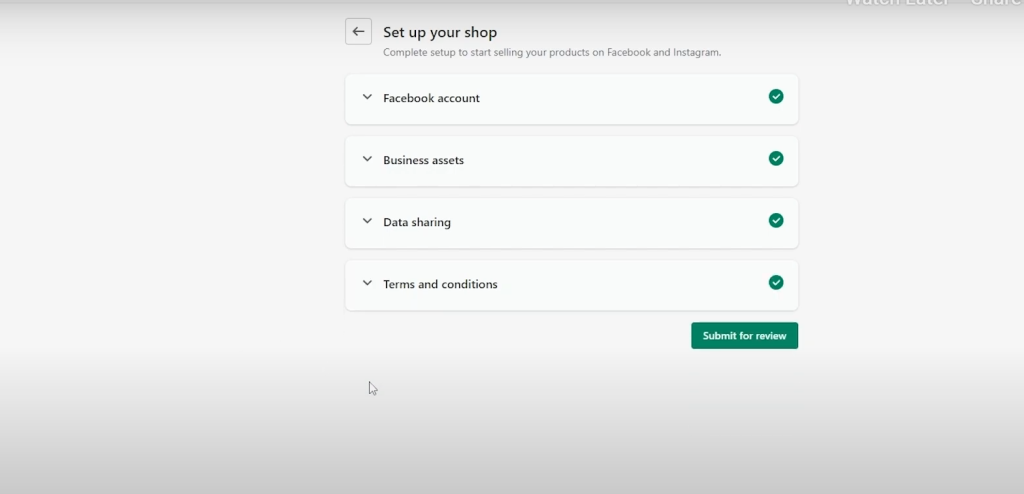
Step 12: after that please proceed with checking their terms and conditions checkbox.
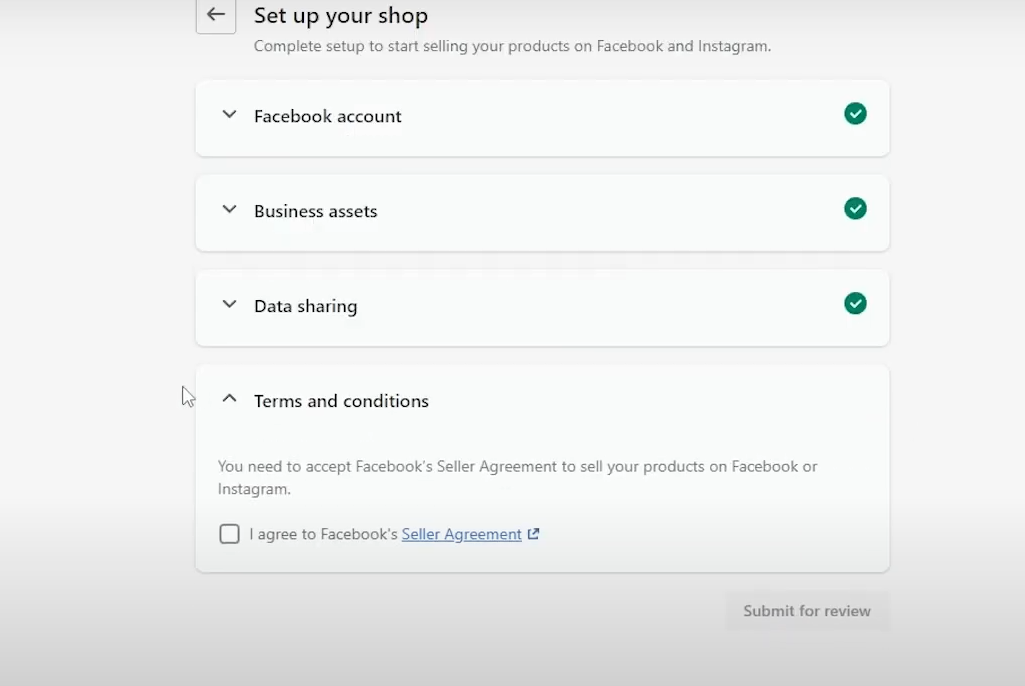
Step 13 : After providing the right information please click the submit for review button to proceed.
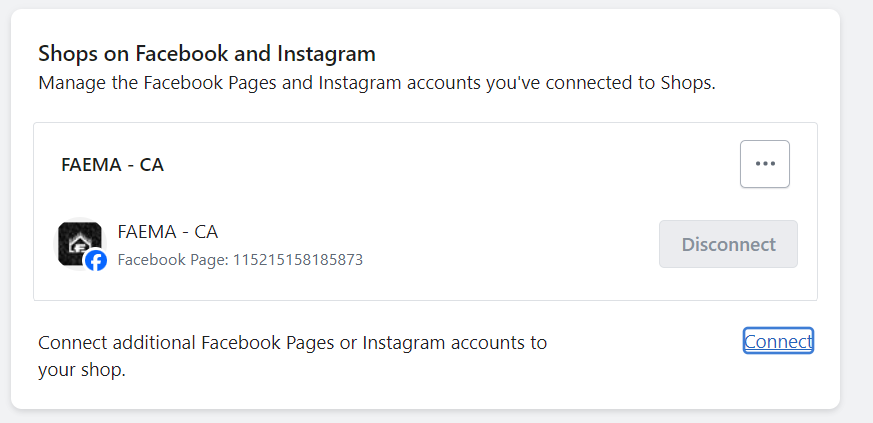
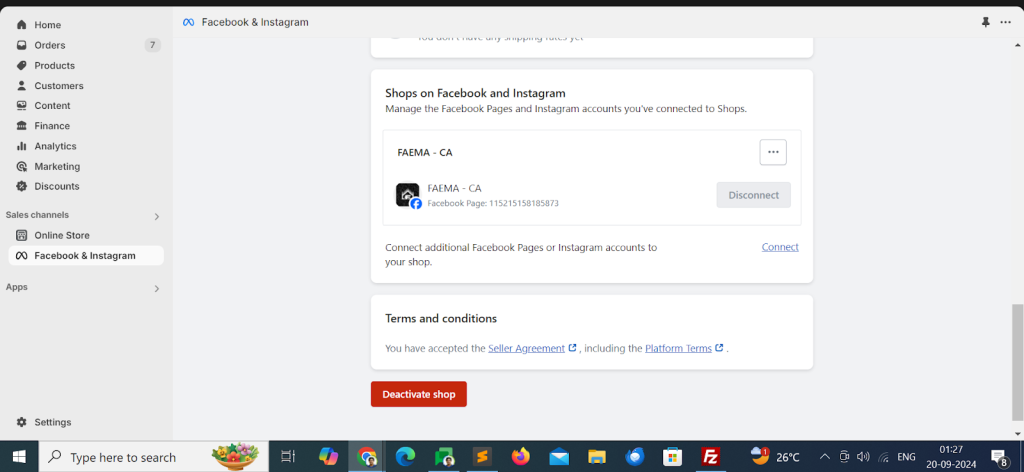
Step 14 : After successful review you can view your connected account info here.
Step 15 : If purchase event values are not pulling to facebook ads . please install custom purchase scripts customer events section in shopify settings .
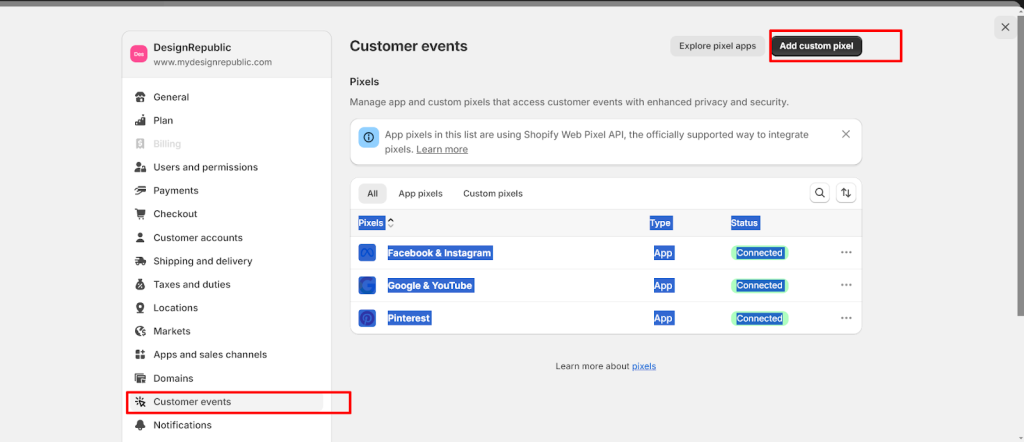
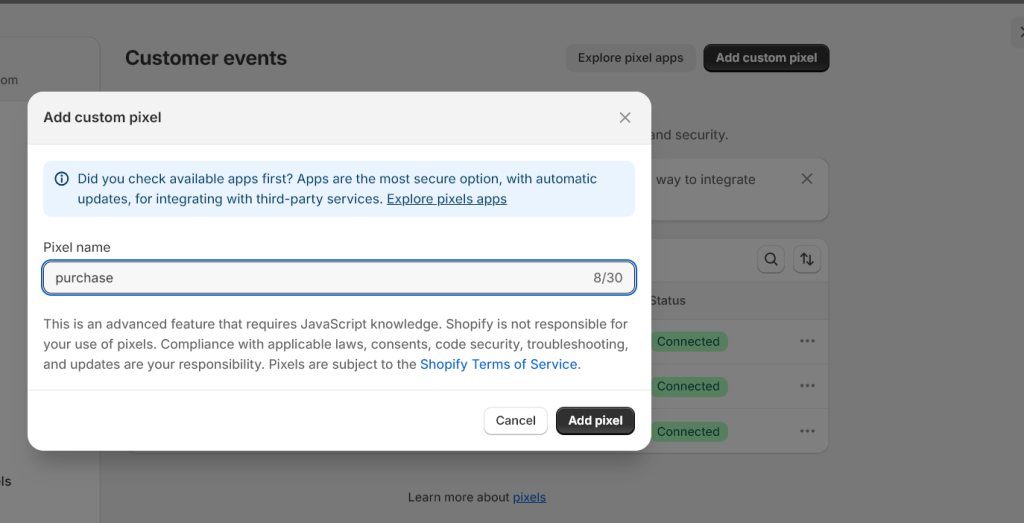
Step 16: Please click the add custom pixel code button to proceed.
Step 17 : Give a name to your pixel event tag and press the add pixel button.
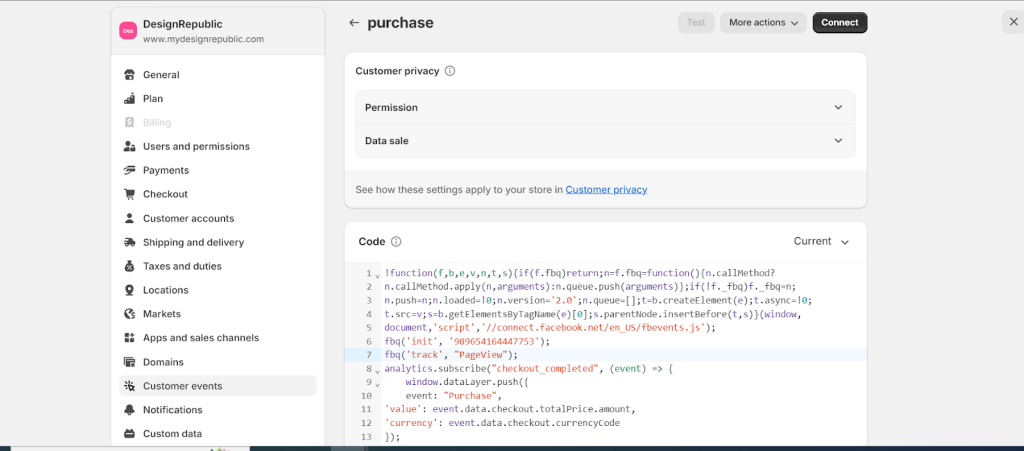
Step 18 : add pixel code here and save the changes.
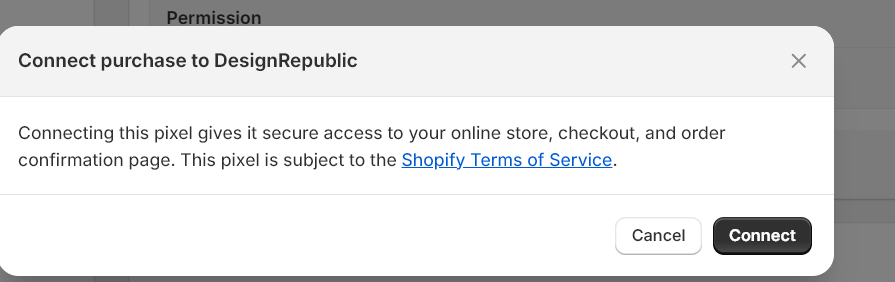
Step 19 : please click the connect button to make the changes live
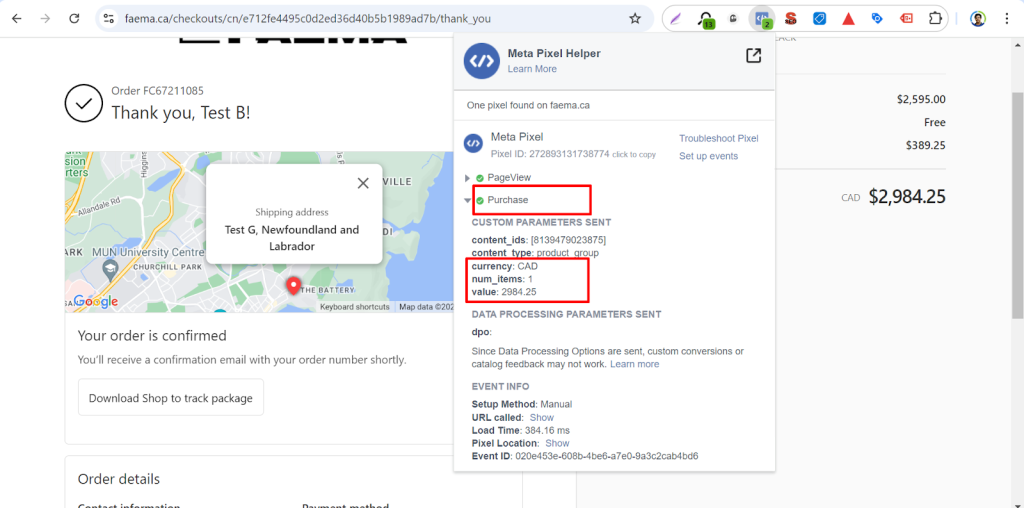
Step 20 : Ensure events are triggering properly on order confirmation page by facebook meta pixel helper extension for chrome .
Google Ads Integration in
WordPres Sites
Step 1 : Ensure google tag installed on the <head> section of your header.php file.
<script async src=”https://www.googletagmanager.com/gtag/js?id=AW-692948020″></script>
<script>
window.dataLayer = window.dataLayer || [];
function gtag(){dataLayer.push(arguments);}
gtag(‘js’, new Date());
gtag(‘config’, ‘AW-692948020’);
</script>
Step 2 : Ensure purchase event code installed on the <head> section of your header.php file for order confirmation page.
<?php
if ( is_checkout() && !empty( is_wc_endpoint_url(‘order-received’) ) ) {
global $woocommerce, $post;
$order = new WC_Order($post->ID);
$value = $order->get_total();
$tax = wc_format_decimal($order->get_total_tax(), 2);
$currency = $order->get_currency();
$transaction = $order->get_id();?>
<script>
gtag(“event”, “purchase”, {
transaction_id: “<?php echo $transaction; ?> “,
value: <?php echo $value; ?>,
tax: <?php echo $tax ; ?>,
currency: “<?php echo $currency; ?>”,
});
</script>
<?php
} ?>
Step3 : Ensure events trigger fine google tag assistant companion tool for google chrome.

Note : We can install GTM plugin send ecommerce data automatically from the wordpress site
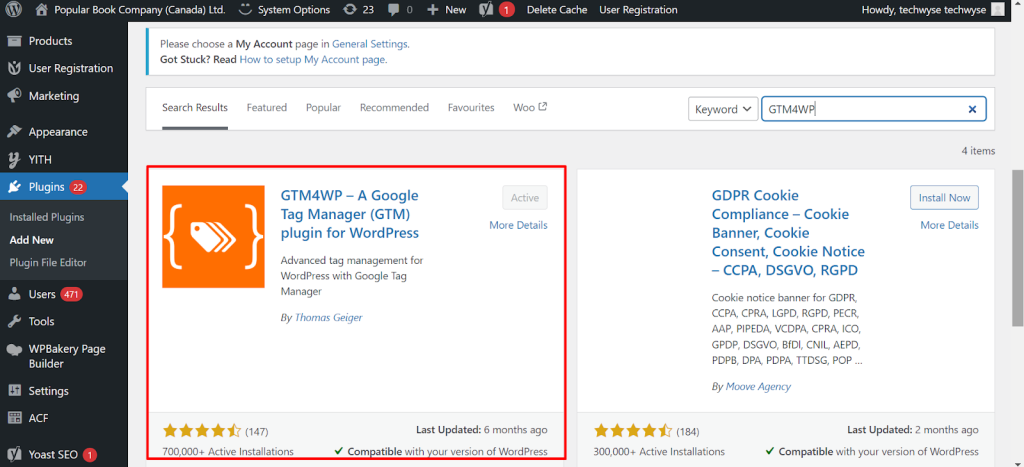
Step 1: Ensure GTM4WP plugin installed on client site.
Step 2: Provide your tag manager id for Google Tag Manager settings under the main settings menu.

Step 2 : Ensure Ecommerce options are active for the under woocommerce integration part of the plugin settings.
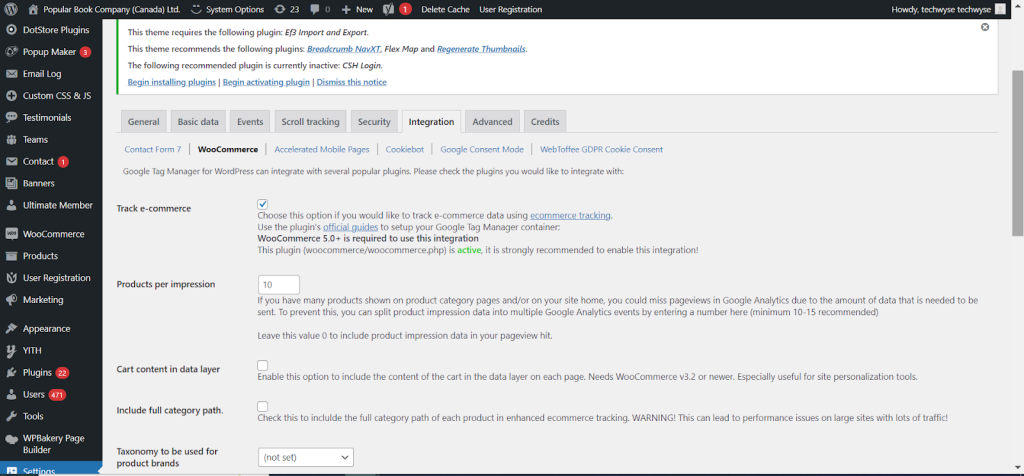
Click the save changes button to save the new options.
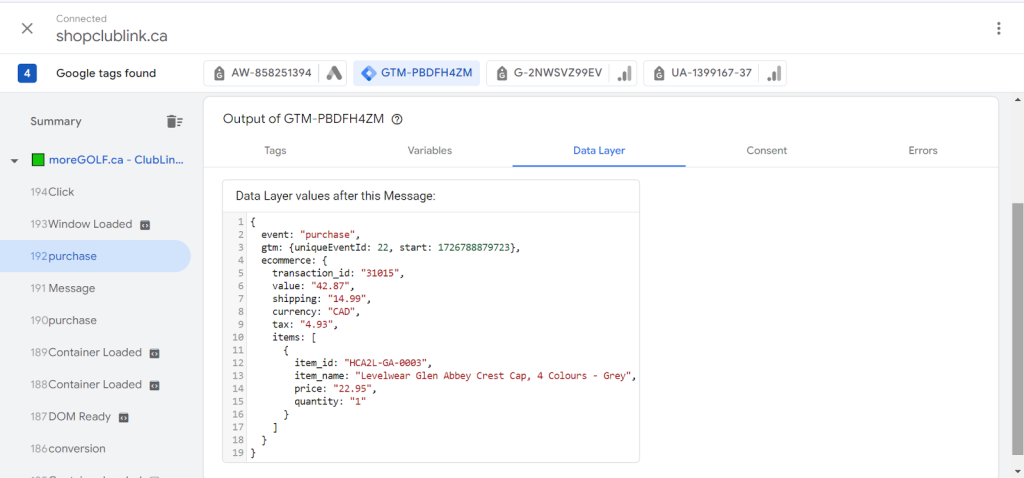
Step3 : Ensure events trigger fine google tag assistant companion tool for google chrome.
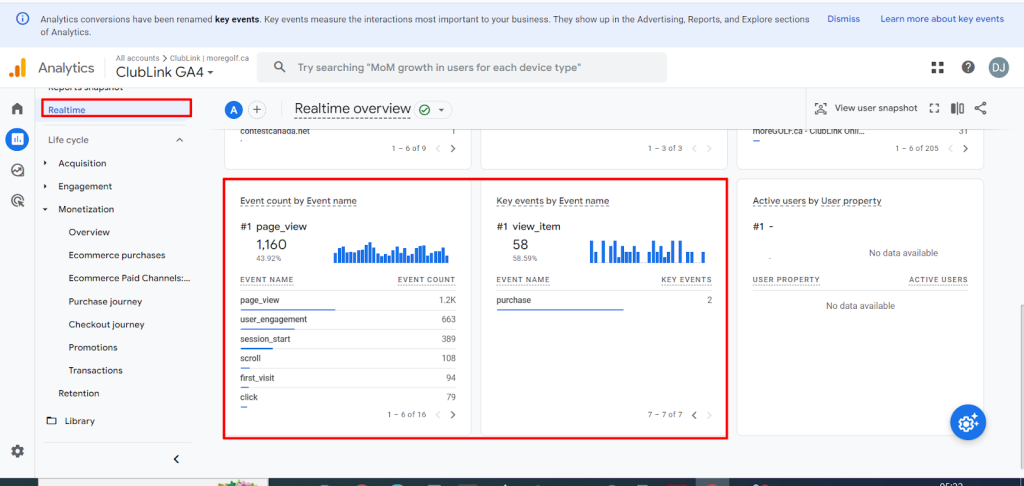
Step 4 : We can check the real time event data under reports snapshot section in google analytics.
Google Ads Integration in
Shopify Sites
Set up the Google & YouTube channel
The Google & YouTube channel automatically syncs your products and relevant information about your Shopify store with the Google Merchant Center. You can then update your Google product feed directly from Shopify. For eligible stores selling in the United States, products synced to Google Merchant Center using the Google & YouTube channel can display in Google Shopping tab search listings for free.
Connect the Google & YouTube channel to sync your products
You can install the Google & YouTube channel from the Shopify App Store.
After you install the Google & YouTube channel, you need to connect your Google account and Google Merchant Center account so that you can sync your Shopify products with Google.
Your store needs to meet a few requirements for the Google & YouTube channel to work. Review the requirements to learn if you need to make any changes to your online store or shipping settings.
Steps :
- From your Shopify admin, click Settings > Apps and sales channels.
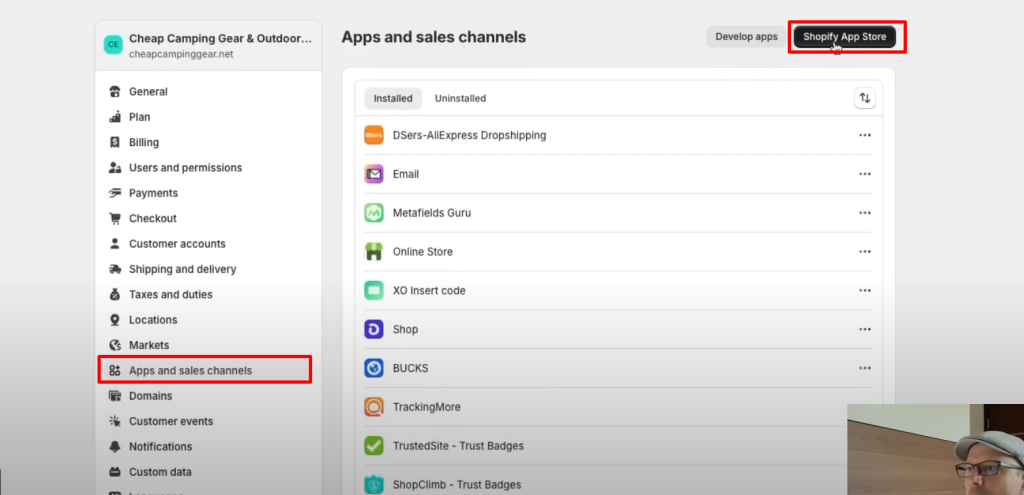
2.From the Apps and sales channels page, click Shopify App Store.
3.If applicable, then log in to continue to the Shopify App Store.
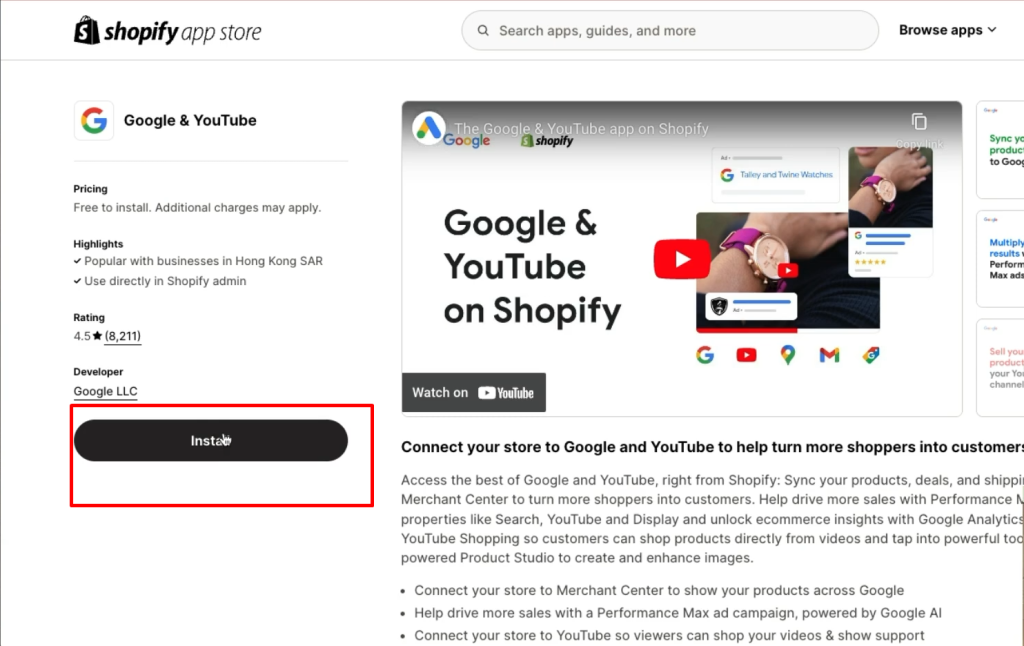
4.From the Shopify App Store, search for Google & YouTube to learn more about the sales channel.

5.Click the Install button.
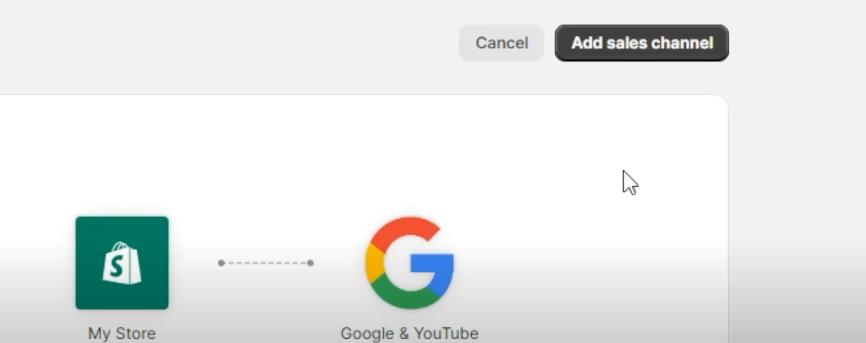
Then click the add sales channel button to proceed.
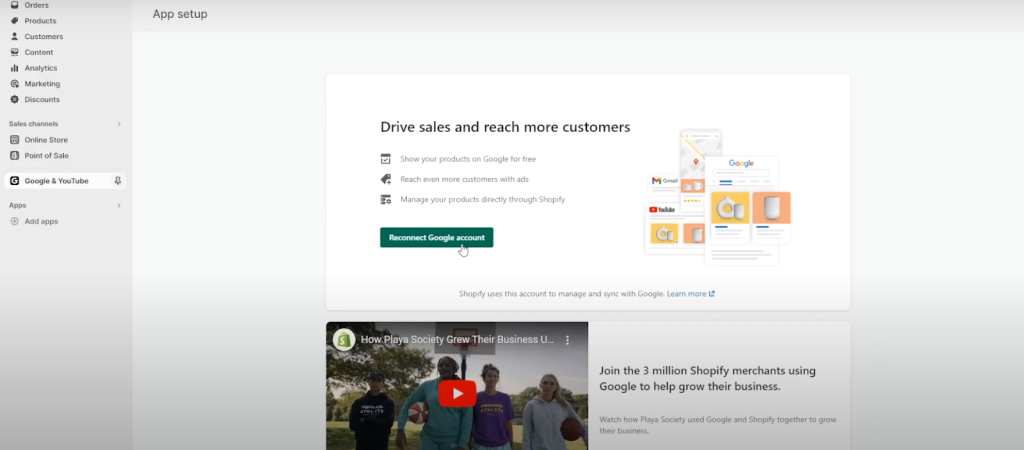
Click Connect Google Account, and then select a Google account or create a new one. You need to allow Shopify to access your Google account information.
It will open a popup with google login page.
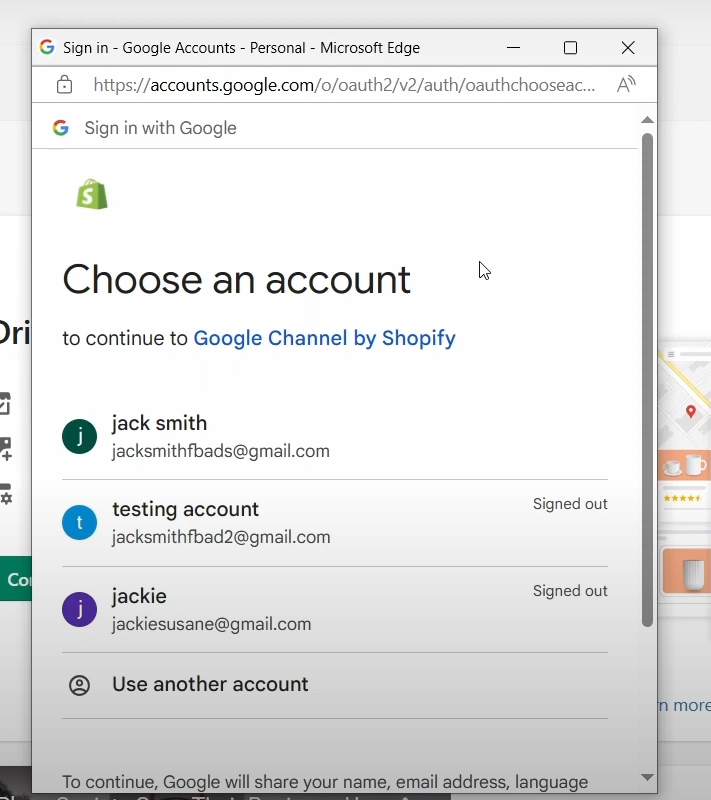
Then choose each step followed by shopify connection like below screenshots.
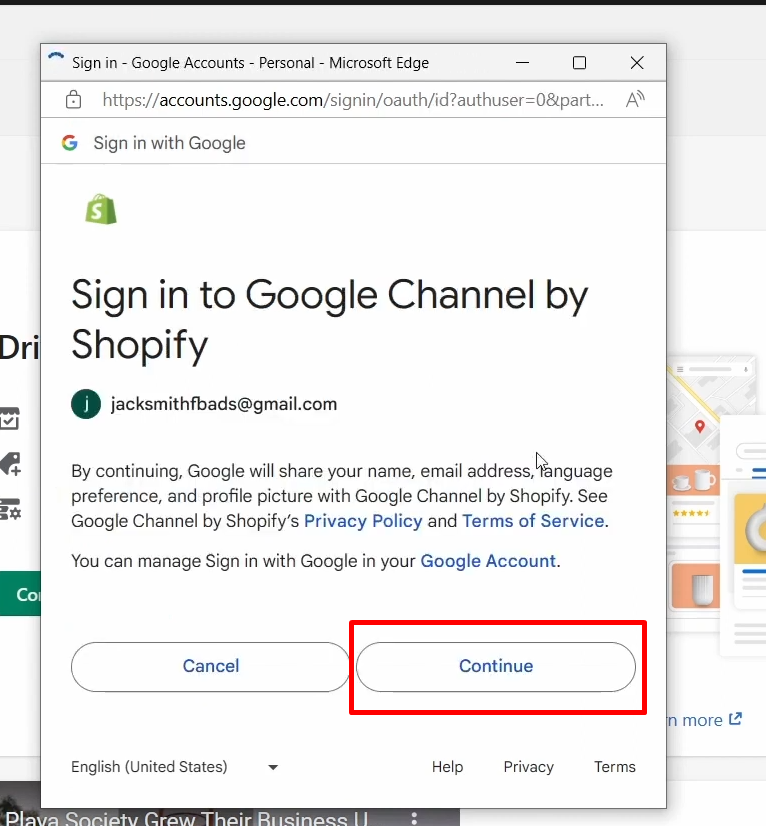
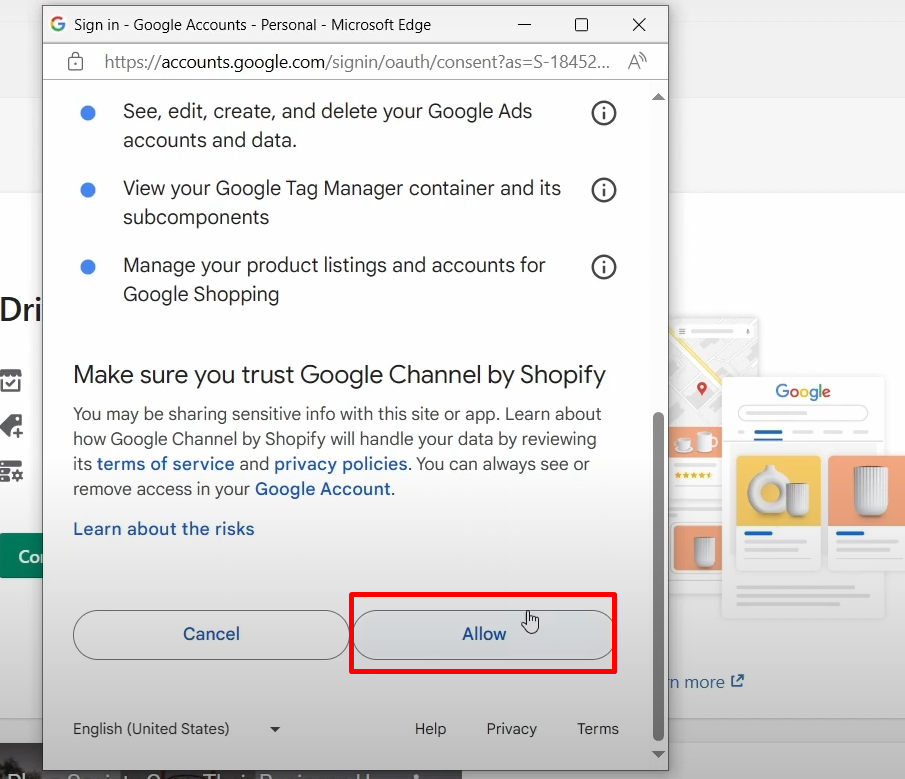
Then click the allow button to proceed.
7.Review the setup requirements for your online store, and make any required changes.
Then proceed with four validation settings on the following page.
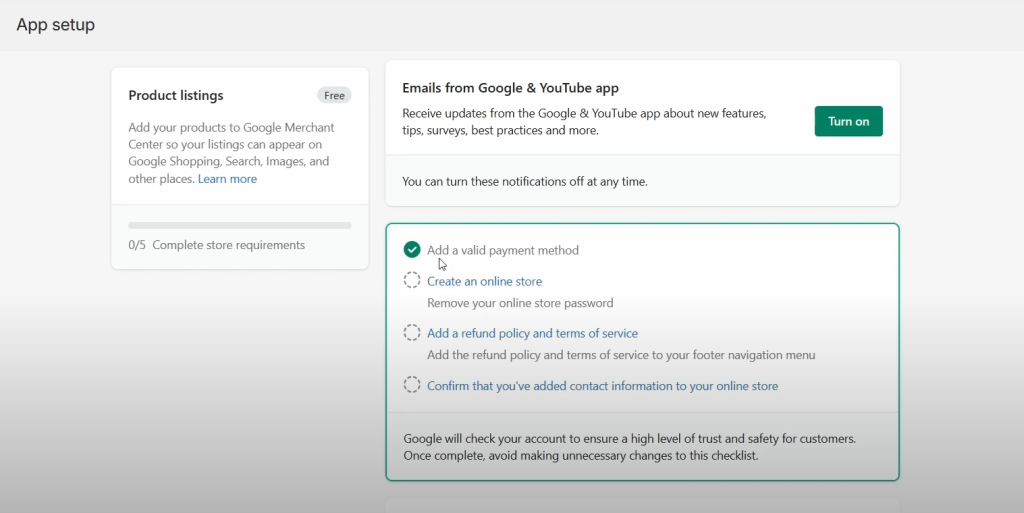
Check each option to make the green tick to proceed.
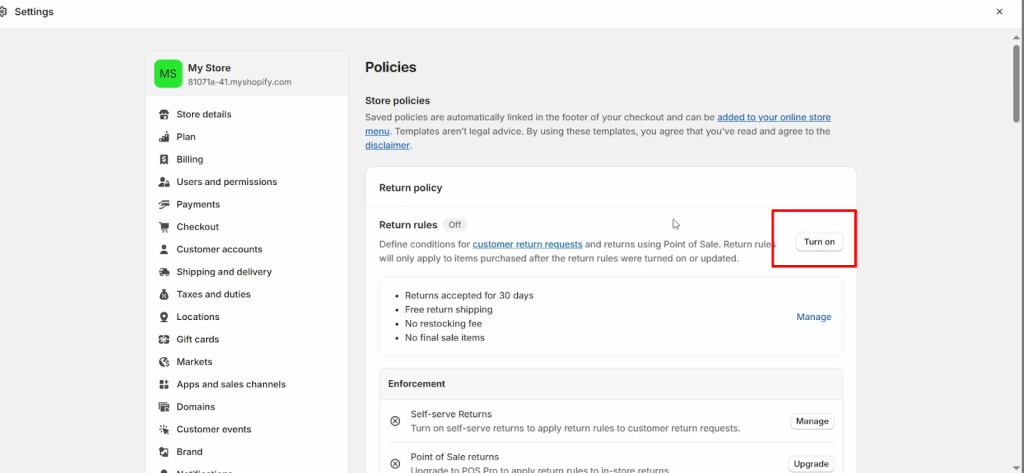
You can turn on the refund policy by clicking the checkbox link there.
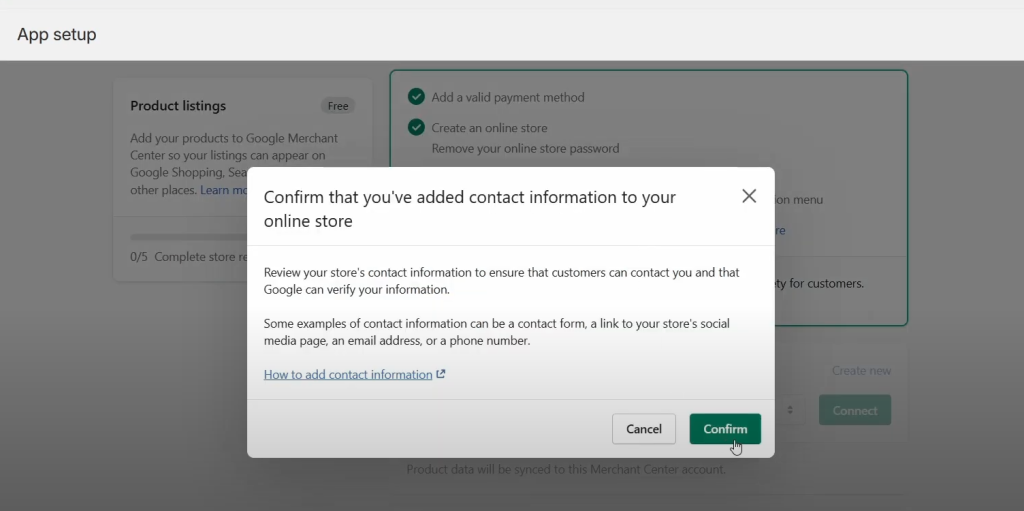
Please click the confirm button if you have added contact information to your store.
After checking these options you will be redirected to google merchant center connection page
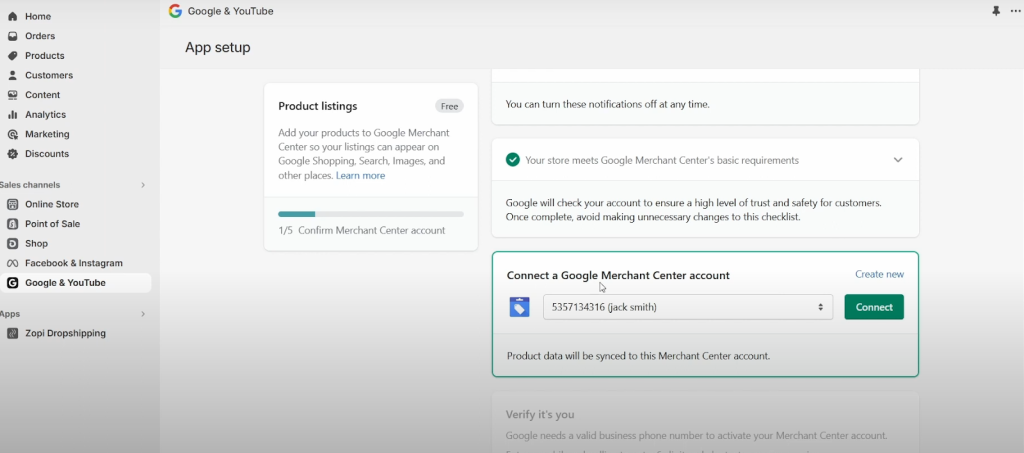
Please choose an GMC account and press Connect button to continue with the setup process.
8.Select or create a Merchant Center account:
a. Select a Merchant Account from the drop-down list. The Merchant Center IDs listed are the IDs associated with your Google account where your Google account is an administrator.
b. If you don’t have a Merchant Center account, then click Create new, and then create an account from Google Merchant Center.
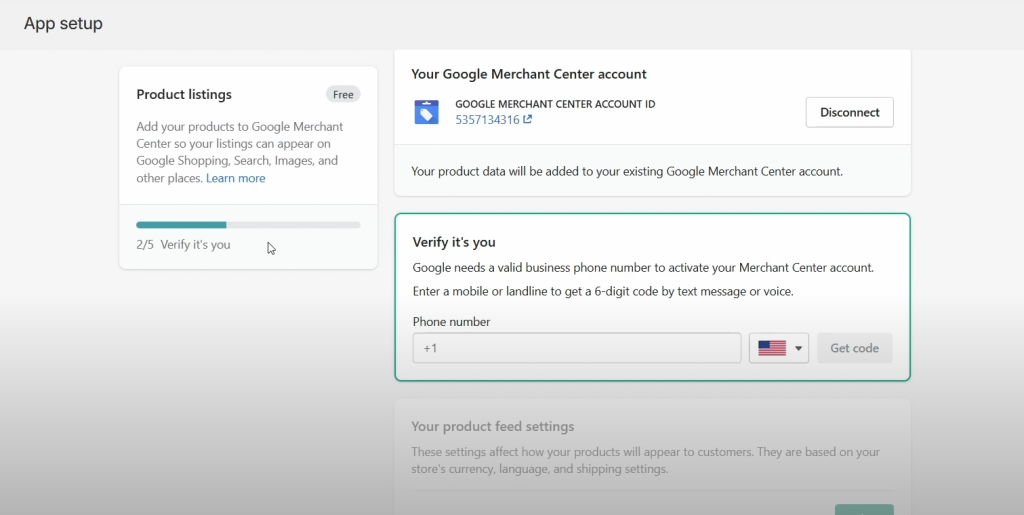
9.You need to verify yourself as the Merchant Center account owner.
a.In the Verify it’s you section, enter your phone number, select your country from the drop-down menu, and then click Get code to receive your verification code.
b.In the Verify it’s you dialog, enter the 6-digit code that you receive by text message to your phone.
c.Click Verify.
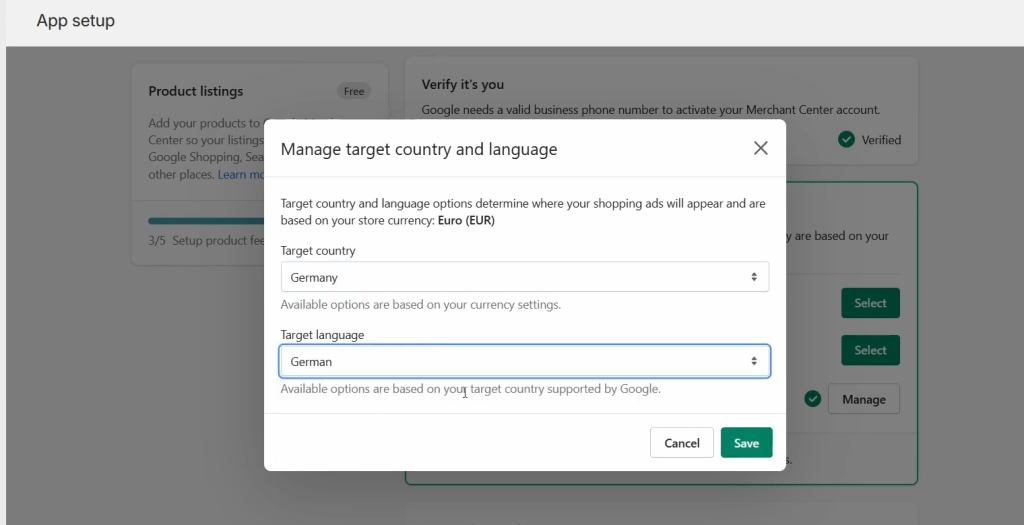
10.Click Select beside Target market to set up where you want to sell your products, and then select a target market and the language. Your store’s currency settings determine the countries and regions available for you to target. The languages available are based on those supported by Google, and depend on your target market.
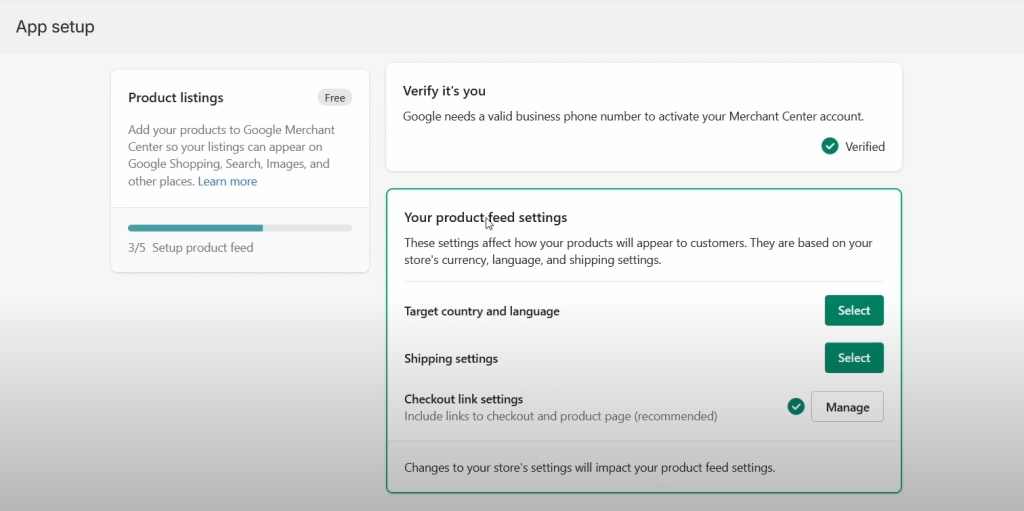
Choose the language and country options here
Then update the shipping options
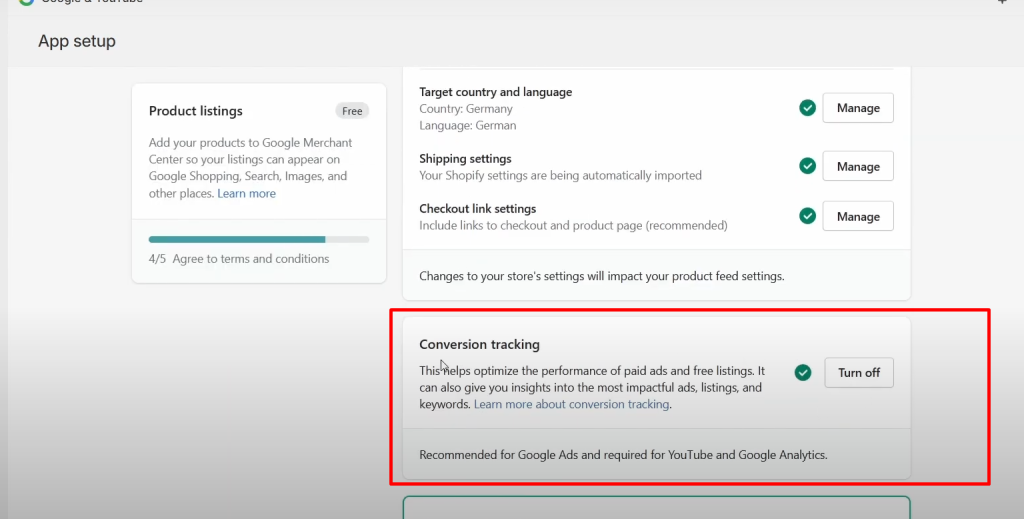
Ensure conversion tracking is turned on in the following section.
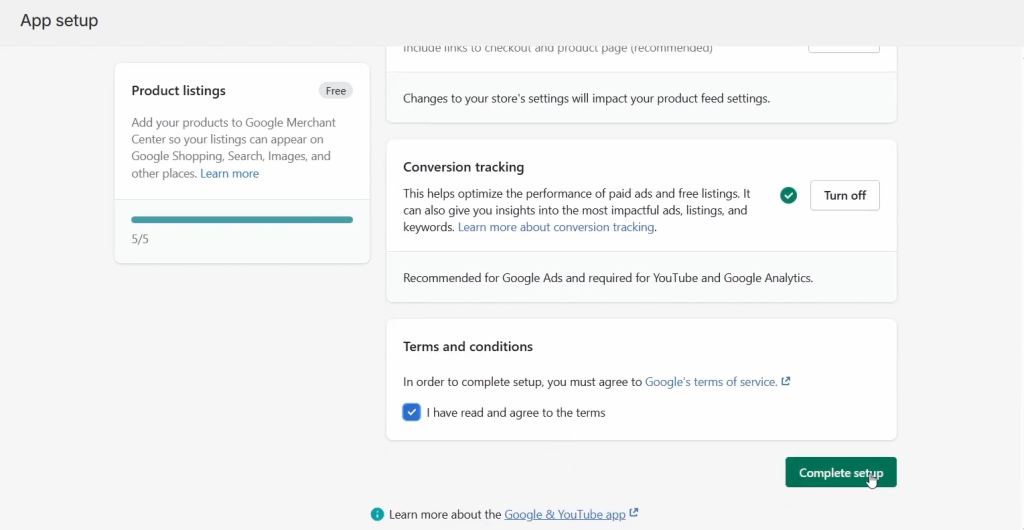
Then agree the terms and conditions and press the complete Setup button to save the changes.
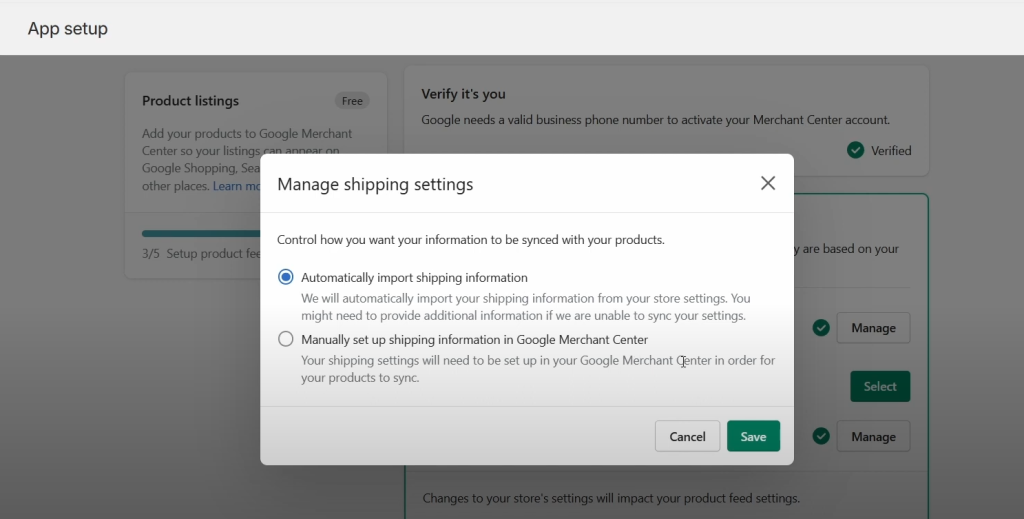
11.Optional: If you’re setting up for paid marketing on Google, then click Select beside Shipping settings, and then click the drop-down menu to select automatic or manual configuration of shipping rates:
Select Automatically import shipping settings to sync your shipping rates from Shopify, and then click Save. Learn more about syncing your shipping rates with Google Merchant Center.
Select Manually set up shipping settings in Google Merchant Center to set up your shipping rates on Google Merchant Center, and then click Save.
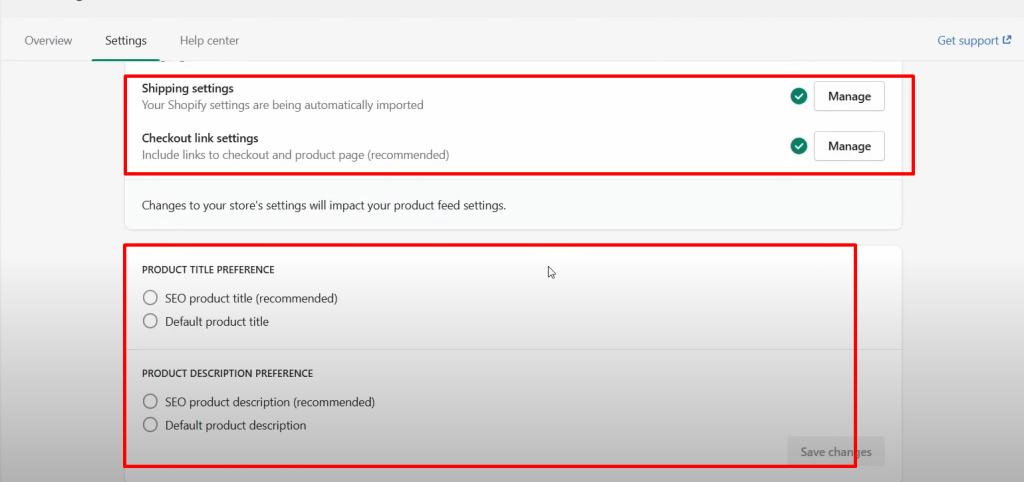
12.Optional: Set your product title and description preferences for products synced with Google.
13.After you complete setup, products that are available to your online store automatically sync with Google. For eligible stores, products synced to Google Merchant Center using the Google & YouTube channel can display on relevant Google surfaces for free.
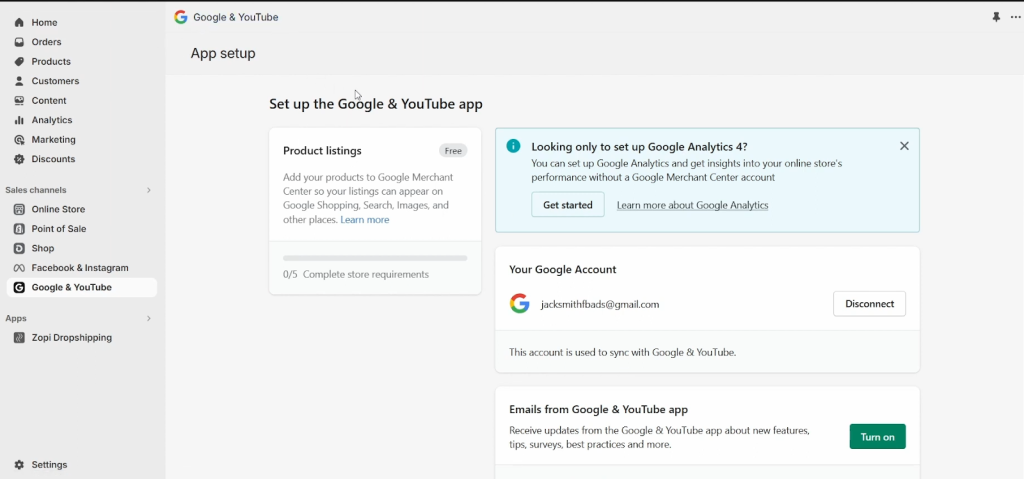
From the Overview page in the Google sales channel, you can view your product listing and marketing information:
- Product listings: All of the products that are synced to the Google Merchant Center. Your approved products might be eligible to display for free across different Google surfaces such as the Shopping tab, Google Search, Google Images, Google Maps, and Google Lens. Learn more about listing your products for free on Google.
- Marketing: Access your Google Merchant Center account, where you can create Performance Max campaigns. Learn more about Google Performance Max.
14. Adding custom event scripts on the order confirmation page if ecommerce purchase eventdata not pulling properly.
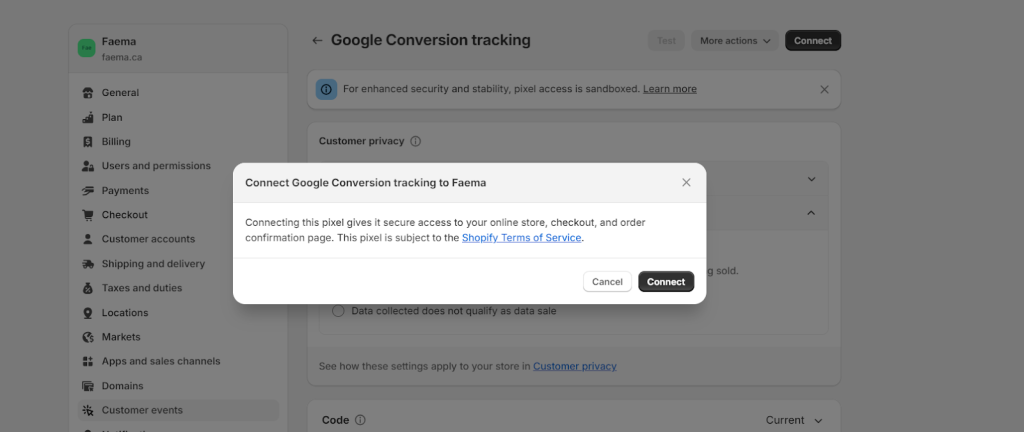
Create custom event code by clicking add a custom pixel button in the customer events under shopify settings menu.
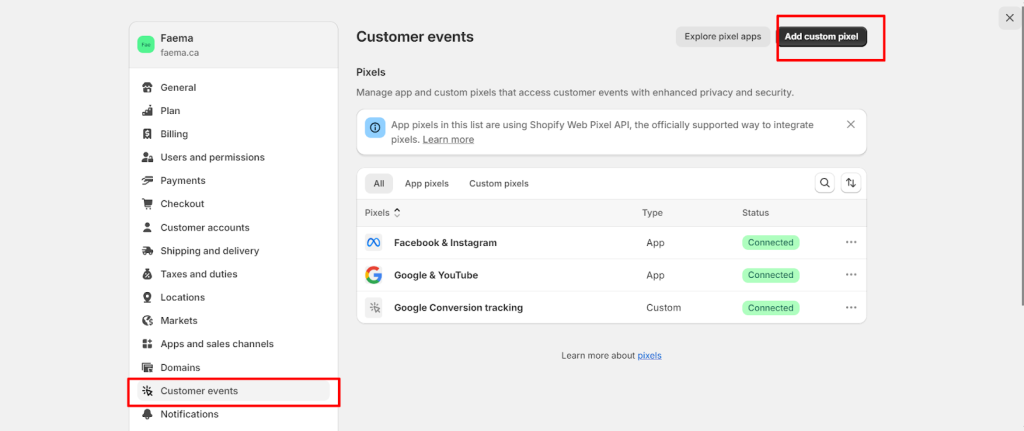
Create a new pixel with name Google conversion tracking.
Add custom events codes on the codes section below.
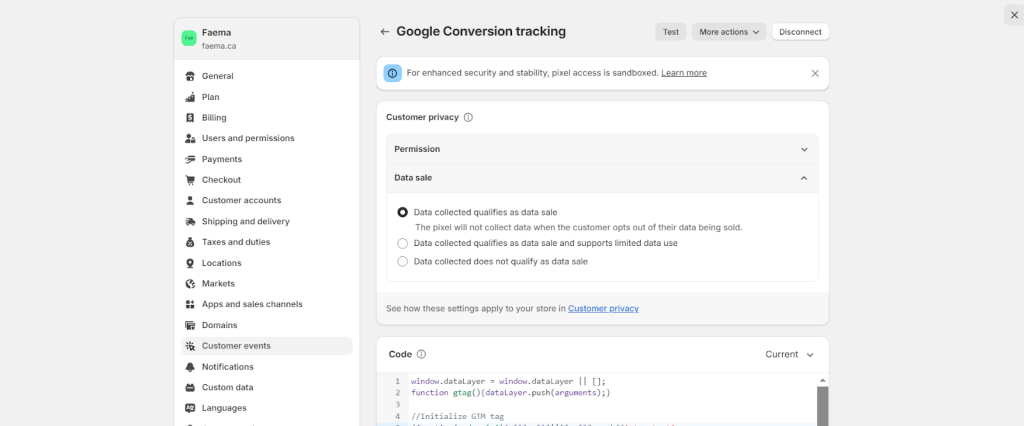
Then click the connect button to activate new tracking scripts.
google tag assistant companion tool for google chrome.

We can check the real time event data under reports snapshot section in google analytics.

Bing Ads Integration in
Web Sites
Step 1: please add the bing UET tracking code provided by the Ads team on the <head> section of your header.php file or other theme files.
Sample code :
<!— Bing Ads UET tag tracking code. –>
<script>(function(w,d,t,r,u){var f,n,i;w[u]=w[u]||[],f=function(){var o={ti:”27000168″};o.q=w[u],w[u]=new UET(o),w[u].push(“pageLoad”)},n=d.createElement(t),n.src=r,n.async=1,n.onload=n.onreadystatechange=function(){var s=this.readyState;s&&s!==”loaded”&&s!==”complete”||(f(),n.onload=n.onreadystatechange=null)},i=d.getElementsByTagName(t)[0],i.parentNode.insertBefore(n,i)})(window,document,”script”,”//bat.bing.com/bat.js”,”uetq”);</script>
<!— END –>
Step 2: add purchase event tracking code on the order confirmation page.
<script>
window.uetq.push(‘event’, ‘purchase‘, {revenue_value: 9.95, currency: ‘CAD‘});
</script>
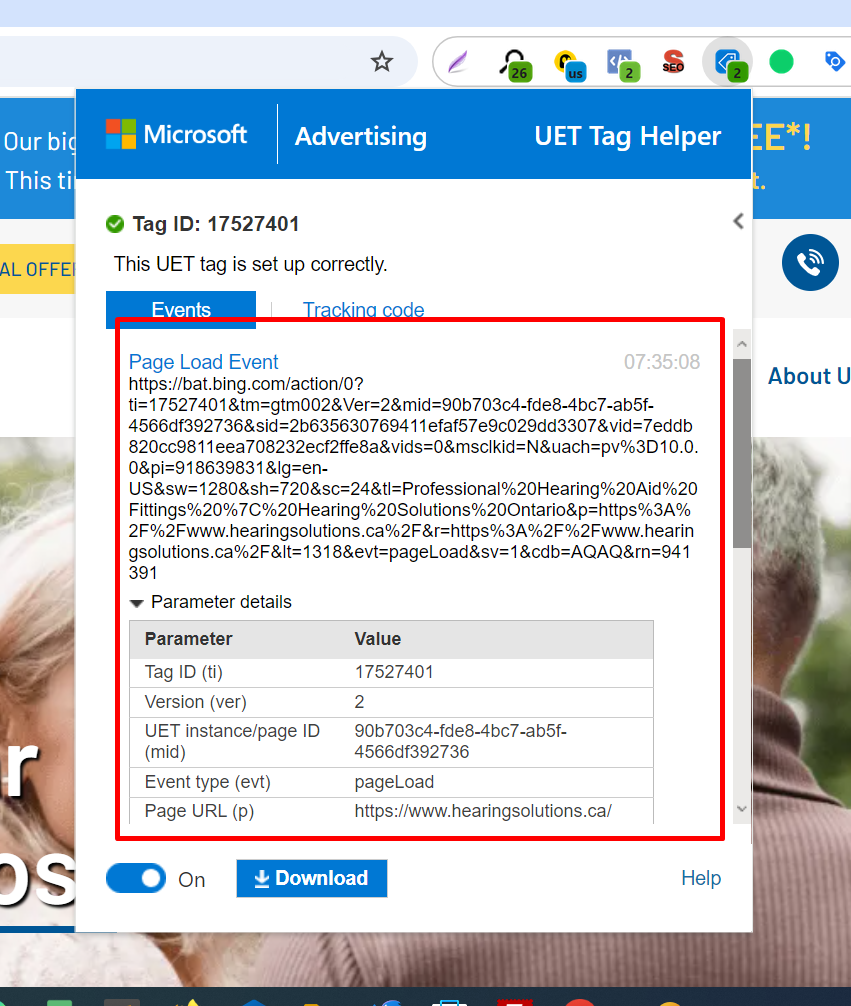
Step 3: We can ensure events are firing properly through the UET Tag helper tool on the chrome.