Simple mails
1: In most cases we use a simple mail() function in php to send mail. But the reputation of this mail is very low respect to gmail like mail servers. So this mail can possibly be blocked or moved to spam by most of the email service providers.
If your mail function is not working properly the first step is check if it is working on your website root folder by adding a test mail file.
<?php
ini_set( ‘display_errors’, 1 );
error_reporting( E_ALL );
$from = “sales@techwyse.com”;
$to = “twbeacon@techwyseintl.com”;
$subject = “PHP Mail Test script”;
$message = “This is a test to check the PHP Mail functionality”;
$headers = “From:” . $from;
mail($to,$subject,$message, $headers);
echo “Test email sent”;
?>
Save the file as test-email.php in the public_html folder of your site.
Then access the file like domain.com/test-mail.php
Example : https://www.techwyse.com/test-mail.php
If it works fine you will receive mail in your inbox.
If it does not work please check with the admin team if anything needs to be fixed on their end. If it is a simple issue, it will probably work after fixes by the server team.
Test Using Temp Mail
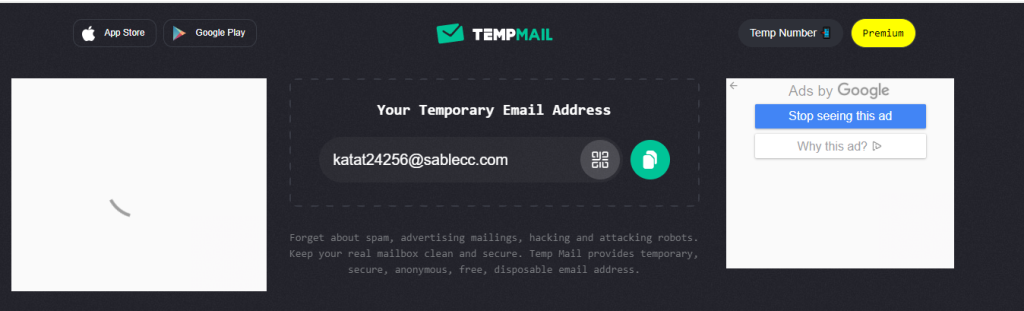
Step 1 : The following action will be simply performed by sending mails to mail ids generated on https://temp-mail.org/en/
After visiting mentioned site you will get your temporary email address testing purposes
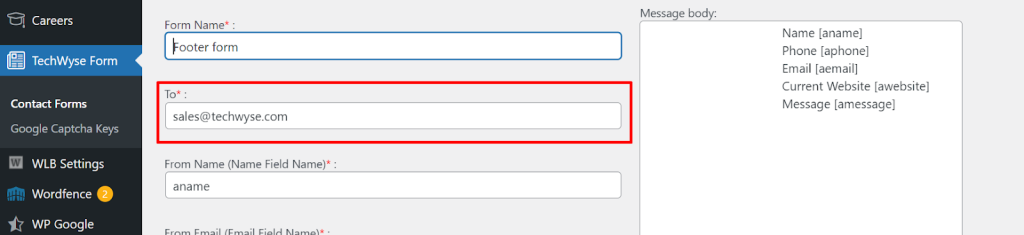
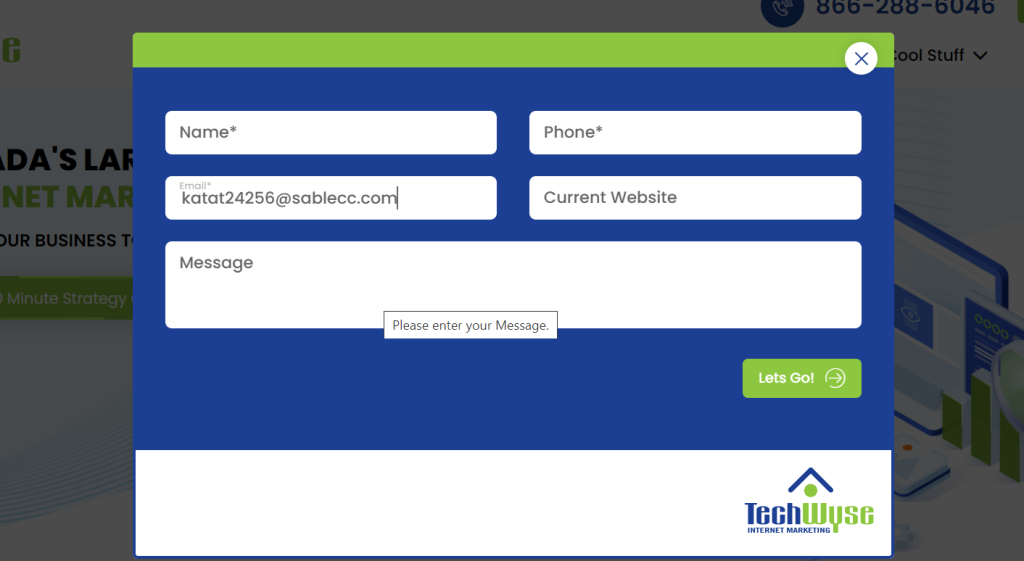
Step 2: please add this mail your forms send to the field and your form management section on the admin panel. Also use this id in your email field of your testing form if you want to check confirmation also.
If the php mail() function working properly you will get a message on temp mail like this
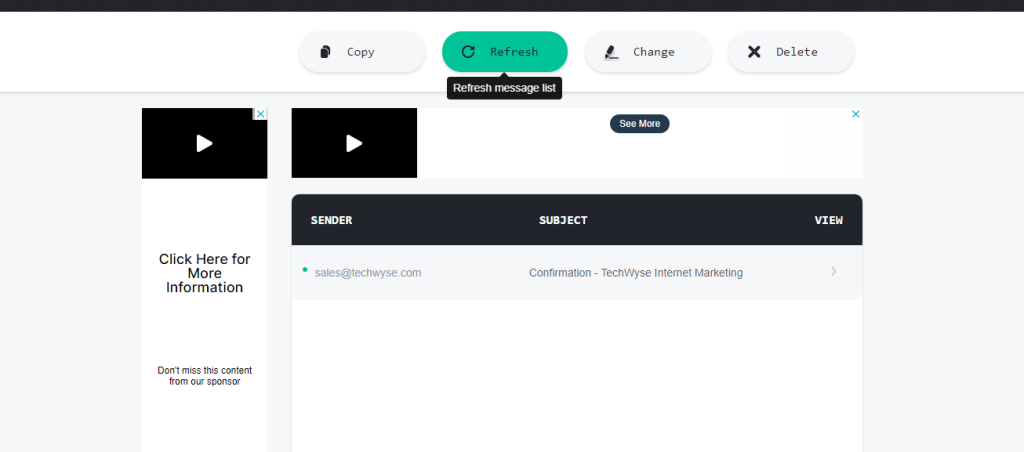
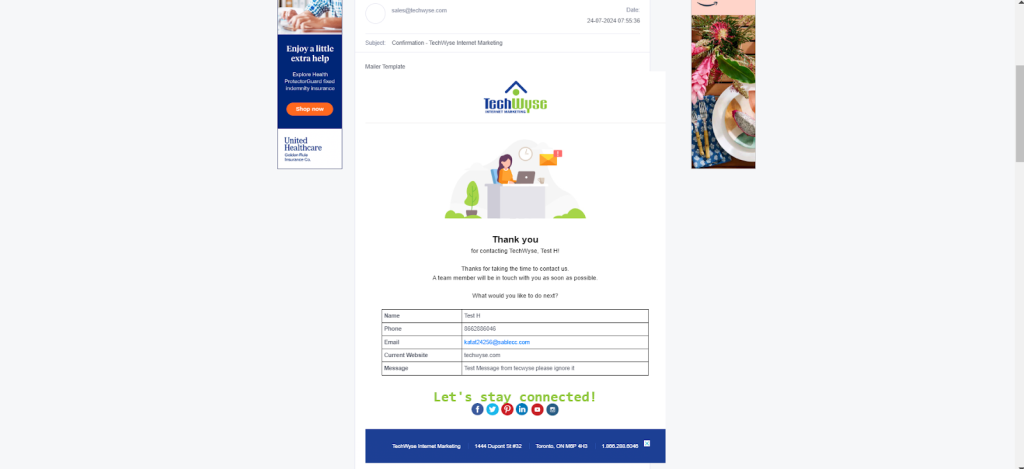
You can verify the template by clicking the arrow mark under the view column like follows.
Tracking Mail Delivery On Cpanel
Step 1: if your site has cpanel access you can check your mails are delivered to specific mail servers from the Track Delivery section under Email application on Cpanel.
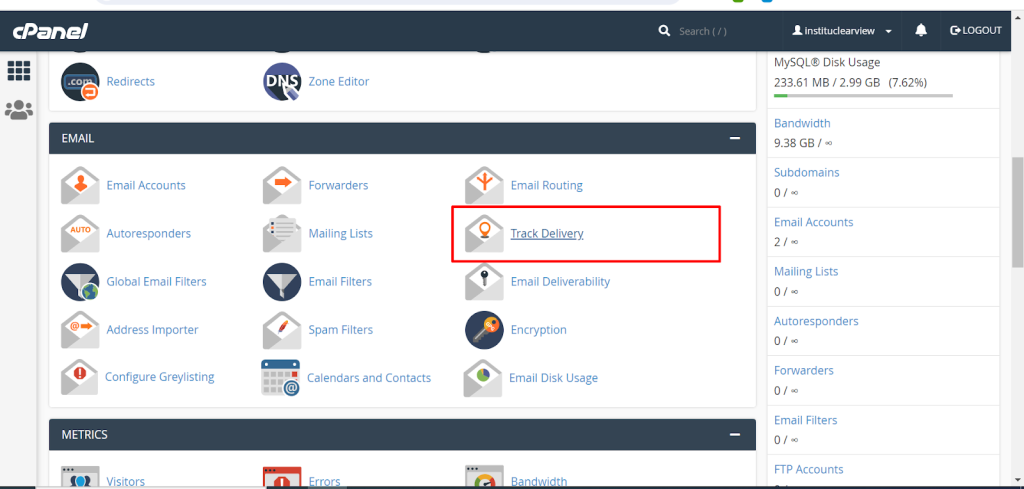
You can find mail delivery details here if your mail service is hosted on the same server.
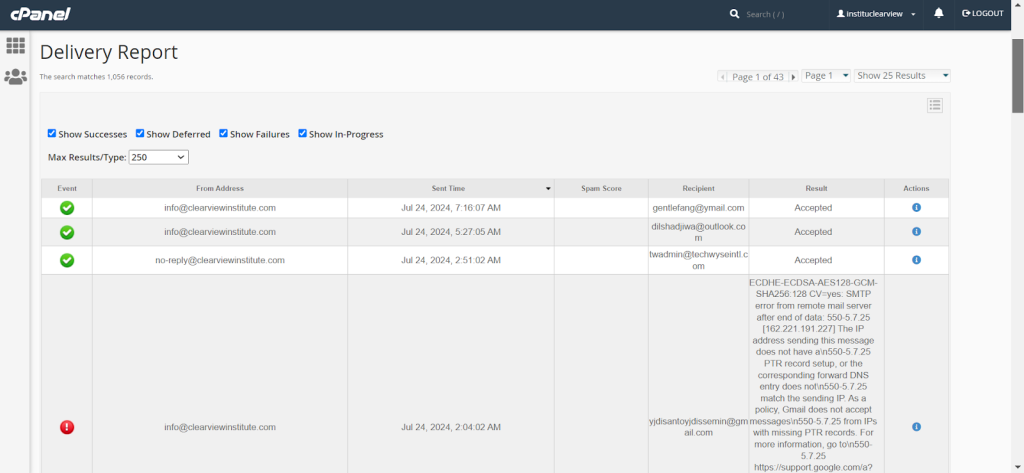
In the above case we can see that mails are delivered properly to the client account and if it is received on any of our web mail we can verify using that and tag AM we have received mails on our temp mail account. In case clients have any mail delivery issues please get SMTP details from them. Before proceeding with tagging AM just confirm the server team if we can access to create an SMTP account for them. If they are using a cpanel based mail server probably we can create SMTP accounts for them from Cpanel.
If the server team provided SMTP credentials we can authenticate the mail server to SMTP.
Testing SMTP Credentials Online.
Step 1 : To test if your SMTP credentials are working fine you can use the following site tools.
Site Url :
Please provide your host,port, Username, password here click test it.
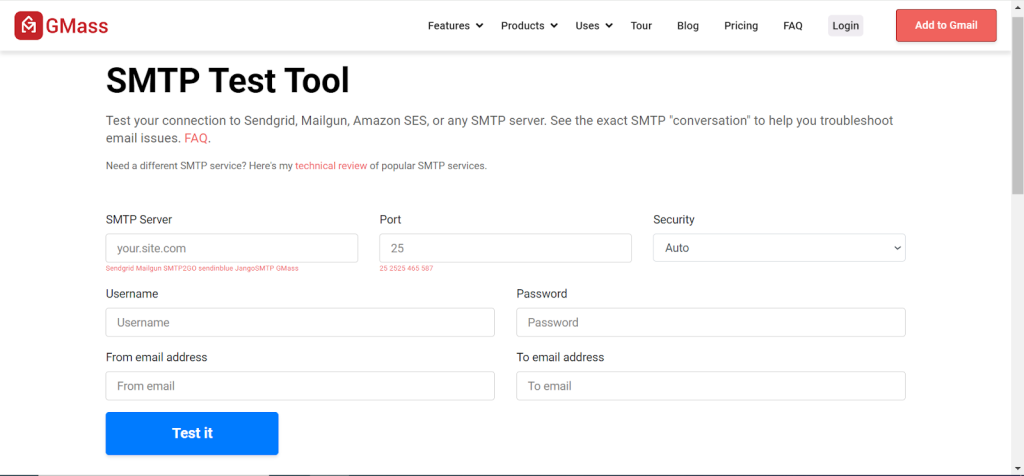
Most of the SMTP authentication required which mail we used to authenticate as the from address.
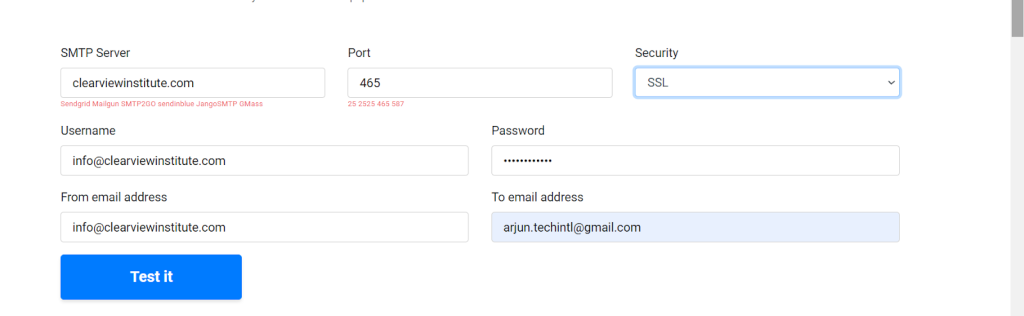
If one option does not work we can try various port and security options here to check which medium provides accurate delivery please remember these settings and copy to a file , it will be useful on SMTP implementation on client site. You can find connection results under the test tool.
What is SMTP ?
SMTP is a fundamental part of email communication that allows messages to be reliably transmitted between email servers. Despite its drawbacks, such as security problems and the possibility of spam, SMTP is still widely used due to its simplicity, efficiency, and broad support across various email systems. Enhancements such as encryption and authentication may solve some of its security issues, making it an appropriate choice for email delivery in a variety of applications.
Simple Mail Transfer mechanism (SMTP) is a mechanism for exchanging email messages between servers. It is an essential component of the email communication process and operates at the application layer of the TCP/IP protocol stack. SMTP is a protocol for transmitting and receiving email messages. In this article, we are going to discuss every point about SMTP.
How does SMTP Work?
- Communication between the sender and the receiver: The sender’s user agent prepares the message and sends it to the MTA. The MTA’s responsibility is to transfer the mail across the network to the receiver’s MTA. To send mail, a system must have a client MTA, and to receive mail, a system must have a server MTA.
- Sending Emails: Mail is sent by a series of request and response messages between the client and the server. The message which is sent across consists of a header and a body. A null line is used to terminate the mail header and everything after the null line is considered the body of the message, which is a sequence of ASCII characters. The message body contains the actual information read by the receipt.
- Receiving Emails: The user agent on the server-side checks the mailboxes at a particular time of intervals. If any information is received, it informs the user about the mail. When the user tries to read the mail it displays a list of emails with a short description of each mail in the mailbox. By selecting any of the mail users can view its contents on the terminal.
What is an SMTP server?
An SMTP server is an application or computer that sends, receives and relays email. These servers typically use TCP on port 25 or 587. The port number identifies specific processes when an internet or network message is forwarded to a server. All network-connected devices come equipped with standardized ports that have an assigned number. Each number is reserved for certain protocols and their associated functions.
SMTP servers are set to an always-on listening mode and as soon as a server detects a TCP connection from a client, the SMTP process initiates a connection to port 25 to send the email.
Outgoing SMTP servers send messages for users. Email clients which are used to read and send emails, must also have the Internet Protocol (IP) address of the SMTP server. To handle issues such as spam, server administrators must control which clients can use the server. They can do this either by restricting users by their IP address or, more likely, by imposing a system or command that requires the authentication of clients.
SMTP Mail Testing Using PHP Code
Download and add the following PHPMailer code to the root of your mail folder.
ZIP File : https://drive.google.com/file/d/1uPVZP6c0bFosNgytK-Ii35XOMKYCkXgj/view?usp=sharing
Or we can download from the github : https://github.com/PHPMailer/PHPMailer/archive/master.zip
Here is the example mail.php file to test your SMTP connection.
<?php
//Import PHPMailer classes into the global namespace
//These must be at the top of your script, not inside a function
use PHPMailer\PHPMailer\PHPMailer;
use PHPMailer\PHPMailer\SMTP;
use PHPMailer\PHPMailer\Exception;
//Load Composer’s autoloader
require ‘PHPMailer/PHPMailer/src/Exception.php’;
require ‘PHPMailer/PHPMailer/src/PHPMailer.php’;
require ‘PHPMailer/PHPMailer/src/SMTP.php’;
//Create an instance; passing `true` enables exceptions
$mail = new PHPMailer(true);
try {
//Server settings
$mail->SMTPDebug = SMTP::DEBUG_SERVER; //Enable verbose debug output comment after tests are completed.
$mail->isSMTP(); //Send using SMTP
$mail->Host = ‘smtp.example.com’; //Set the SMTP server to send through
$mail->SMTPAuth = true; //Enable SMTP authentication
$mail->Username = ‘user@example.com’; //SMTP username
$mail->Password = ‘secret’; //SMTP password
$mail->SMTPSecure = PHPMailer::ENCRYPTION_SMTPS; //Enable implicit TLS encryption
$mail->Port = 465; //TCP port to connect to; use 587 if you have set `SMTPSecure = PHPMailer::ENCRYPTION_STARTTLS`
//Recipients
$mail->setFrom(‘from@example.com’, ‘Mailer’);
$mail->addAddress(‘joe@example.net’, ‘Joe User’); //Add a recipient
$mail->addAddress(‘ellen@example.com’); //Name is optional
$mail->addReplyTo(‘info@example.com’, ‘Information’);
$mail->addCC(‘cc@example.com’);
$mail->addBCC(‘bcc@example.com’);
//Attachments
$mail->addAttachment(‘/var/tmp/file.tar.gz’); //Add attachments
$mail->addAttachment(‘/tmp/image.jpg’, ‘new.jpg’); //Optional name
//Content
$mail->isHTML(true); //Set email format to HTML
$mail->Subject = ‘Here is the subject’;
$mail->Body = ‘This is the HTML message body <b>in bold!</b>’;
$mail->AltBody = ‘This is the body in plain text for non-HTML mail clients’;
$mail->send();
echo ‘Message has been sent’;
} catch (Exception $e) {
echo “Message could not be sent. Mailer Error: {$mail->ErrorInfo}”;
}
?>
Here is the example mailsendclass.php file techwyse form or static forms : https://drive.google.com/file/d/1dYDl6alAkQubtv3p67-5iApqoaqls3ST/view?usp=sharing
Normal SMTP Installation Using WP Mail SMTP Plugin
WP Mail SMTP plugin easily resolves email delivery problems by changing the way your WordPress site sends email. We reconfigure the wp_mail() function to use proper SMTP host credentials or an SMTP mail provider.
With our built-in SMTP mail provider integrations (recommended), emails are sent using the provider’s direct API. Even if your web host is blocking SMTP ports, your emails will still be sent successfully.
WP Mail SMTP fixes your email deliverability issues by reconfiguring WordPress to use a proper SMTP provider when sending emails.
Installation
Install WP Mail SMTP by WPForms either via the WordPress.org plugin repository or by uploading the files to your server.
If you want prefer installation by file upload you can download it from here
Here are the instructions for plugin installation.
Install a Plugin Using WordPress Plugin Search
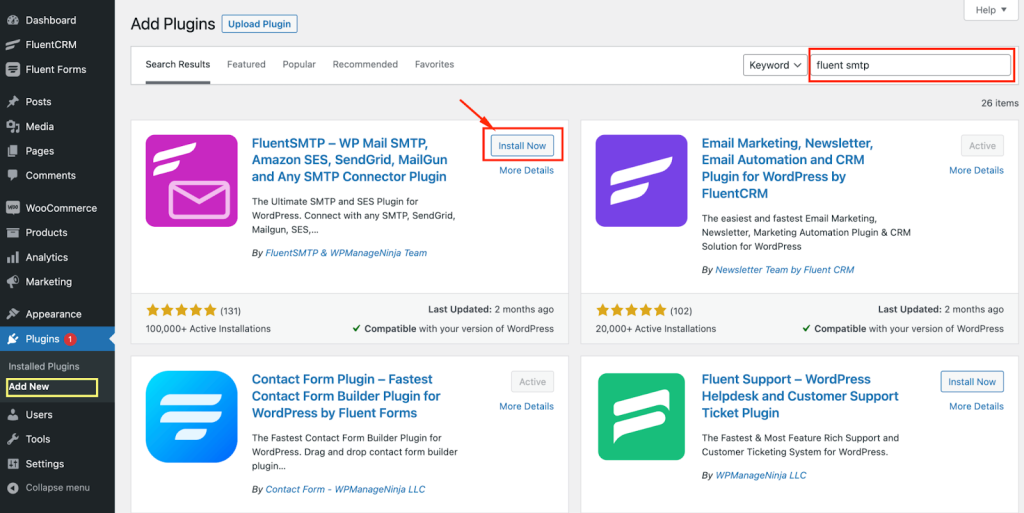
The easiest way to install a WordPress plugin is to use the plugin search. The only downside of this option is that a plugin must be in the WordPress plugin directory, which is limited to free plugins.The first thing you need to do is visit the Plugins » Add New page inside your WordPress admin area.
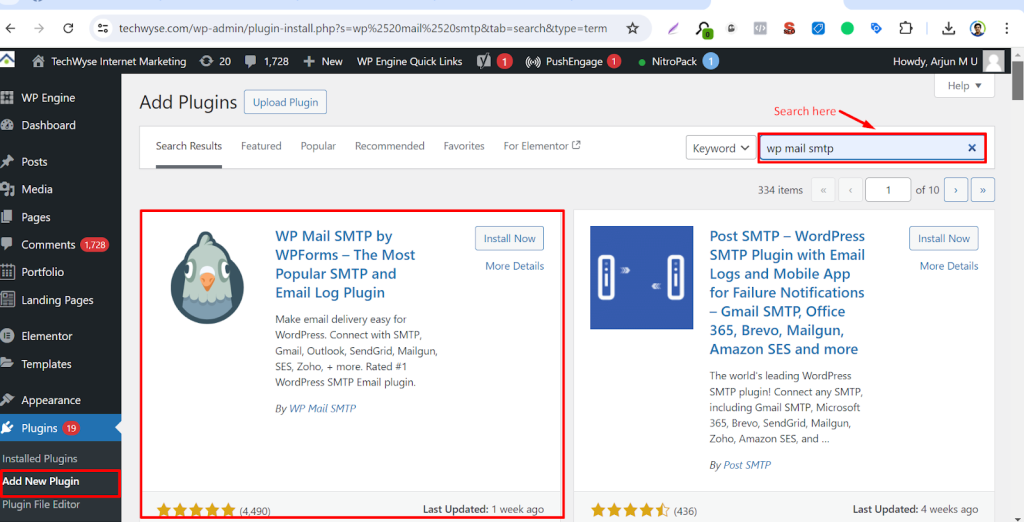
You will then see a screen like the one in the screenshot above.
Now, you can find the plugin you want to install by typing the name of the plugin or the functionality you need. For example, here we type ‘WP Mail SMTP‘ into the search bar.
When the loading is complete, you will see a bunch of listings like the example below:
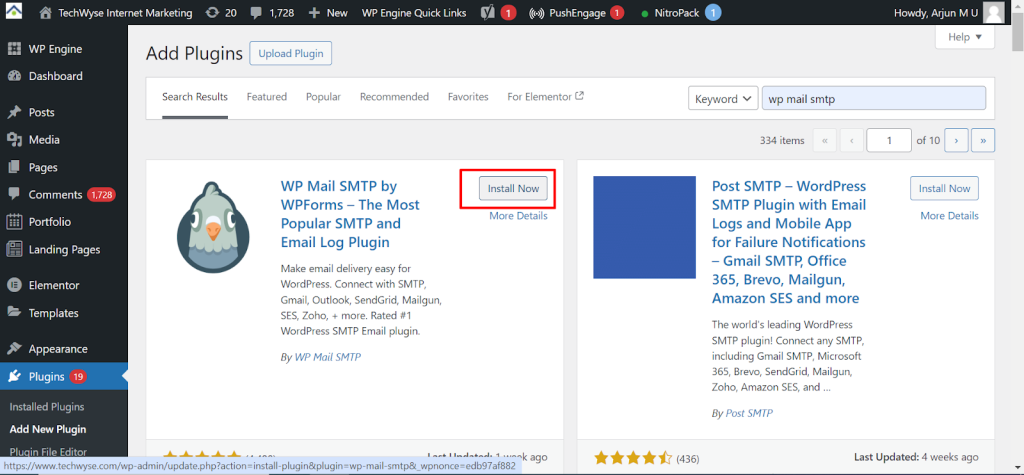
You can pick the plugin that is best for you. Since we were looking for WP Mail SMTP, we’ll click the ‘Install Now’ button next to it.
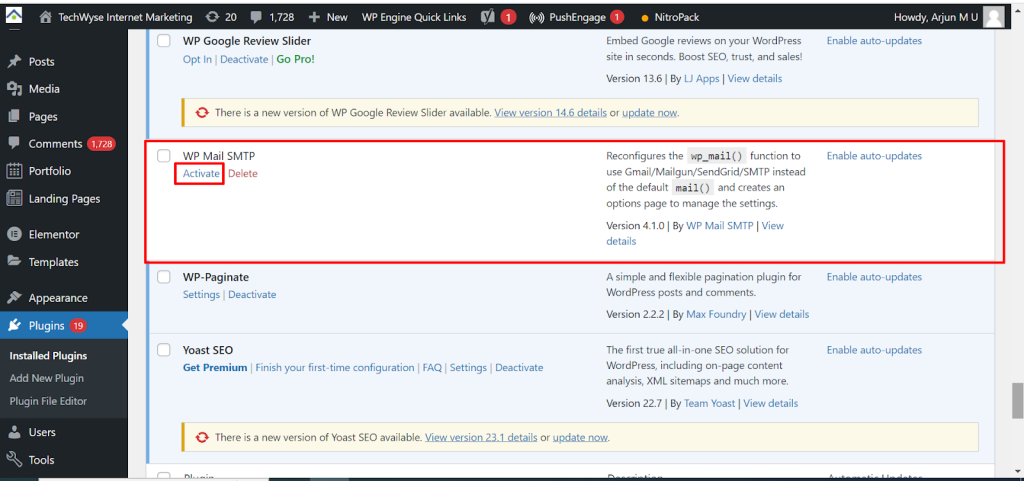
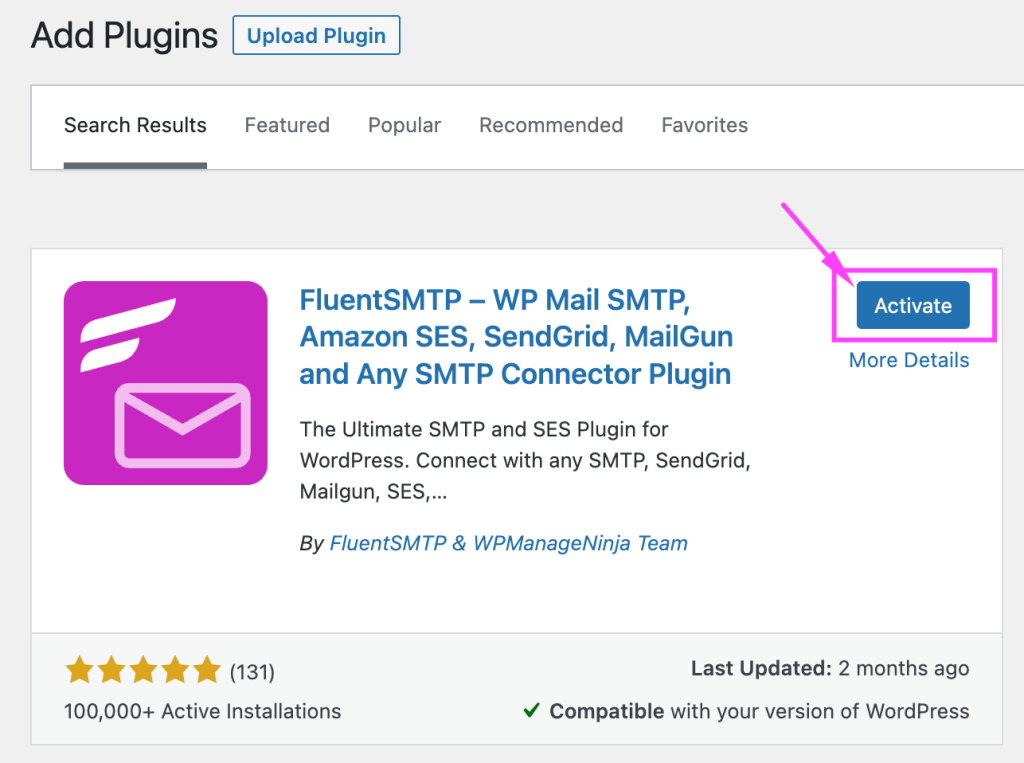
WordPress will now download and install the plugin for you. Once installation is done, you’ll notice that the ‘Install Now’ button changes to the ‘Activate’ button.
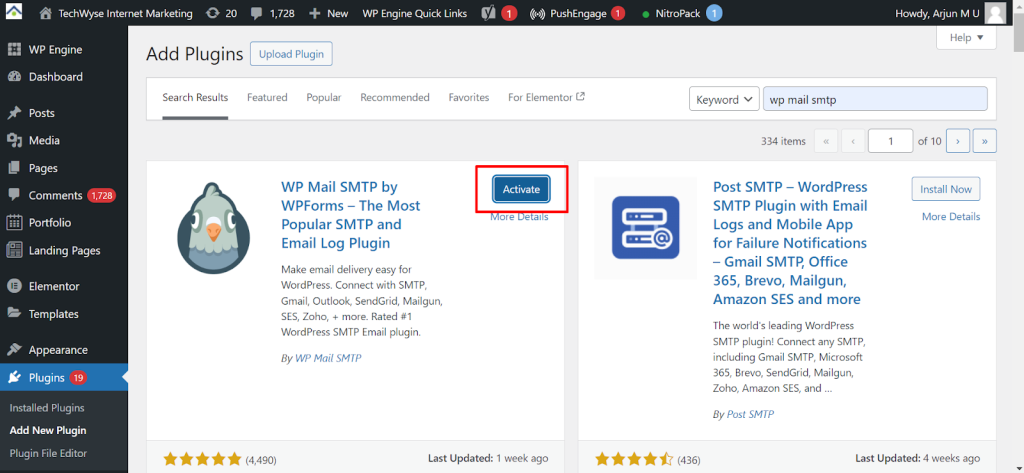
Now, note that a WordPress plugin won’t work until you activate it. So go ahead and click the ‘Activate’ button to start using the plugin on your WordPress site.
That’s all! You have successfully installed the WP Mail SMTP WordPress plugin.
Install a Plugin Using the WordPress Admin Plugin Upload
Paid WordPress plugins are not listed in the WordPress plugin directory, and they cannot be installed using the first method.
That’s why WordPress comes with the upload method to install such plugins. In this section, we’ll show you how to install WordPress plugins using the upload option in the admin area.
First, you’ll need to download the plugin from the source, which will be a zip file. Once done, you can navigate to Plugins » Add New from the WordPress admin area.
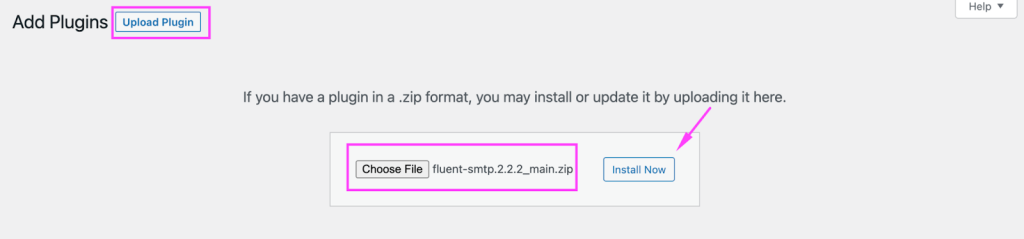
After that, just click on the ‘Upload Plugin’ button at the top of the page.

This will reveal the plugin upload form.
Here, you’ll want to click the ‘Choose File’ button and select the plugin file you downloaded earlier to your computer.
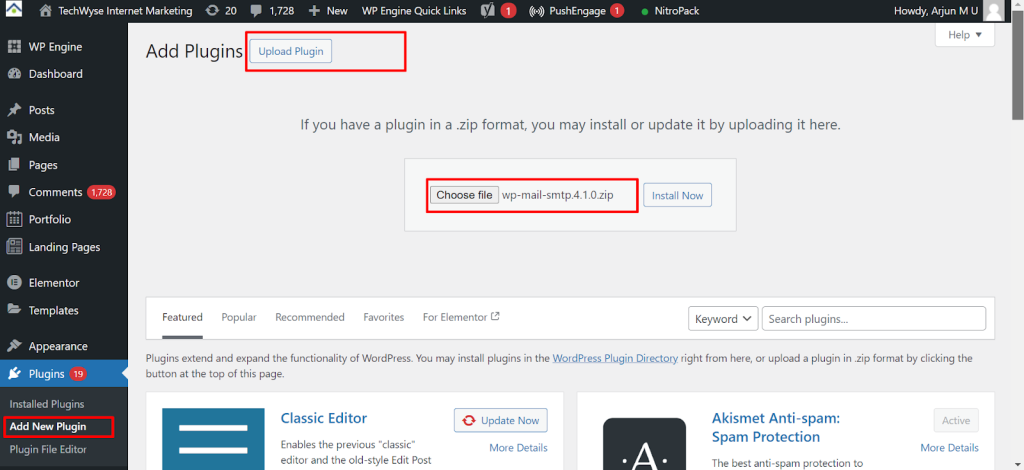
After you have selected the file, go ahead and click the ‘Install Now’ button.
WordPress will now upload the plugin file from your computer and install it for you. After the installation is finished, you will see a success message like this.
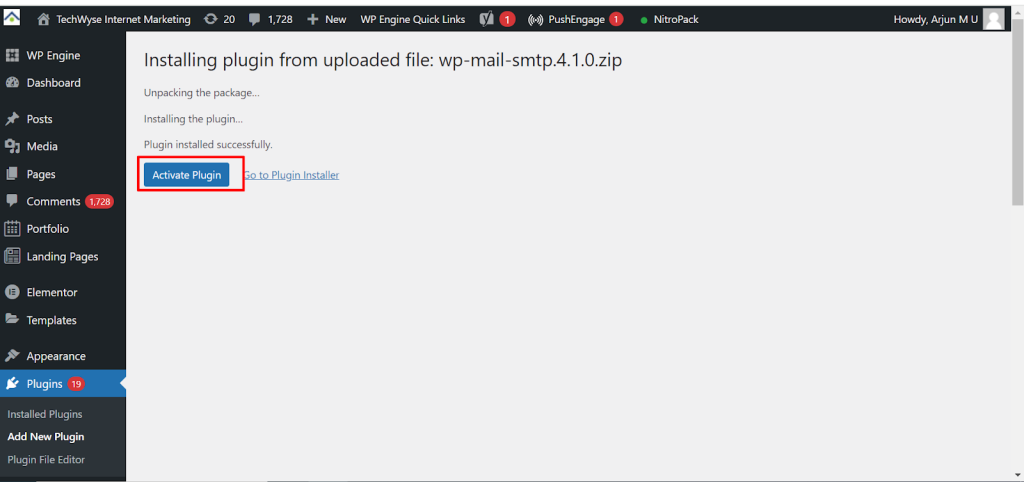
Then, all that’s left to do is click the ‘Activate Plugin’ button to start using the plugin.
Manually Install a WordPress Plugin Using FTP
In some rare cases, your WordPress hosting provider may have file restrictions that limit your ability to install a plugin from the admin area.
In this situation, your best bet is to install the plugin manually using FTP. However, the FTP manager method is the least friendly for beginners.
Before we get started, you’ll need to download the plugin’s zip file and extract it on your computer.
Extracting the plugin zip file creates a new folder with the same name. You need to manually install the WordPress plugin in this folder with an FTP client.
Now, let’s make sure you have access to your host through the FTP manager. If you do not have your FTP username and password, then you might want to contact your Admin team and ask them.
When you have the extracted zip folder and FTP login details ready, you can open the FTP client on your computer.
The first thing you must do is connect to your website using the FTP login credentials provided by your web host. Once connected, you can head over to the /wp-content/plugins/ folder on your website.Here, simply upload the folder you extracted from the zip file to the /wp-content/plugins/ folder on your web server.
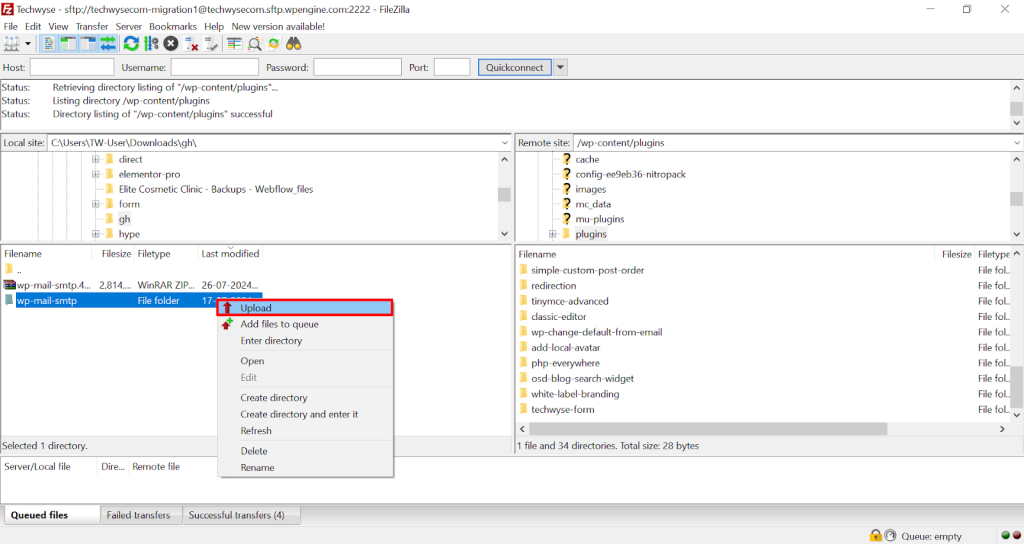
After uploading the files, you’ll need to visit the WordPress admin area and click the ‘Plugins’ menu item.
You should see that your plugin was successfully installed on the plugins page. To start using the plugin, go ahead and click the ‘Activate’ link in its section.
Upon activation, you may need to configure the plugin settings.
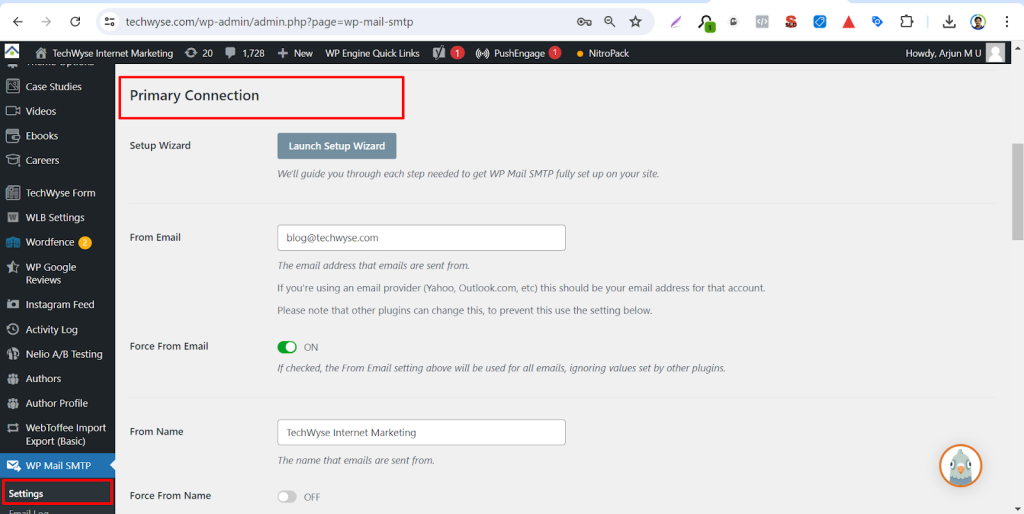
Step 1: After pressing the activate button you will be redirected to a setup page Click the go back to plugin dashboard for now. It will redirect to plug in general settings page.
Scroll Down to the primary connection section here we can provide from address and from name in most case we need to add the mail id we used to authenticate as the from address otherwise some SMTP servers doesn’t authentication.
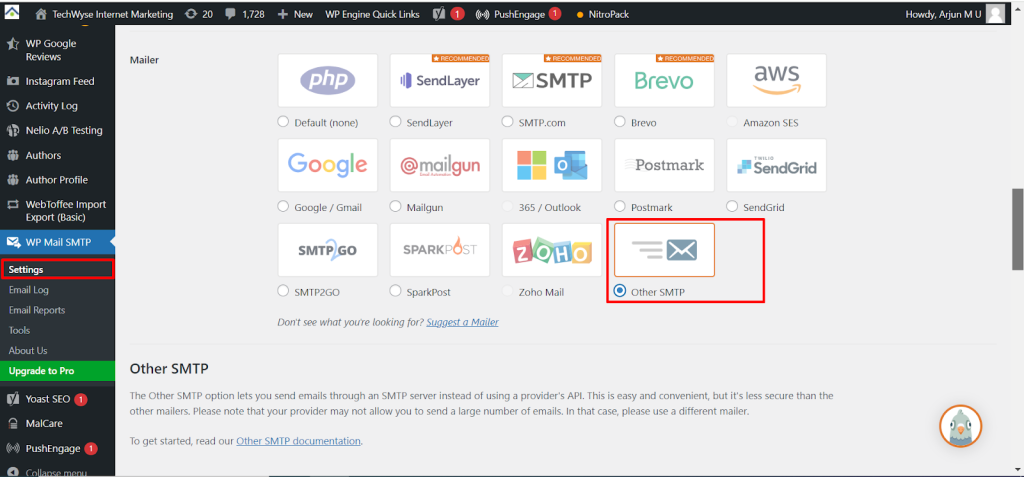
Step 2: scroll down to the mailer section and choose other SMTP provide custom SMTP settings.
Step 3: Scroll down to the Other SMTP section here we can have field for provide the SMTP info we have like SMTP Host, Encryption Type, SMTP port ,Auto TLS, Authentication , Username and Password.
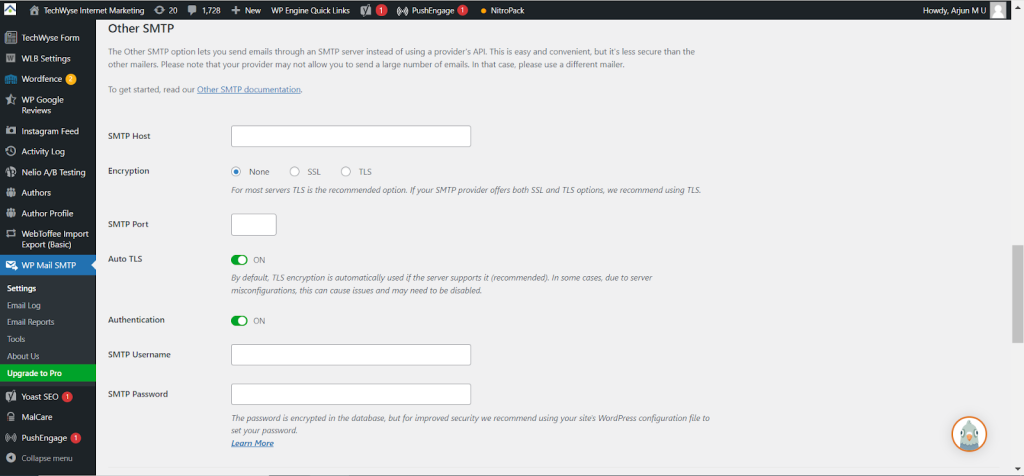
Step 4 : Please fill the fields accordingly and press Save settings button.
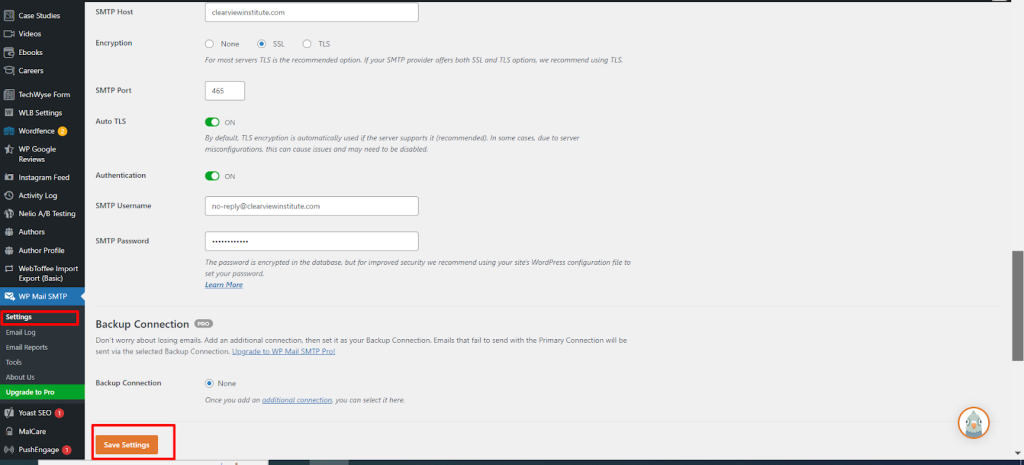
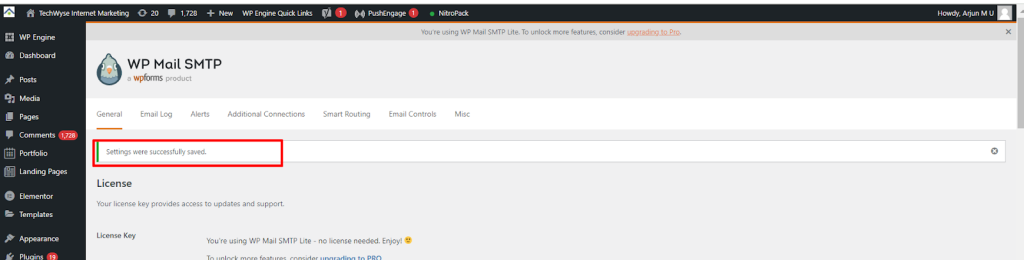
After saving settings to the database you will be notified by a message like follows.
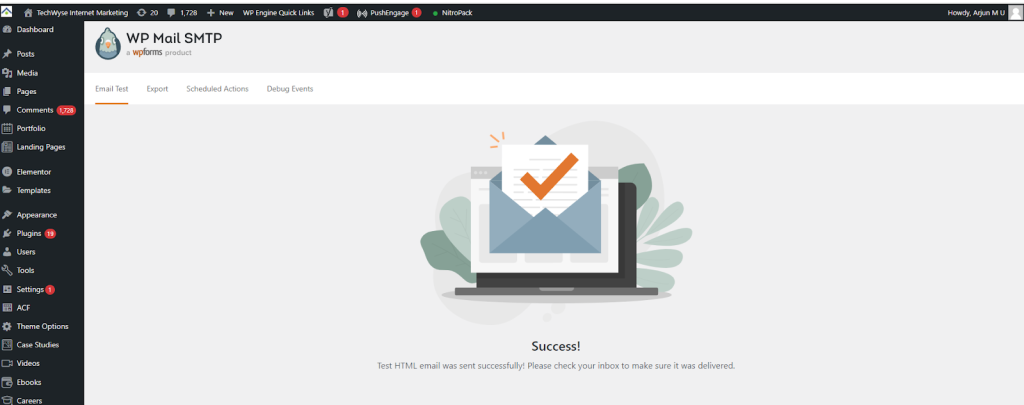
Step 5 : For testing connection you will need to click tools from SMTP menu on wordpress admin bar.

You will be redirected to the Email Test Page.
Step 6 : please put your mail you want to receive your mail here and click send email button , you will receive mail if connection works smoothly.

If the authentication works successfully you will get a confirmation message like below.
API Based SMTP connection With Gmail Servers.
If the above normal SMTP connection may not work with some gmail based SMTP servers in that case we option specific connection option servers works with G Suite.
Step1 : Please switch the mailer option to Google / Gmail instead of other SMTP in the previous setup.
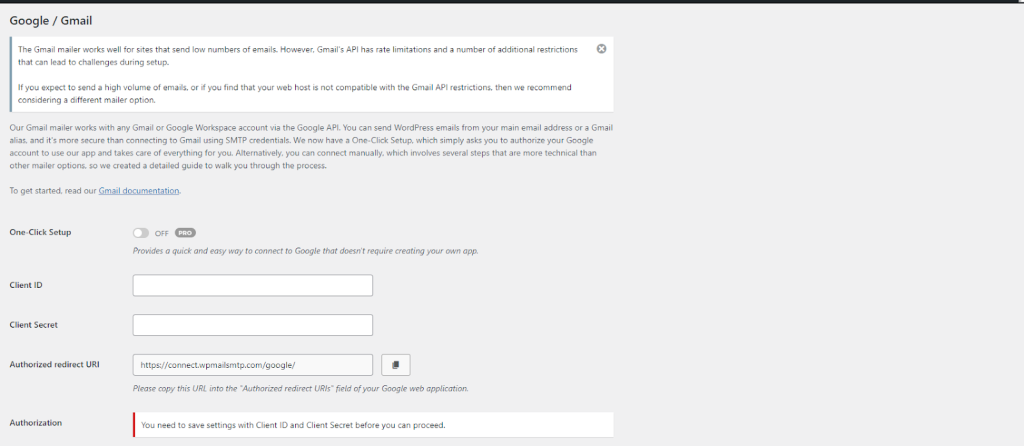
Scroll down to the gmail section here we need following details Google Work Space to setup the gmail API.
To create those records we need proceed with following steps.
To proceed with Gmail SMTP connection WP Mail SMTP » Settings and looking under the General tab.
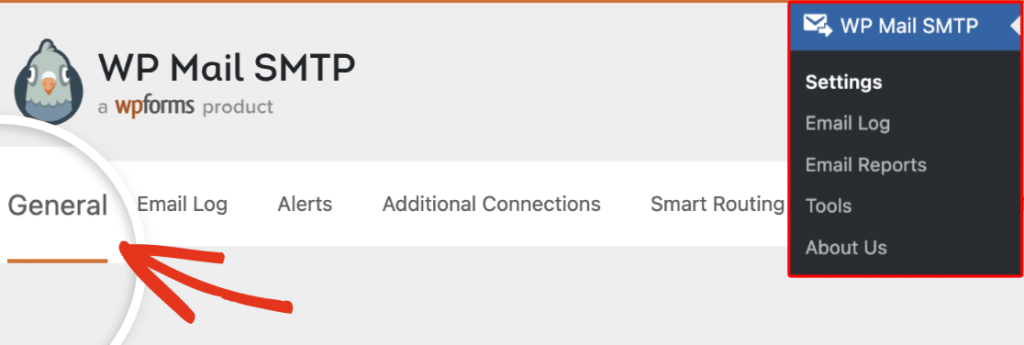
Below, we’ll cover the settings needed for this setup.
From Email
This is the email address that all of your site’s emails will be sent from. You can type your email address into the field provided, including any aliases you’ve configured, after you connect your site to the Gmail API in later steps.
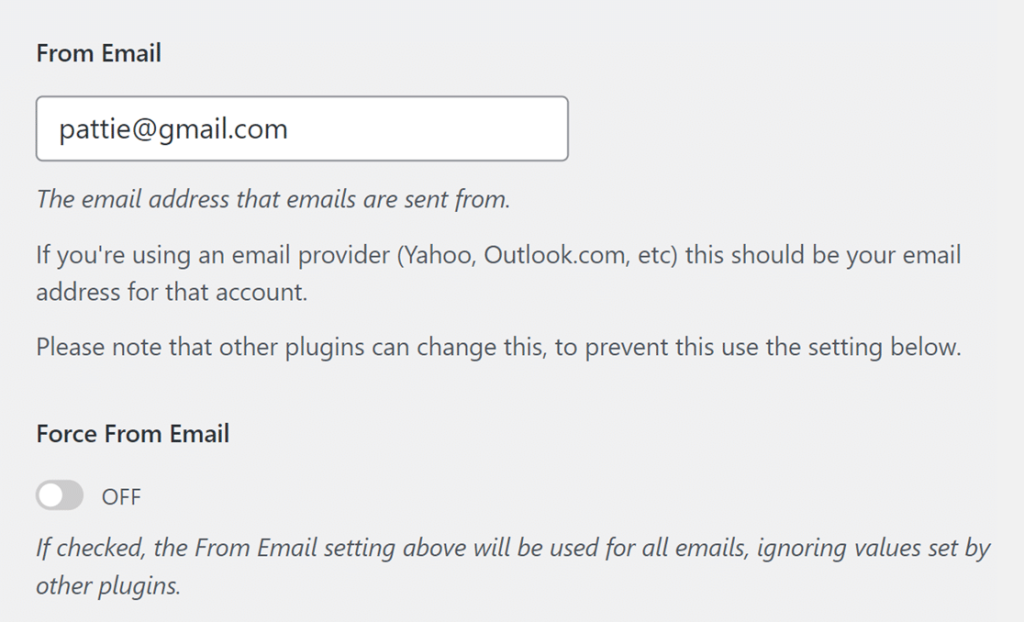
The Force From Email option will make it so that all the emails sent from your site come from the address you’ve entered.
Note: In order to use multiple Gmail aliases throughout your WordPress site as the From Email address, make sure to leave the Force From Email box unchecked.
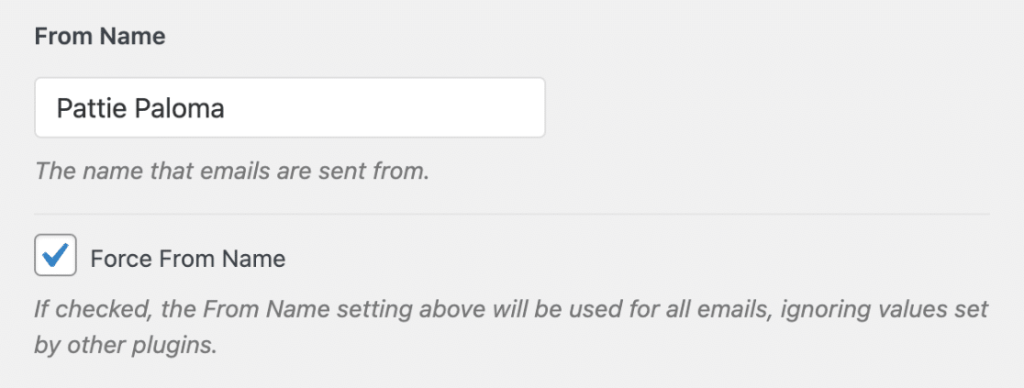
From Name
Below the From Email, you can set the From Name. This is the name associated with the emails your site sends out. By default, it will be set to your site’s name, but you can adjust it to anything you’d like.
You can also check the Force From Name option to apply this setting site-wide.
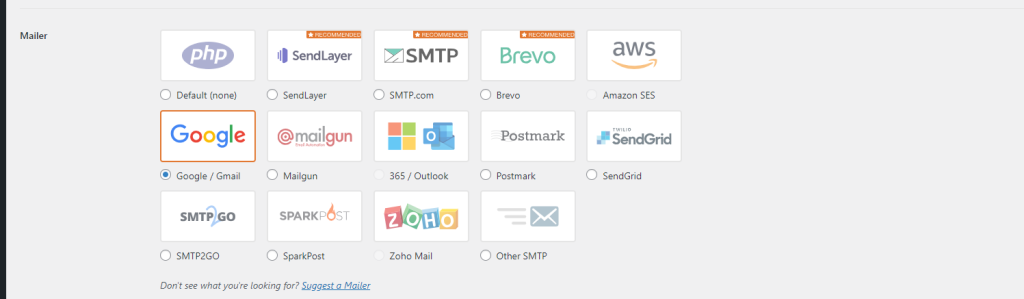
Mailer
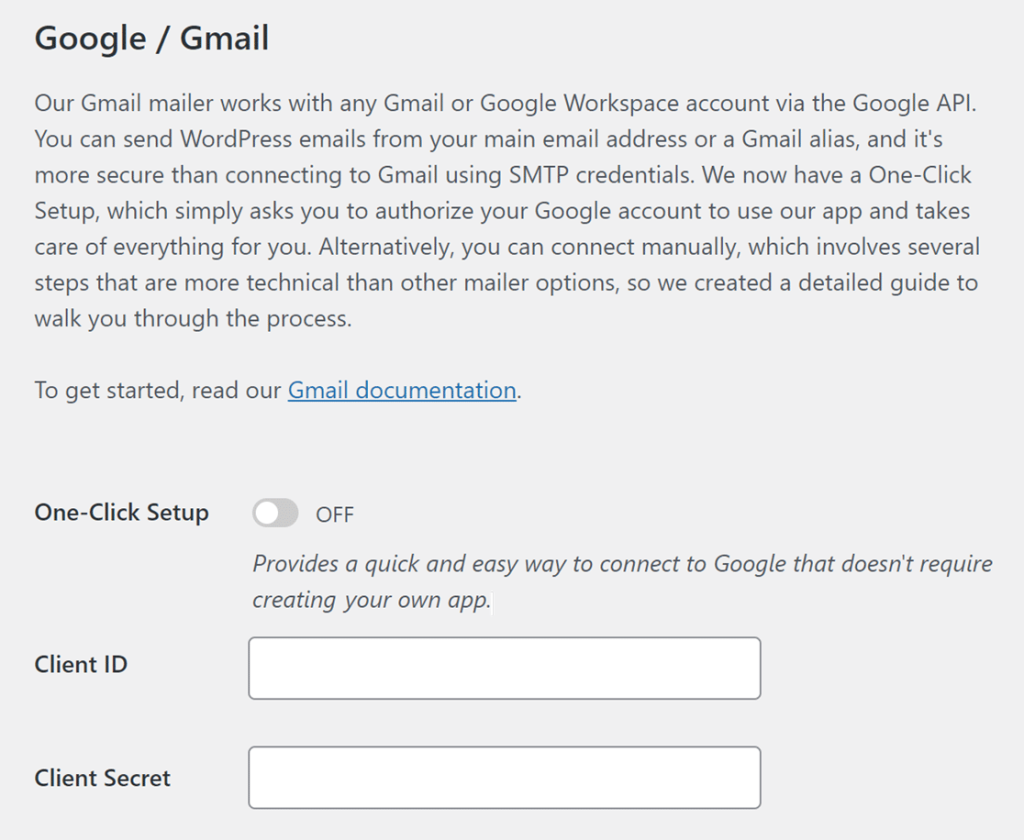
This is where you can choose which mailer you’d like your site to use. Select the Google / Gmail option.

Once you’ve chosen this mailer, you should see a new section appear titled Google / Gmail with more authorization options.
There are two ways to configure the Google Workspace / Gmail mailer: Using the One-Click Setup or manually creating a custom Google app to generate your Client ID and Client Secret.
However, if you are using the Lite version of WP Mail SMTP or you’d like to generate the information for the Client ID and Client Secret fields, you’ll need to use your Google account to create a web application. To continue with this method, jump to the creating a web app section of this guide.
Creating a Web App in Your Google Account
You’ll be coming back to WP Mail SMTP’s settings page a little later, so for this step, open a new tab or window in your browser.
In the new tab or window you’ve opened, log in to your Google account and open your Google Cloud Console.
Note: Before continuing, be sure to sign out of all other Google accounts besides the account you’ll be using for the SMTP setup.
Also, if you’re using Google Workspace, make sure that the Google account you use has permission to send emails (in other words, access to its own inbox).
If it’s your first time using Google Cloud Console, you may see a popup asking you to select your country and agree to the Terms of Service. Go ahead and do so, then click on AGREE AND CONTINUE to move on to the next step.
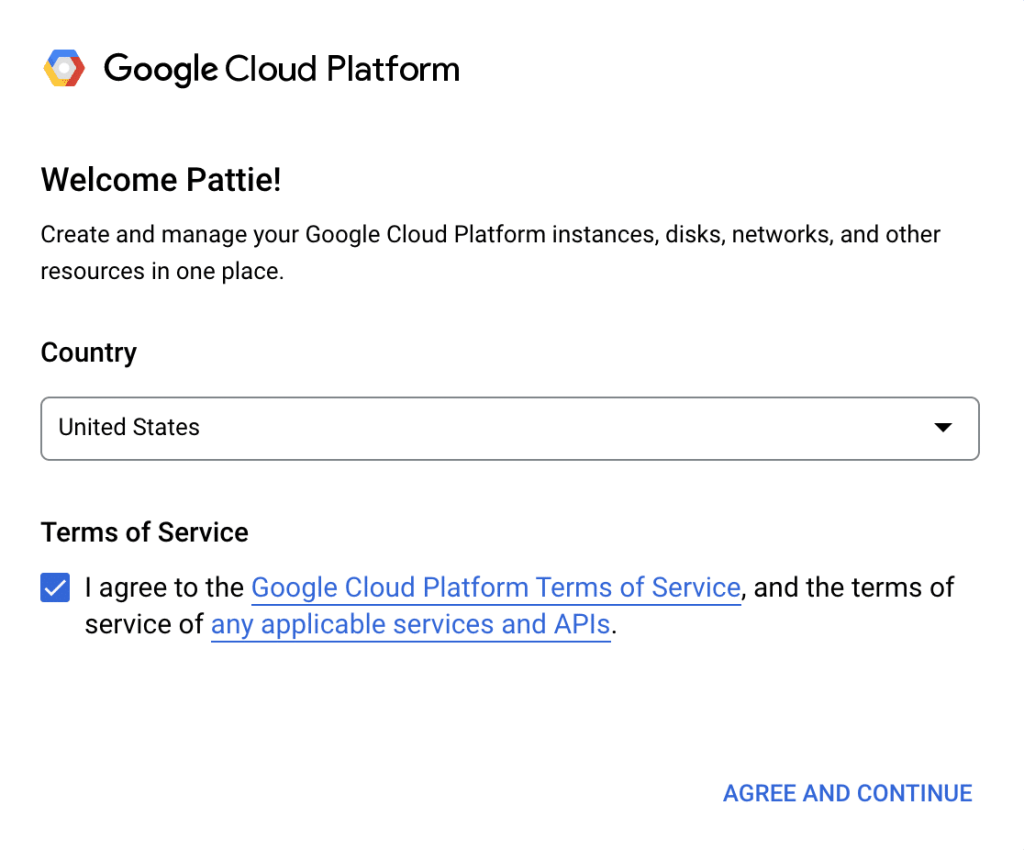
If you’ve logged in to the Google Cloud Console before, you’ll likely bypass the Terms of Service.
Creating or Choosing a Project
First, you’ll need to choose a project to use for your app. You can select an existing one or create a new one.
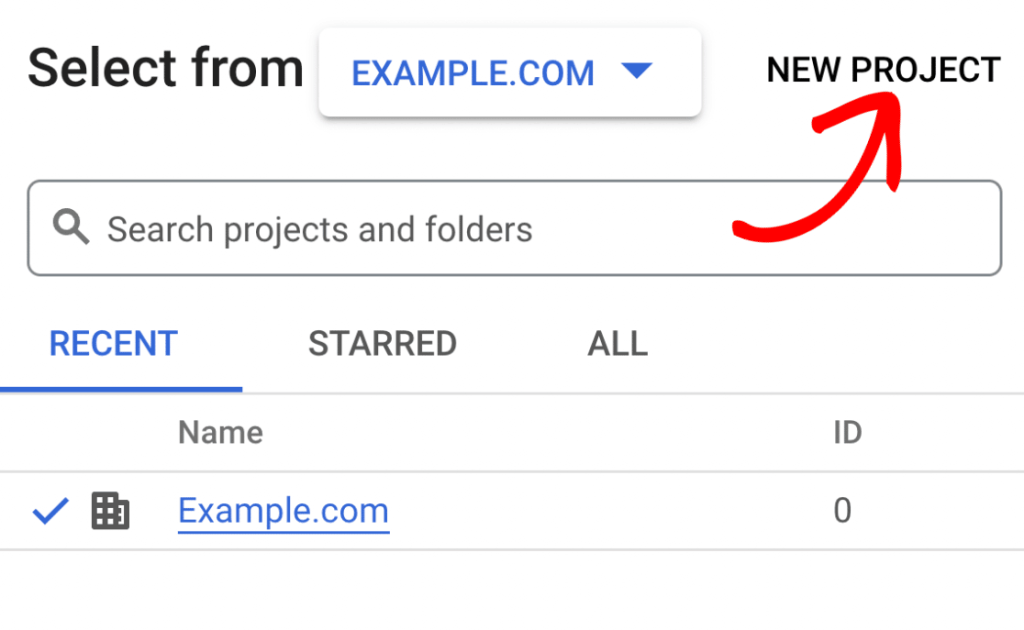
To do so, click on the project’s dropdown in the toolbar at the top of your dashboard.

In the popup that appears, select an existing project from the list or click on New Project in the top right corner.
If you selected an existing project, move on to the next step. For a new project, enter a project name and select an organization and location from the dropdowns.
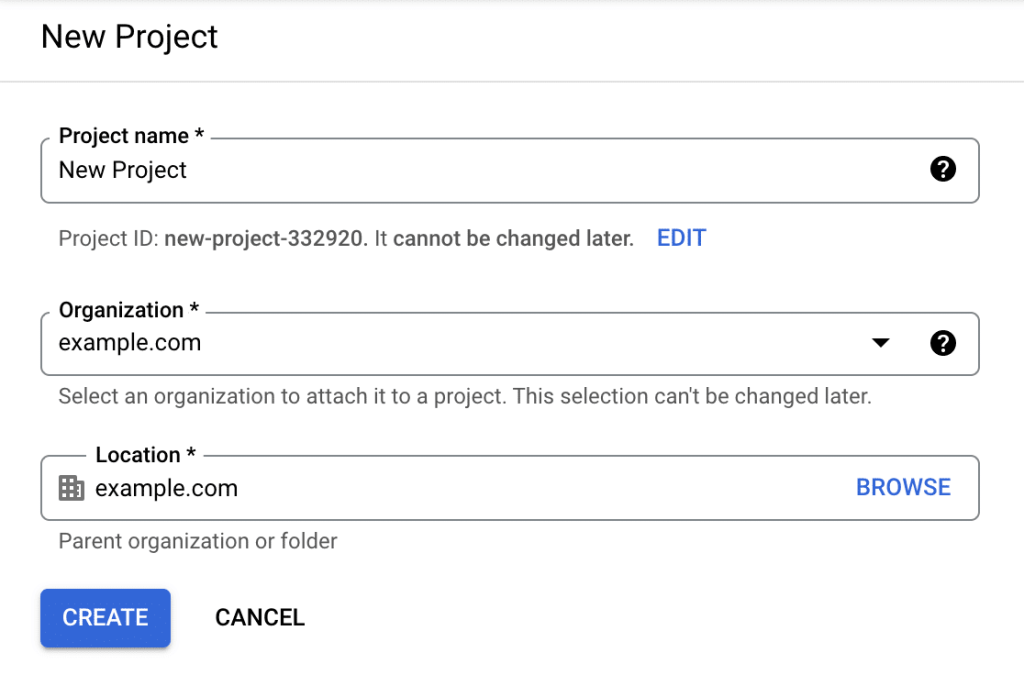
Then click on the CREATE button.
Enabling the Gmail API
Next, you need to enable the Gmail API for your project. In your Google Cloud Console sidebar, go to APIs & Services » Library.
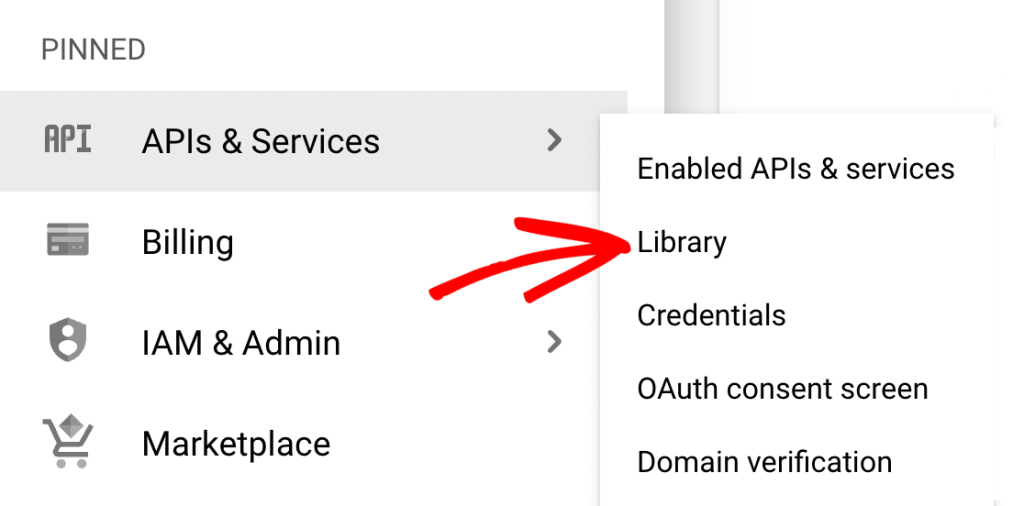
Note: If you don’t see APIs & Services in the sidebar, it may be found by scrolling down and clicking on MORE PRODUCTS.
Then look under Category and click on Google Workspace, or enter “Gmail API” in the search bar.
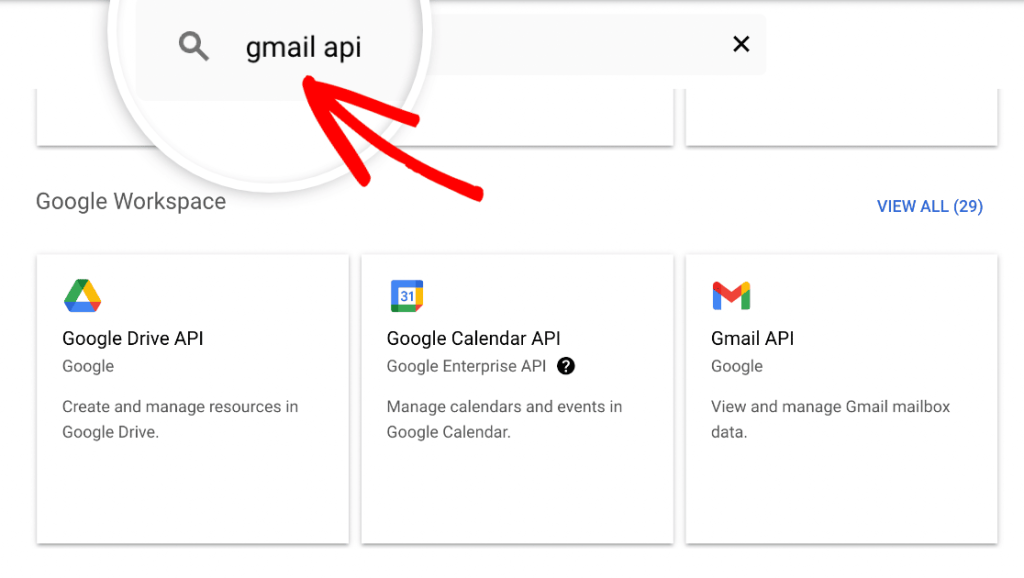
Click on the Gmail API result.
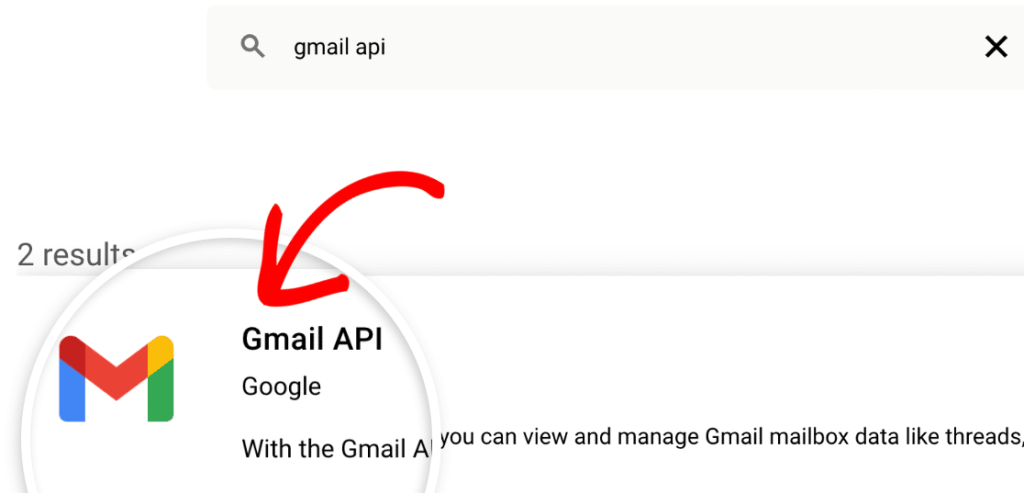
On the Gmail API page, click on the blue ENABLE button.
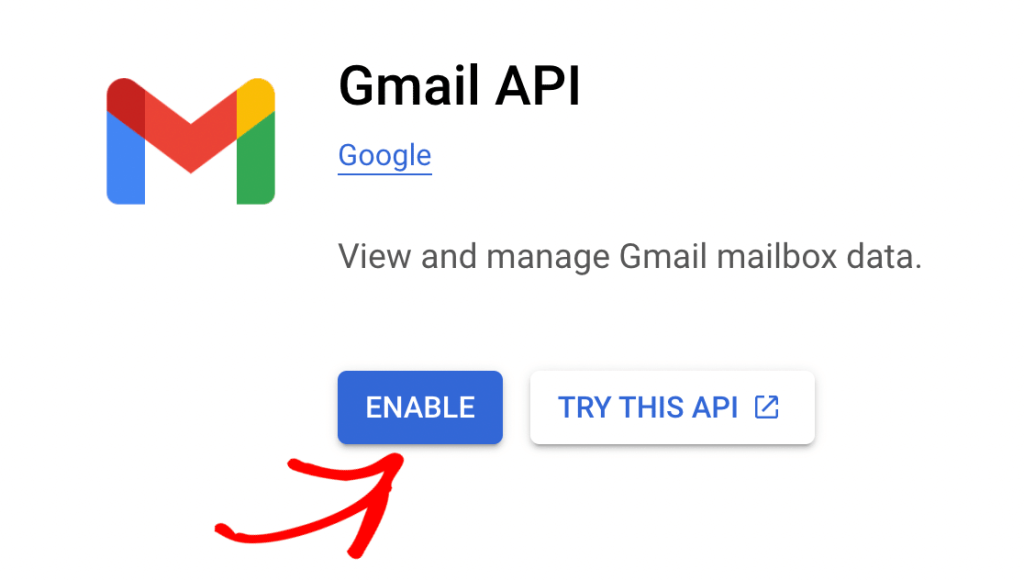
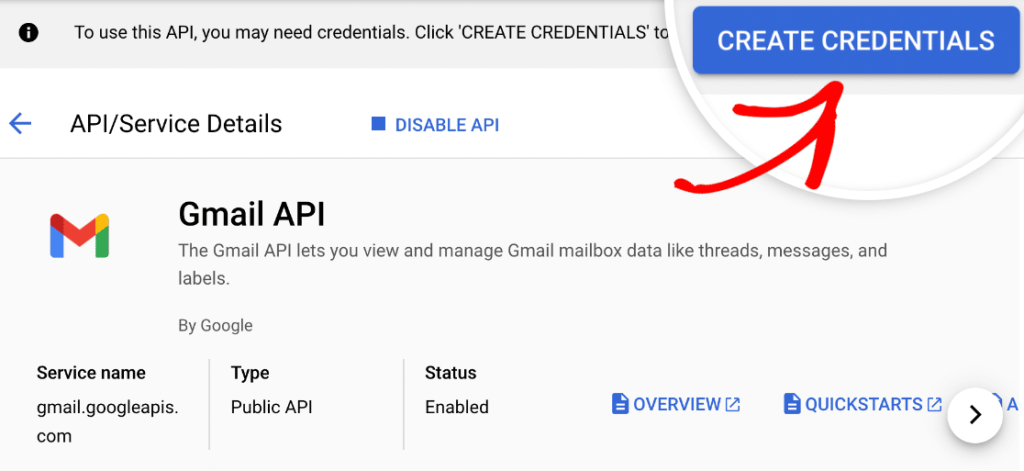
Creating Your Application’s Credentials
After you enable the Gmail API, you should be redirected to the Gmail API Overview page. Here, click on the CREATE CREDENTIALS button.
On the next page, Google will ask a few questions to determine the Credential Type you need. From the Select an API dropdown, choose Gmail API.
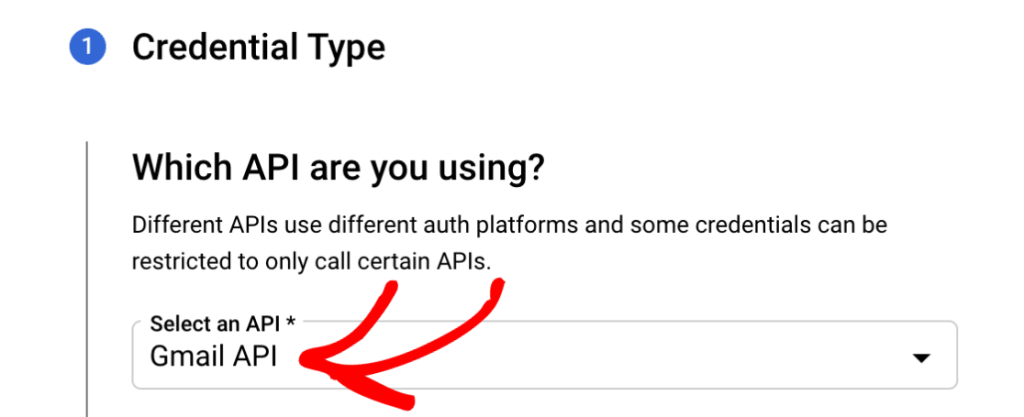
Note: If you don’t see an option for the Gmail API in the dropdown, be sure that you have the Gmail API enabled for your account.
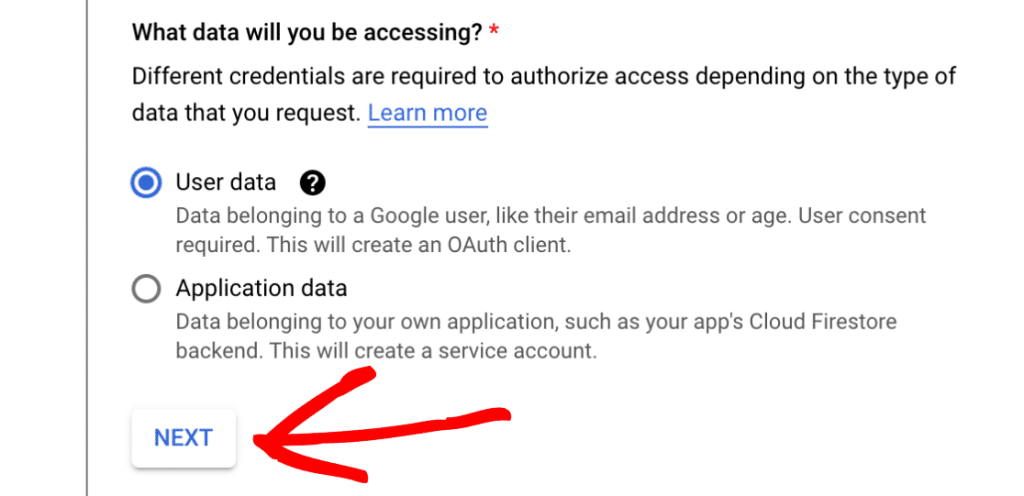
Next, under What data will you be accessing?, select the User data option. Then click the NEXT button to proceed.
Configuring Your OAuth Consent Screen
Google will then ask for some basic information about your app.
This section is mostly for personal use since no one else will be using your app. However, some fields are still marked as required:
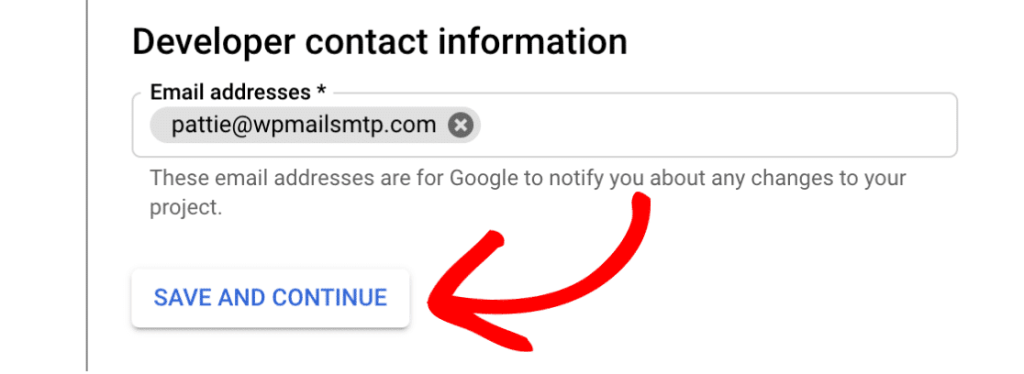
- App name: Enter an app name of your choice (e.g., Pattie’s App).
- User support email: Select your email address from the choices provided.
- App logo: If you’d like, you can upload a logo for your app. This is optional.
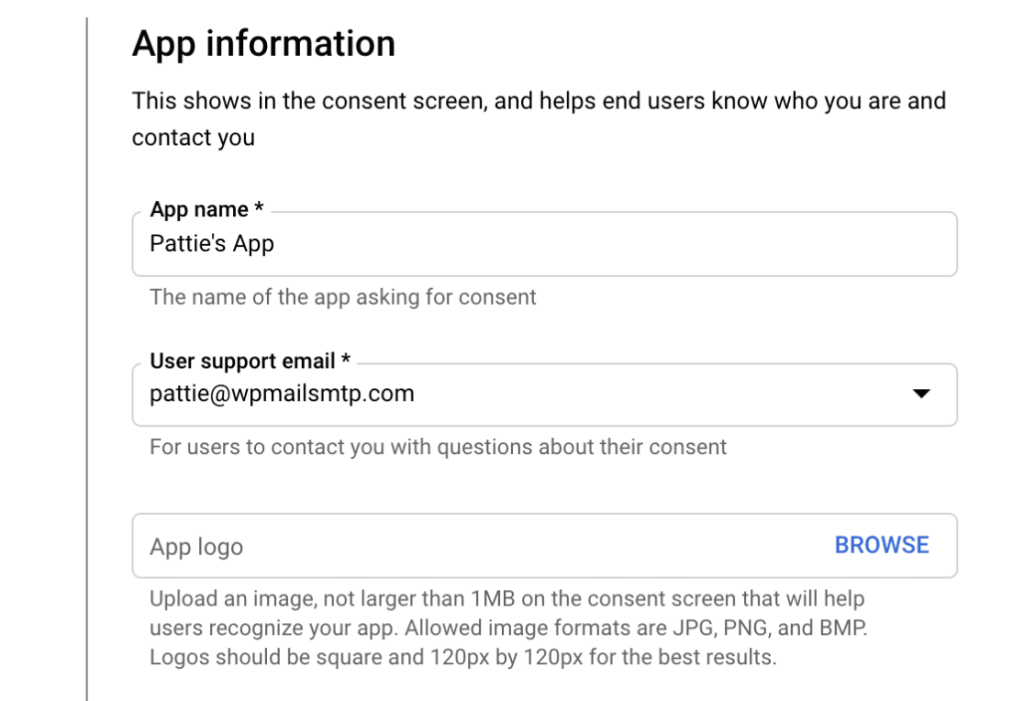
Finally, add your email address in the Email addresses field. Then click on the SAVE AND CONTINUE button to proceed to the next step.
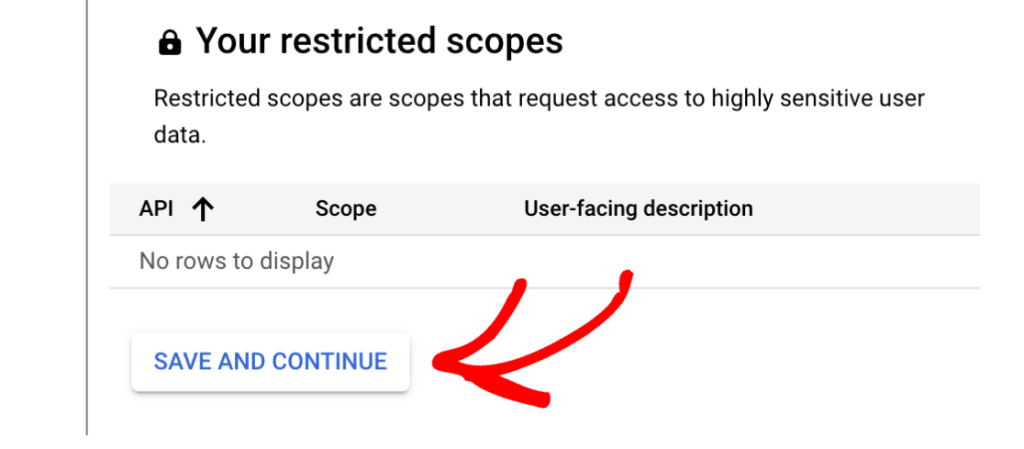
Configuring Scopes (Optional)
This is an optional step that we’ll be skipping for this tutorial. Scroll down to the end of the Scopes section and click on the SAVE AND CONTINUE button to proceed.
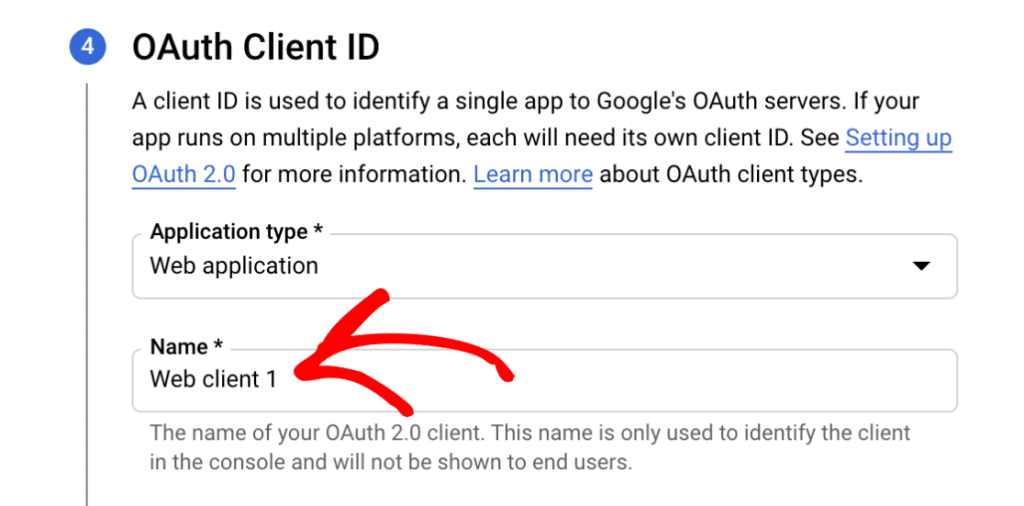
Setting Up Your OAuth Client ID
Next, you’ll need to fill out some information about your OAuth Client ID.
From the Application type dropdown, select the Web application option. Once you do so, more fields will automatically populate.

You can leave the Name field as the default value or change it to something more relevant. For this example, we’ll keep the default name, Web client 1.
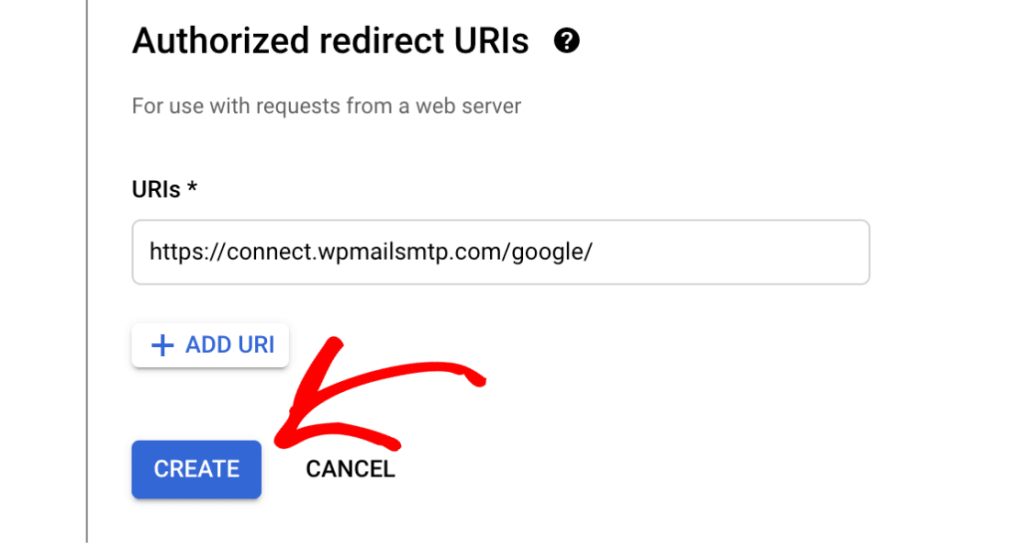
Next, skip the Authorized JavaScript origins section and scroll to Authorized redirect URIs.
Click on the + ADD URI button and input the following: https://connect.wpmailsmtp.com/google/. You can also copy this value from your WP Mail SMTP settings and paste it here if you prefer.
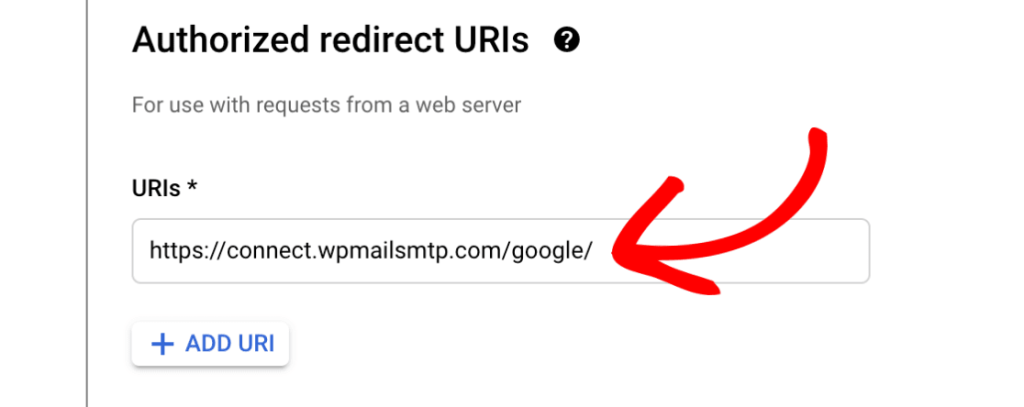
Then click on the CREATE button to complete this step.
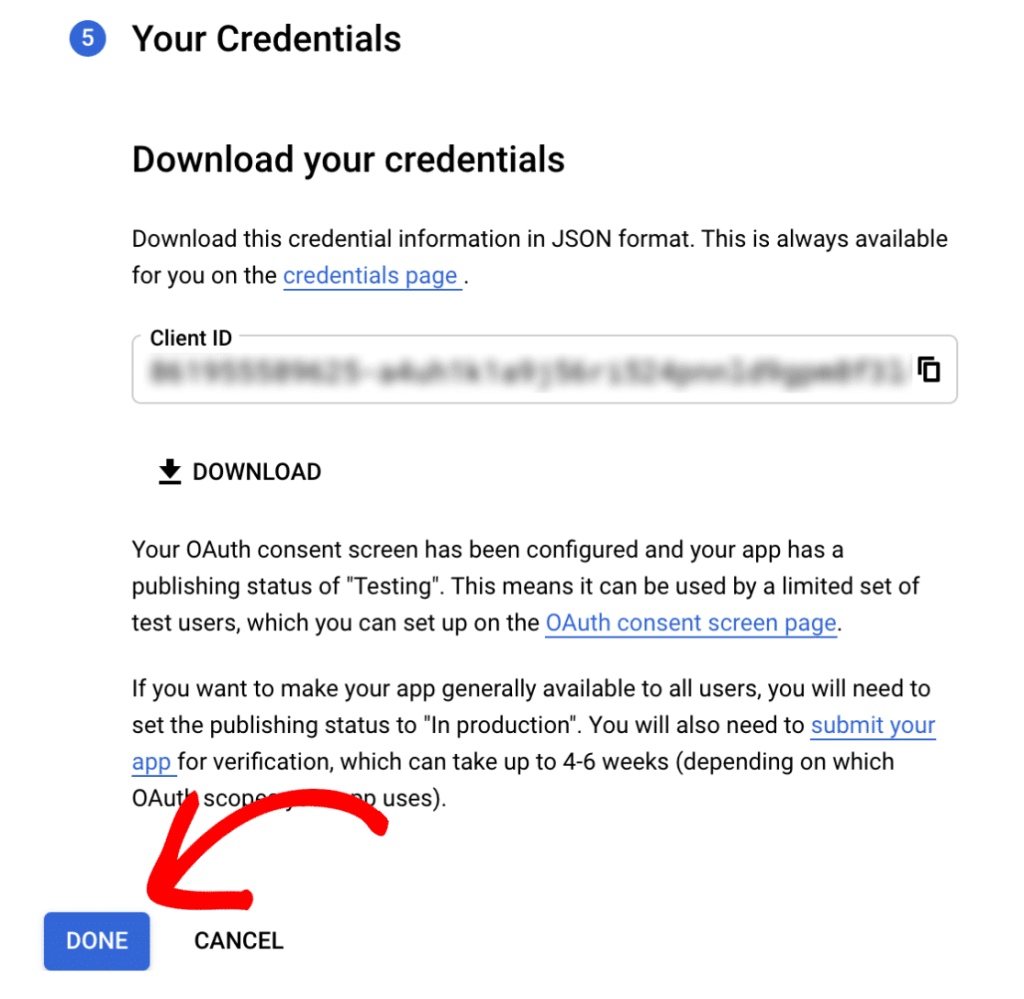
Once your app has been created, the Your Credentials section will expand to show you your Client ID. There’s no need to copy it now, as you’ll access it from another area in a later step.
Instead, go ahead and click the DONE button at the bottom of the page.
Updating the Publishing Status From Testing to Production
Google will put your app into Internal mode by default. It’s really important that you switch it to External mode and publish it. Otherwise, your app will be super limited and won’t function properly.
Google Workspace Users
In your Google Cloud Console sidebar, go to APIs & Services » OAuth consent screen. Under User type, click on the MAKE EXTERNAL button.
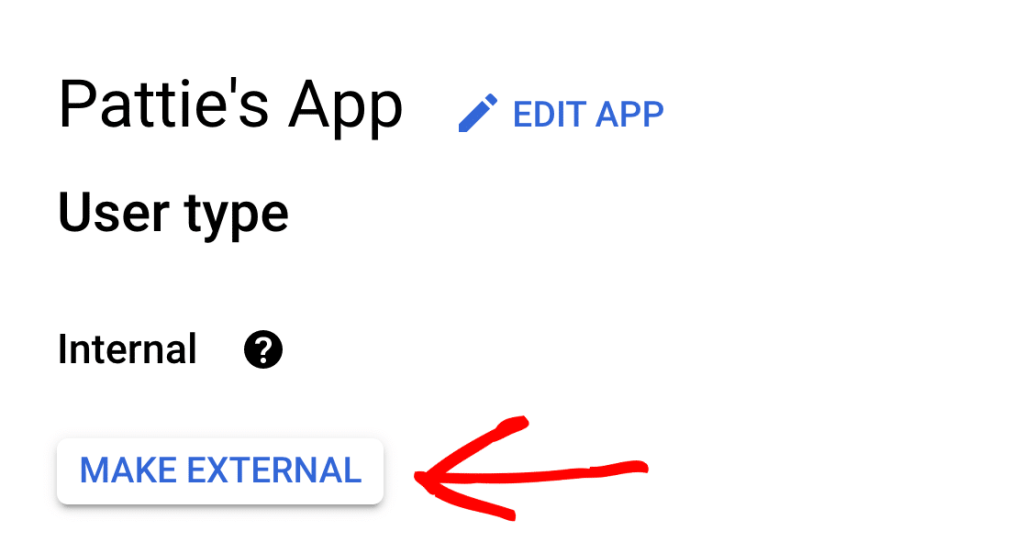
Note: Only users within your organization can access your app if the User type is set to Internal. For example, if your Workspace domain is example.com, users can only access your app using an @example.com email address.
External email addresses will see an error that reads Error 403: org_internal when granting WP Mail SMTP access to your app.
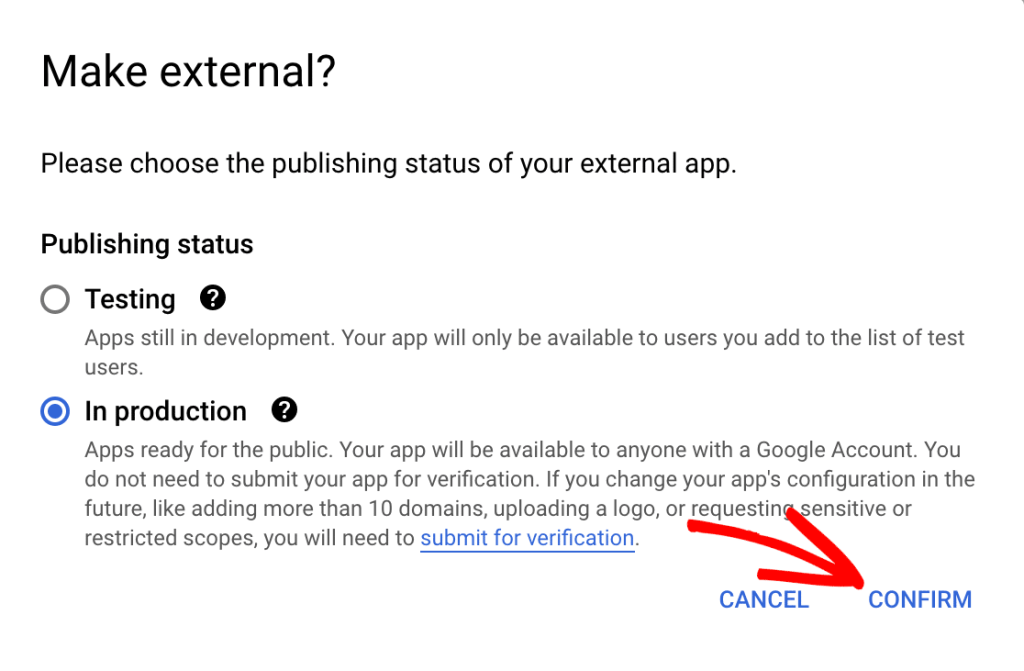
In the popup window that appears, select the In production option. Then click on CONFIRM.
Gmail Users
If you’re not using Google Workspace, you won’t see the MAKE EXTERNAL option. Instead, you’ll need to publish your Google app.
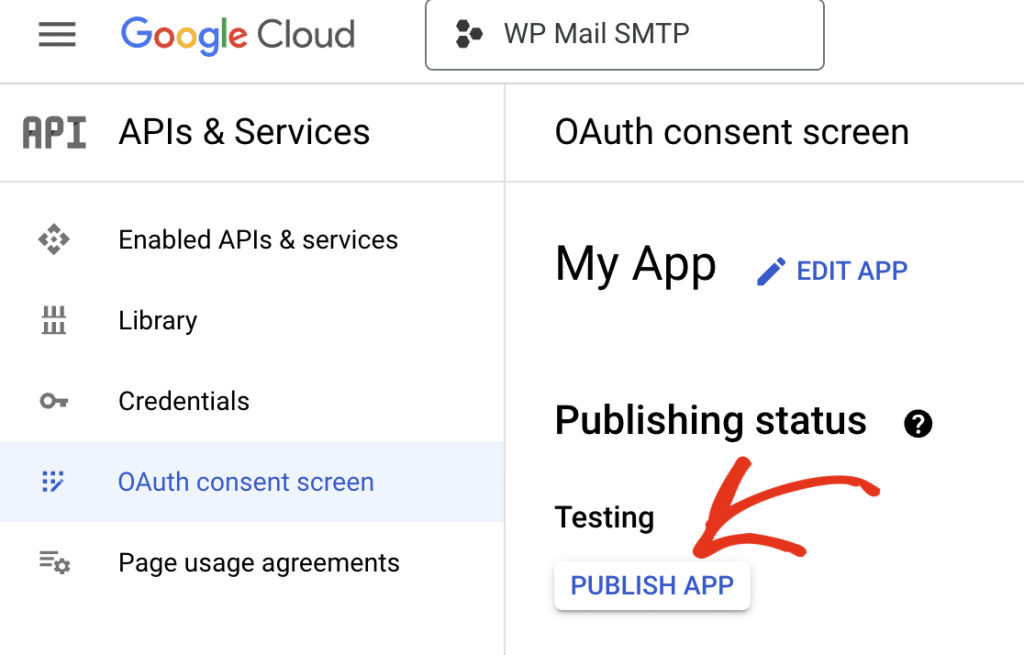
To do so, go to APIs & Services » OAuth consent screen. Under Publishing status, you’ll see the app status is set to Testing. Go ahead and click the PUBLISH APP button to update your app status.
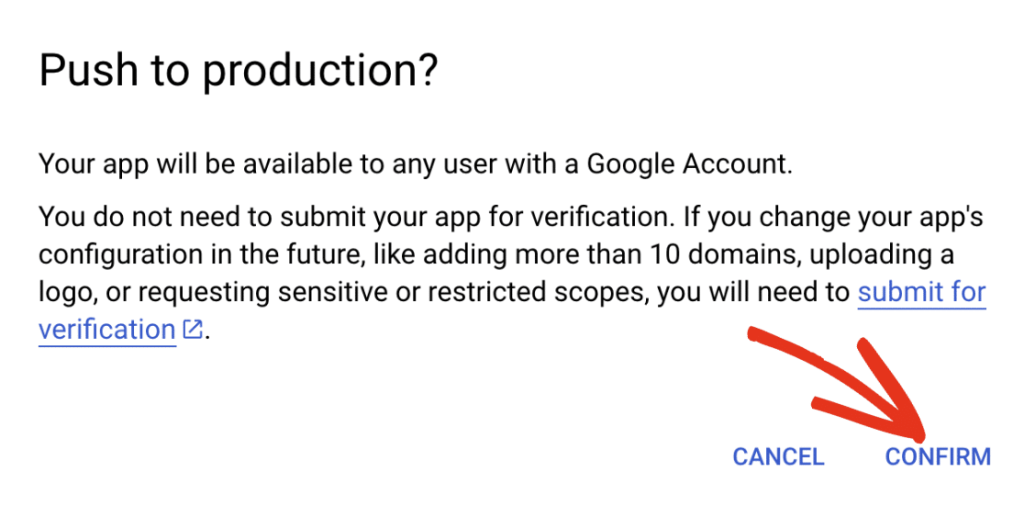
In the overlay that appears, click CONFIRM to publish your app.
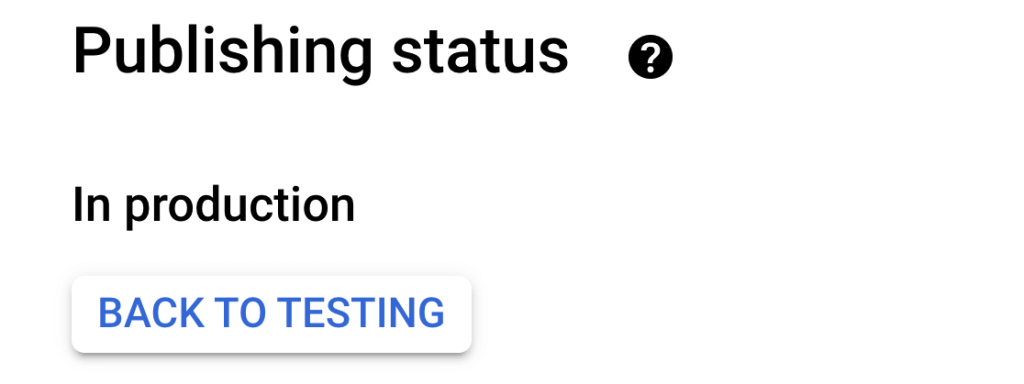
Once confirmation is complete, you’ll see that your app’s Publishing status is now In production.
Granting Your Site Google / Gmail Permissions
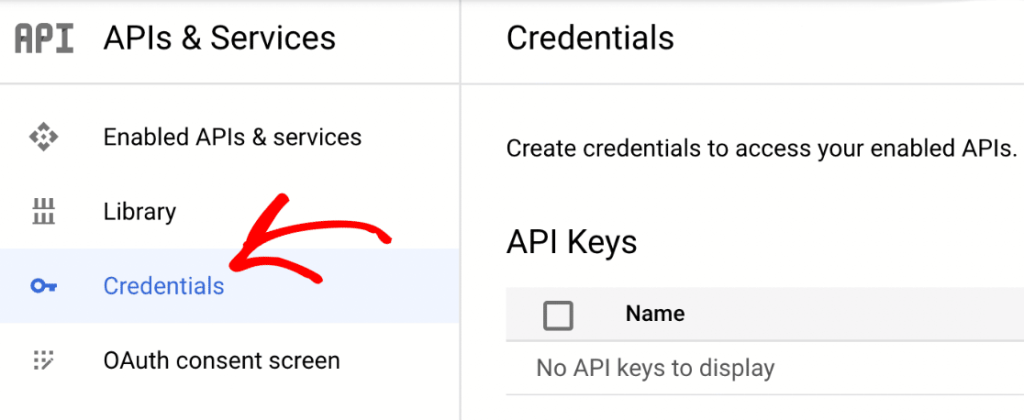
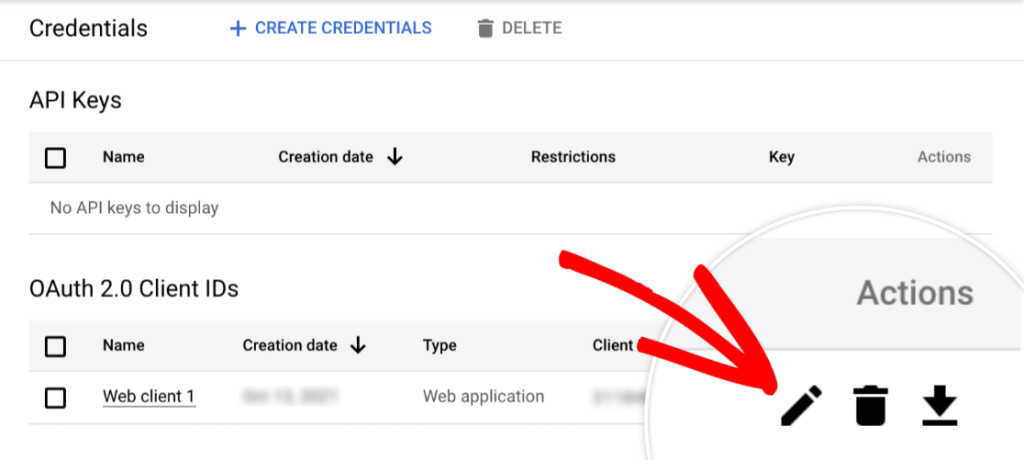
Next, click on Credentials in the left side menu.
Once you’re on the Credentials page, in the OAuth 2.0 Client IDs section you can see the details of the web application you just created. To view the Client ID and Client Secret, click the pencil icon.
This will open all of the details for your app. On the right side of this page, you’ll see the Client ID and Client secret values.
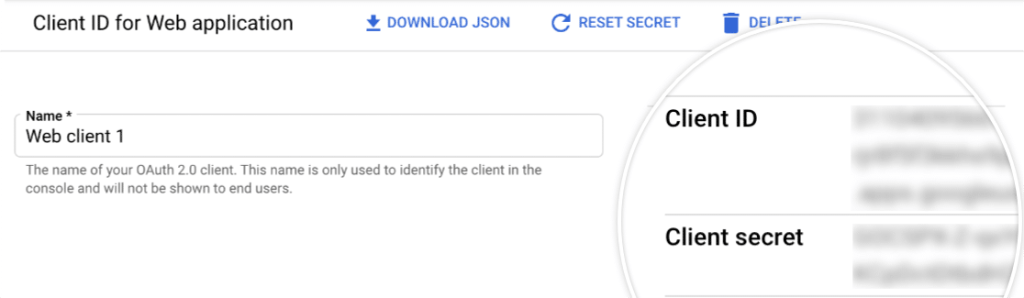
Go ahead and copy both of these values into the corresponding fields in your WP Mail SMTP settings.
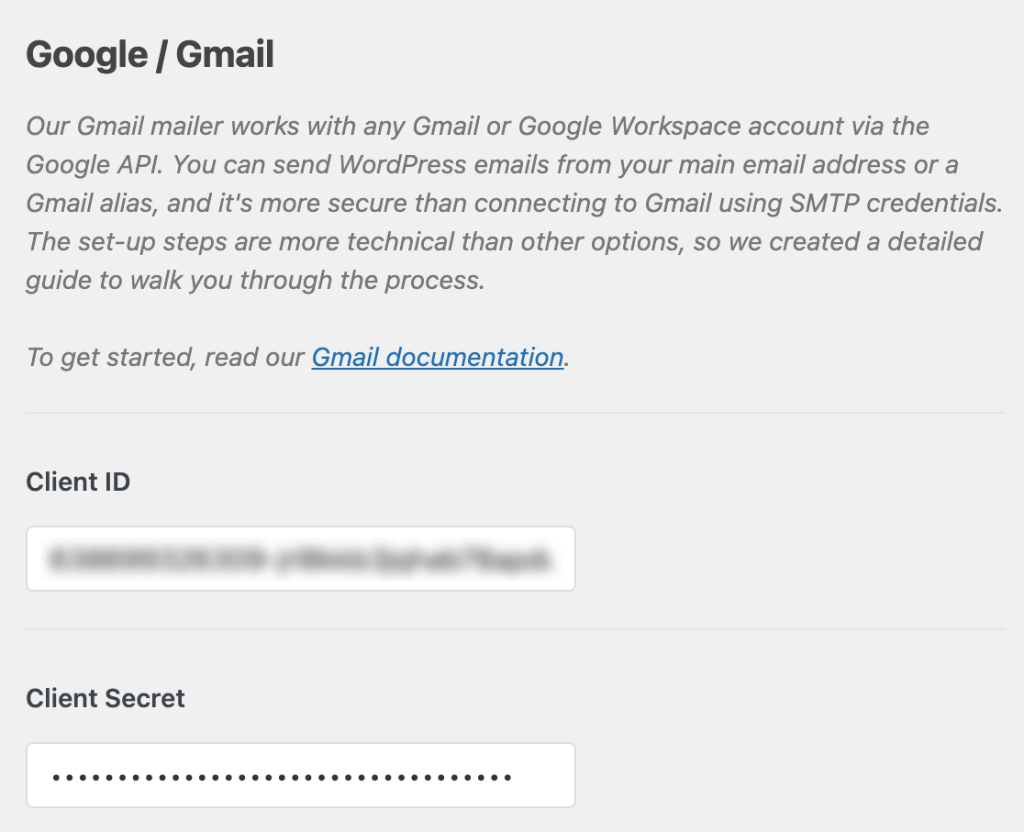
Note: Be very careful not to copy any extra text or spaces with your Client ID or Client Secret, as this will result in an error in the next step.
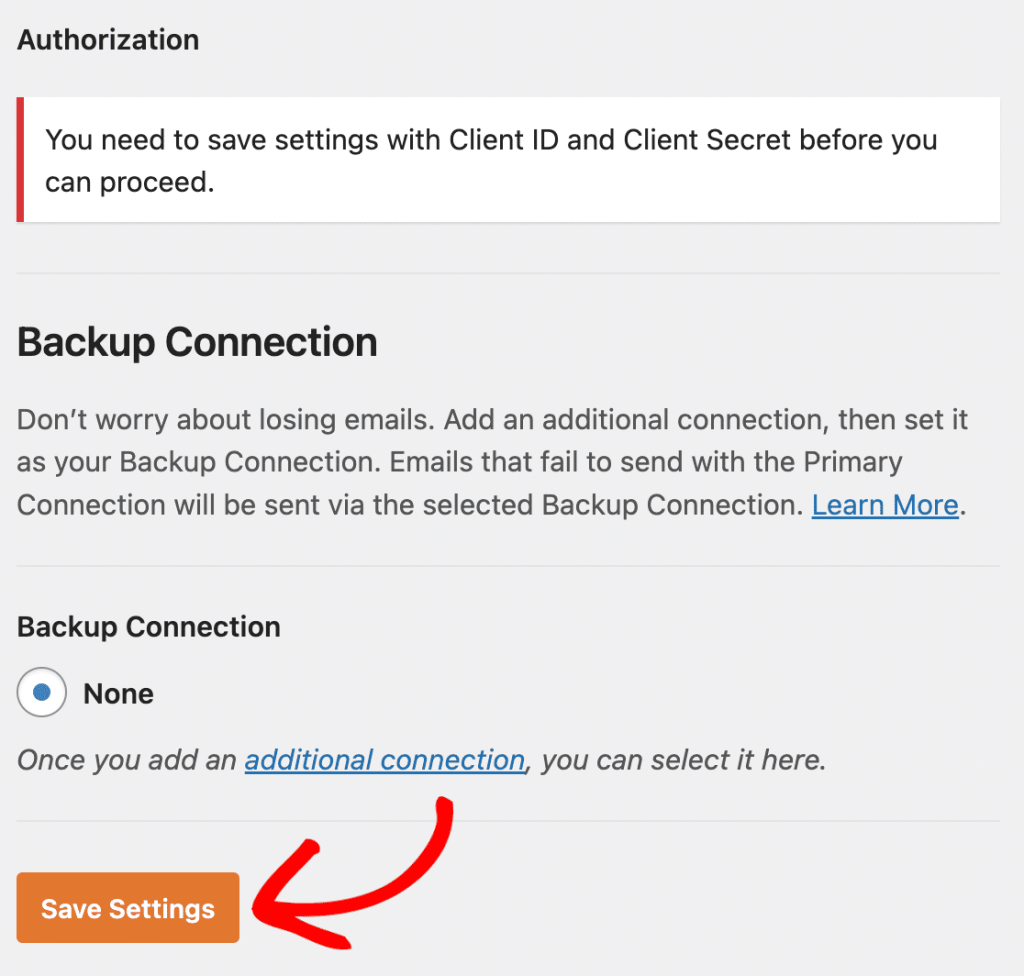
Once you’ve added these values, click the Save Settings button at the bottom of the page.
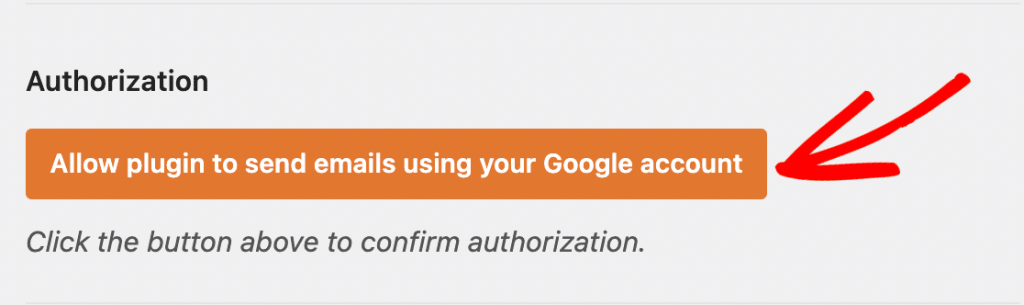
After saving your settings, the page will refresh. You must grant permission before Google allows our plugin to use your Gmail API to send emails.
To do this, scroll to the bottom of the WP Mail SMTP settings page and click the button labeled Allow plugin to send emails using your Google account.
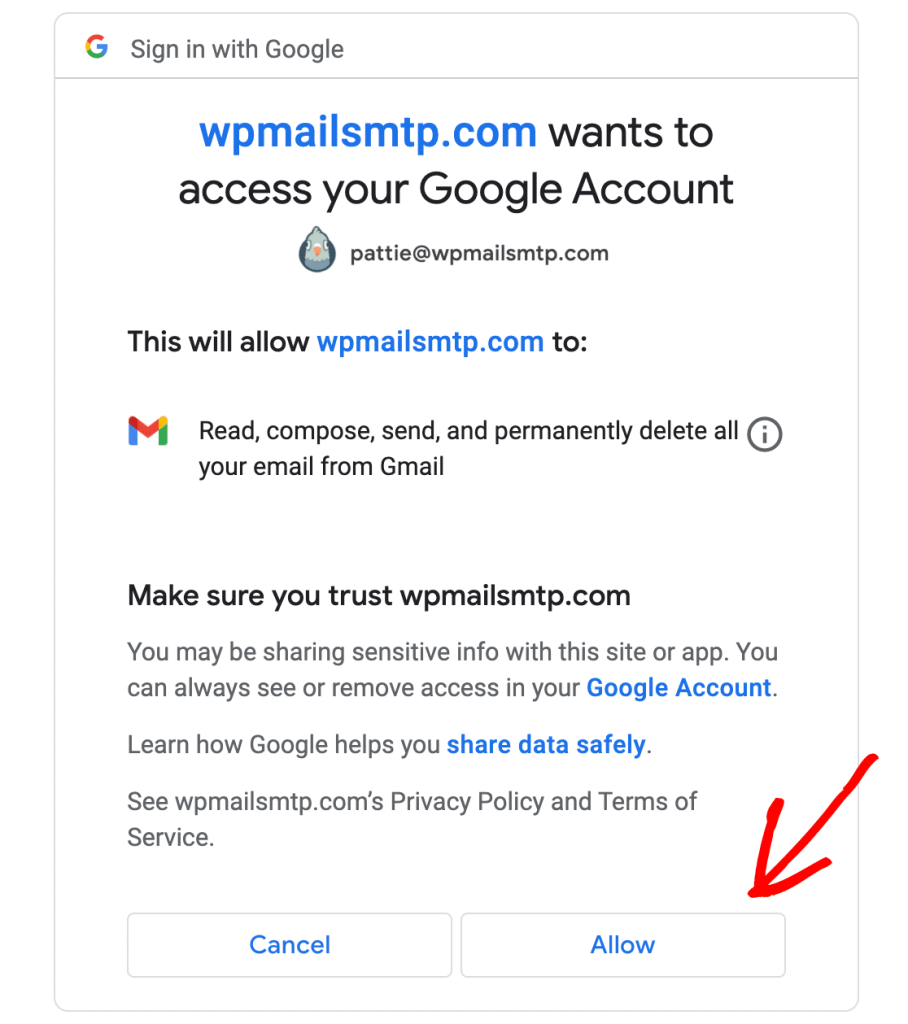
This will open a login screen for Google. Go ahead and log in to the account you’re setting up SMTP with.
Next, you’ll see a screen asking for permission for this site to send emails on your behalf.
When you’re ready, click the Allow button to proceed.
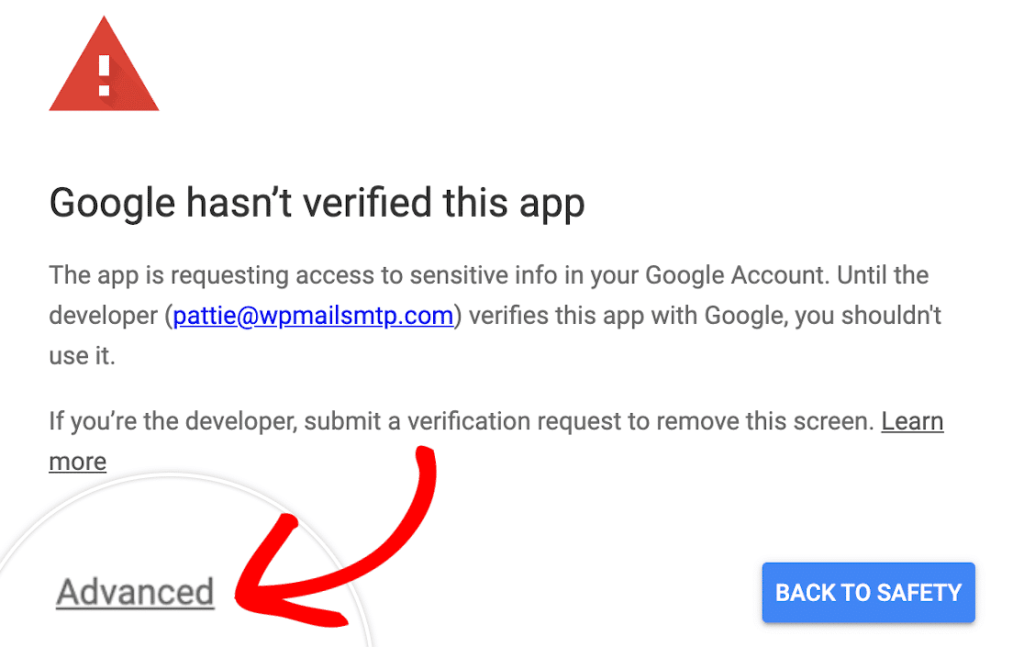
Bypassing Google’s Verification Warning (Free Gmail Users Only)
You might see the following screen if you are connecting with a free Gmail account. Go ahead and click on the Advanced link in the bottom left corner.
In the expanded section, click on Go to wpmailsmtp.com (unsafe). Don’t worry, Google only displays this warning because it hasn’t verified your app. There is no need to verify it since you created this app just for your own use.
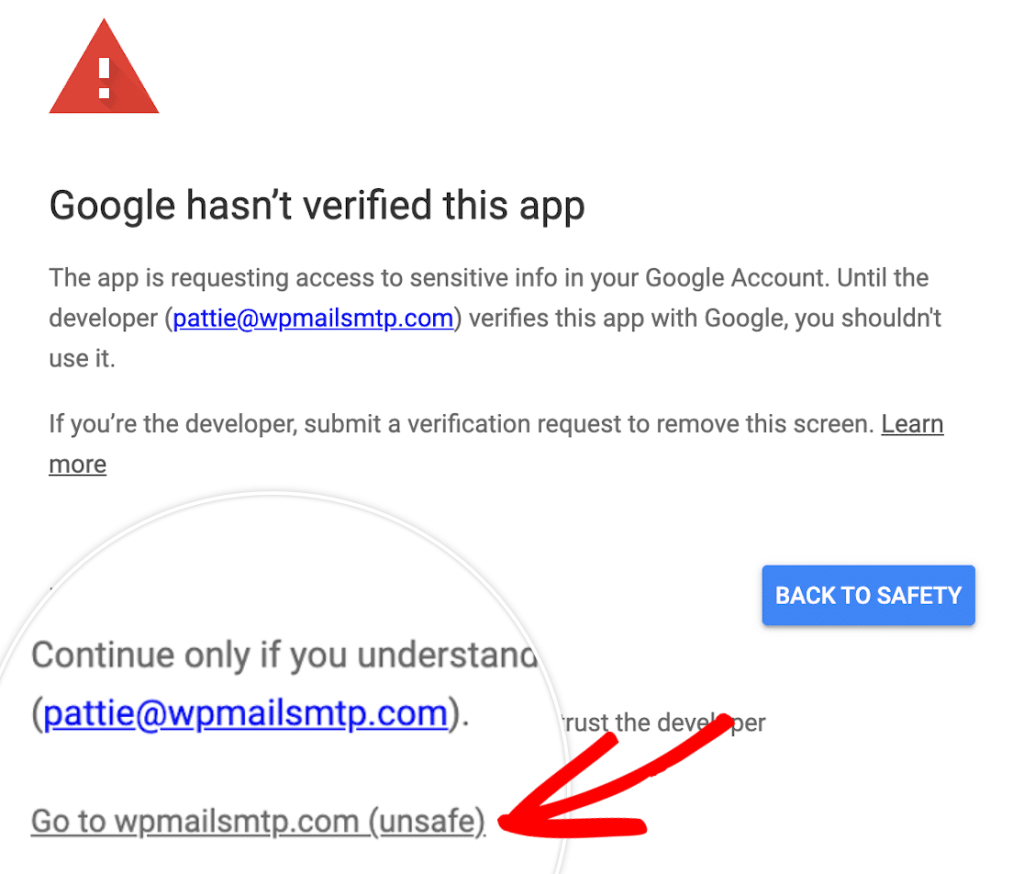
Then click on the Allow button as shown above.
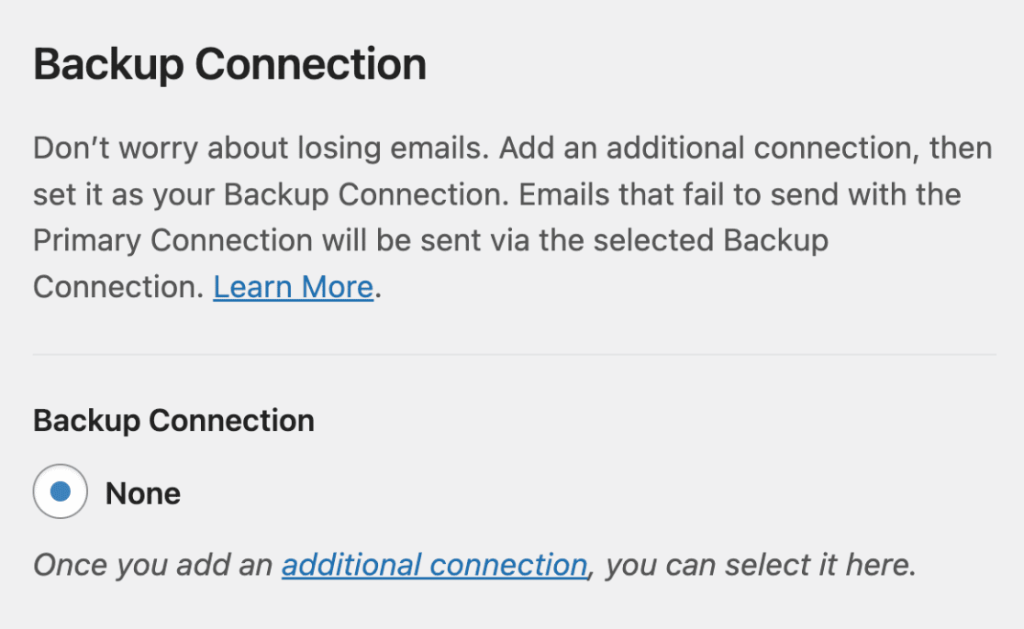
Backup Connection
Setting up a Backup Connection is optional and isn’t required to complete your Google Workspace / Gmail mailer setup. However, to further improve email deliverability, we recommend configuring an additional connection to serve as a backup in case your Primary Connection fails.
Sending a Test Email
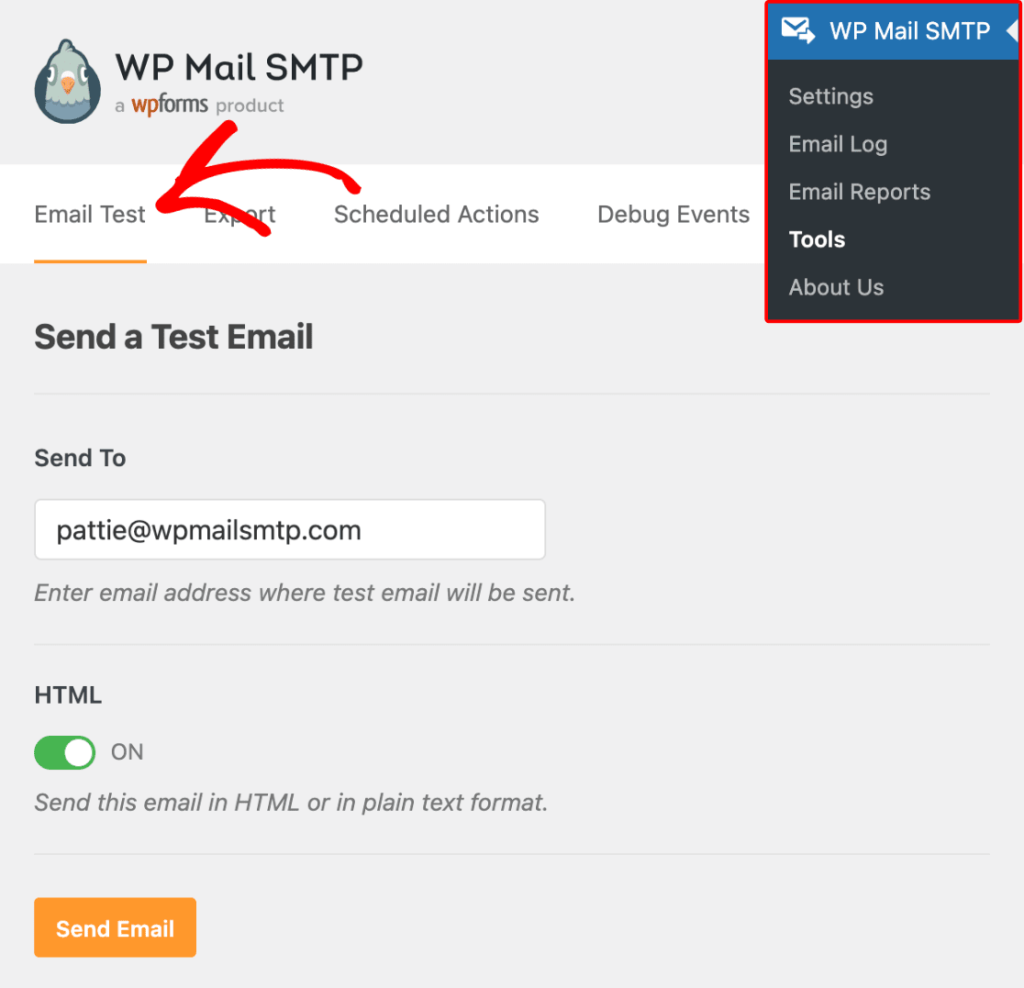
Next, you’ll be returned to your WP Mail SMTP settings and a success message will be displayed. Once the connection is complete, you’re ready to send a test email. To do so, navigate to WP Mail SMTP » Tools and open up the Email Test tab.
Once the Email Test tab is open, you’ll need to enter an email address whose inbox you have access to.
Next, choose whether to send a plain text or HTML email. Unless you know you’ll only be sending plain text emails, we recommend leaving the HTML setting toggled ON. \Then click the Send Email button.
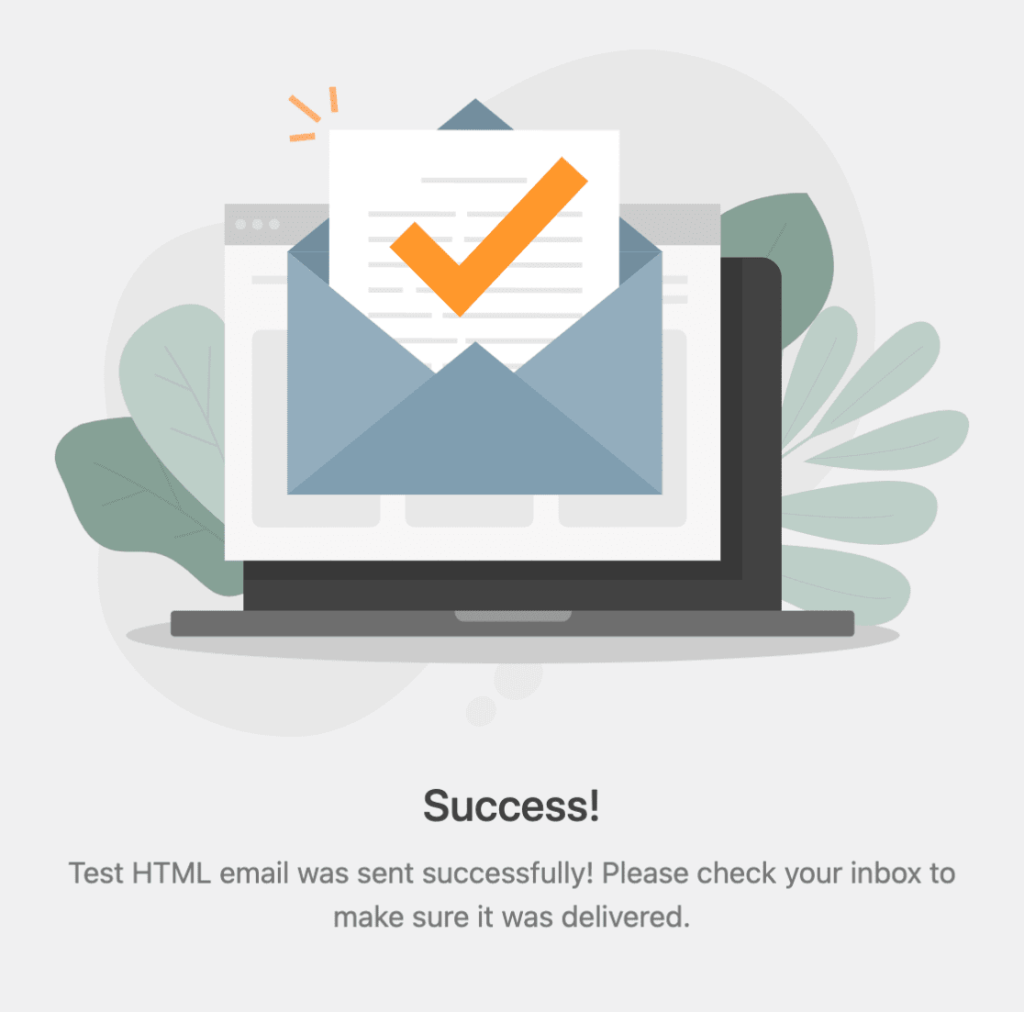
You’ll see a success message when the test email has been sent.
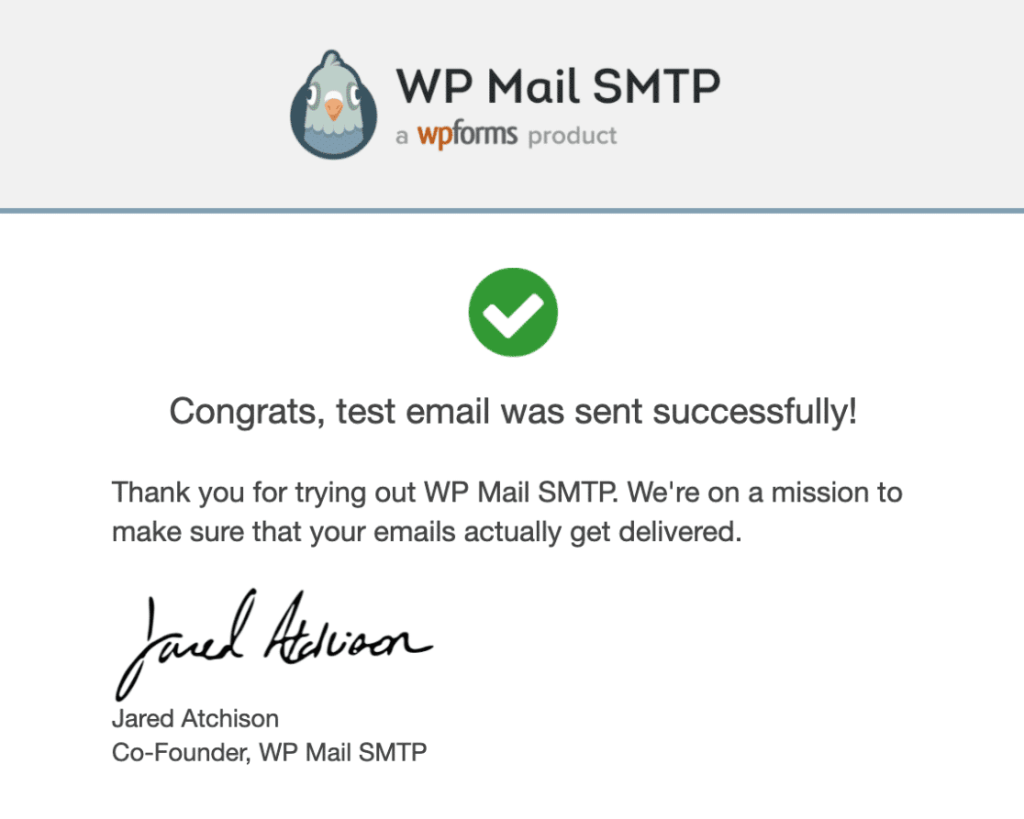
You should also soon receive the test email at the email address you entered.
If we set up this properly. We can use the settings of our custom mailsendclass.php file by replacing our simple mail() with wp_mail() function. For this we need to include wp-load.php file to our custom mail file mail.php.
The free version of WP mail SMTP Function doesn’t support Microsoft outlook and office 365 mail service for free. So we recommend installing the Fluent SMTP Plugin. It supports microsoft api based mail connection on its free version. Please try it to work with Other SMTP settings in mailer section of WP mail SMTP before proceeding with Fluent SMTP Installation.
INSTALL AND ACTIVATE FLUENTSMTP
The FluentSMTP plugin fixes your email delivery issue by connecting WordPress Mail with your email service providers. These integrations are native, so they will send the emails super fast.
This plugin will solve all your email deliverability problems. FluentSMTP is the ultimate WP Mail Plugin that connects with your Email Service Provider natively and makes sure your emails are delivered properly.
FluentSMTP Requirements
To use FluentSMTP,
you need:
– WordPress 4.5 or later
– PHP version 5.6 or later
Install & Activate the FluentSMTP Plugin from the Dashboard
The very first step to setting up FluentSMTP is to install the plugin on your WordPress website.
To do so, in your WordPress dashboard, select Plugins > Add New from the menu. Then type Fluent SMTP into the search function. Once the FluentSMTP plugin is displayed, click on the Install Now button.
Once FluentSMTP is installed, then please click on the Activate button to make it active on the WordPress website.
Install & Activate FluentSMTP Manually
FluentSMTP can be installed on your site from the official WordPress plugin repository. You can also download the plugin from wordpress.org and install it on your WordPress site manually.
To manually install & activate FluentSMTP you need to download and upload the package to your WordPress and the steps are:
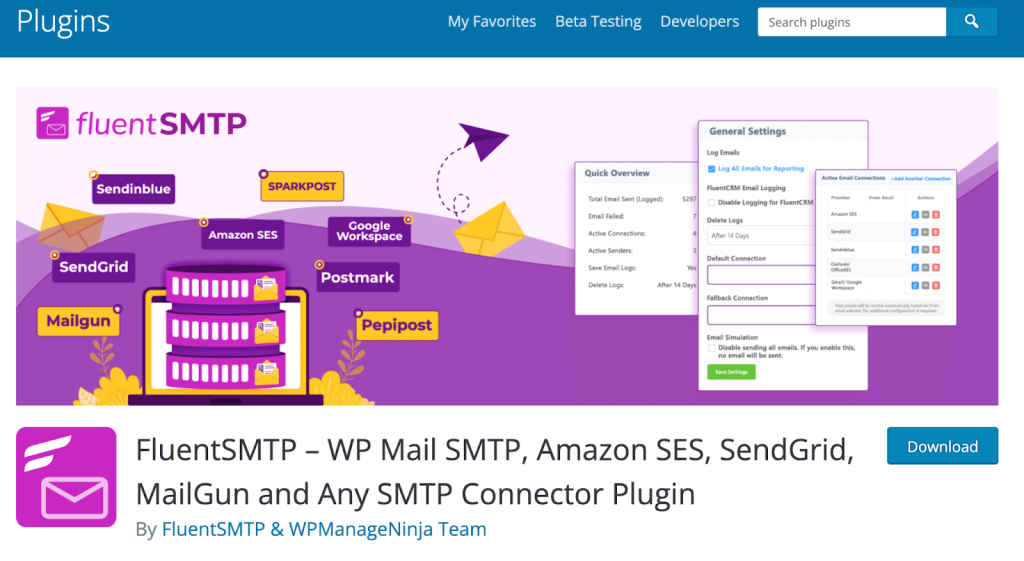
- Go to https://wordpress.org/plugins/fluent-smtp/
- Download the plugin by clicking on the Download button
- Go back to your WordPress Dashboard → Add New → Upload Plugin.
- Select the .zip file you just downloaded earlier, and click on Install Now.
After installing, go ahead and click on the Activate button.
And once it is activated, it will be listed under your Active Plugins as below:

That’s all for installing and activating FluentSMTP on your WordPress website. Now please follow and check out more about FluentSMTP documentation to configure your desired Email Delivery Provider and send out emails from your WordPress Website.
CONFIGURE FLUENTSMTP WITH MICROSOFT OUTLOOK/OFFICE EMAIL
This documentation shows the process of Configuring FluentSMTP with Microsoft Outlook from the Microsoft Entra Admin Center.
Configure Email Service Provider in Fluent SMTP
To configure Outlook/Office 365 with your Fluent SMTP plugin go to the WordPress Settings and select Fluent SMTP.
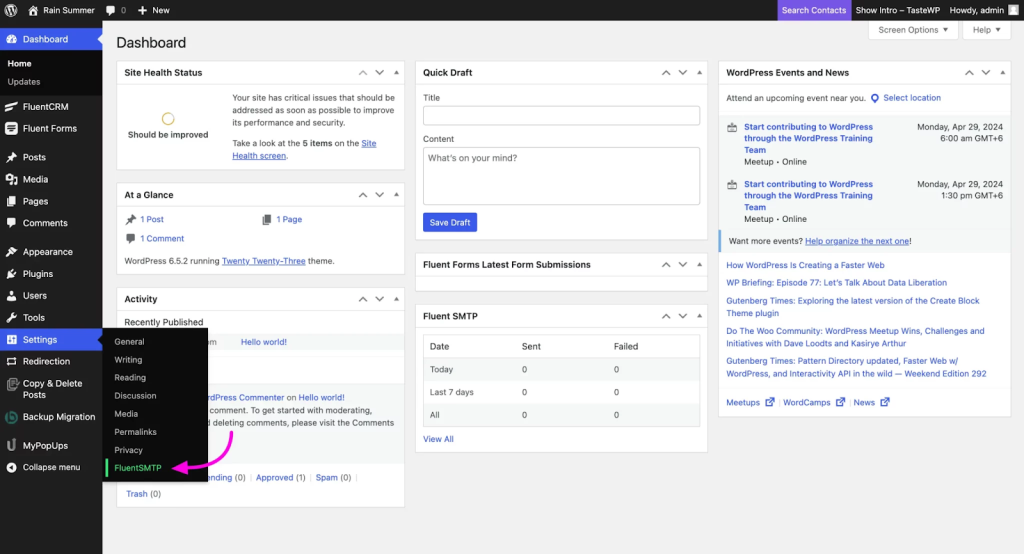
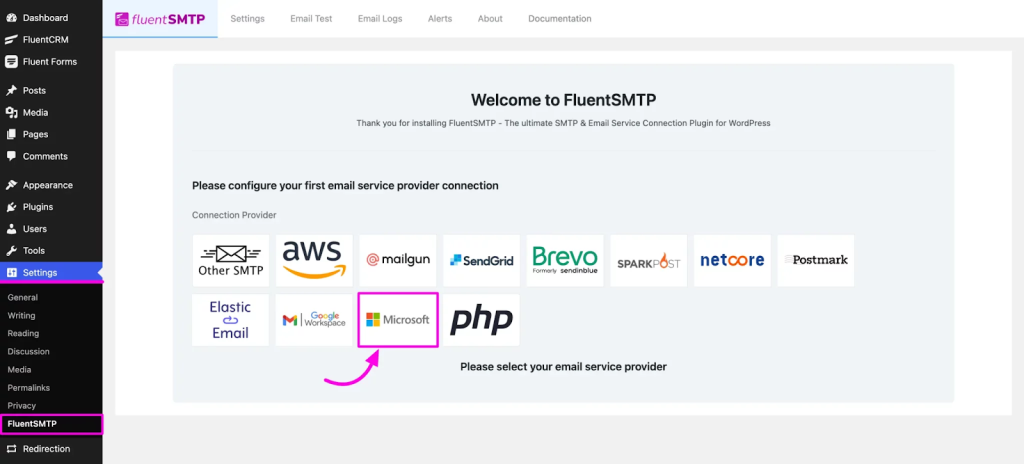
Navigate to WordPress Settings and select Fluent SMTP. If connecting to Fluent SMTP for the first time, select the Microsoft Email Service Provider.
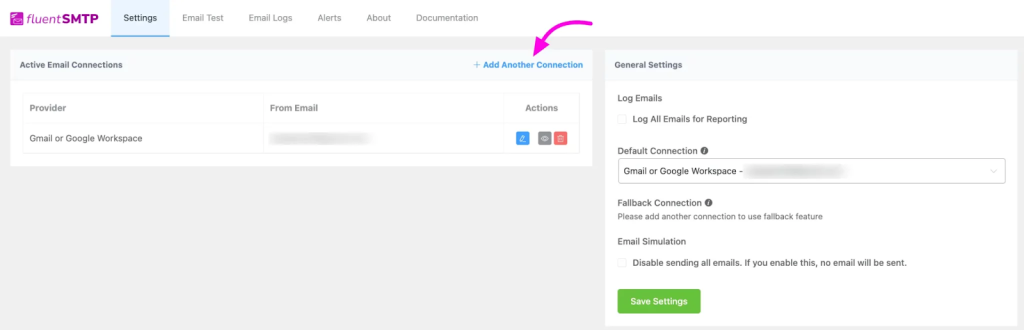
If Fluent SMTP is already connected to another Email Service Provider, click on the “Add Another Connection” button. Then select the Microsoft Email Service Provider to proceed to the Microsoft Outlook/Office 365 configuration page.
Credential Configuration of Microsoft in Fluent SMTP
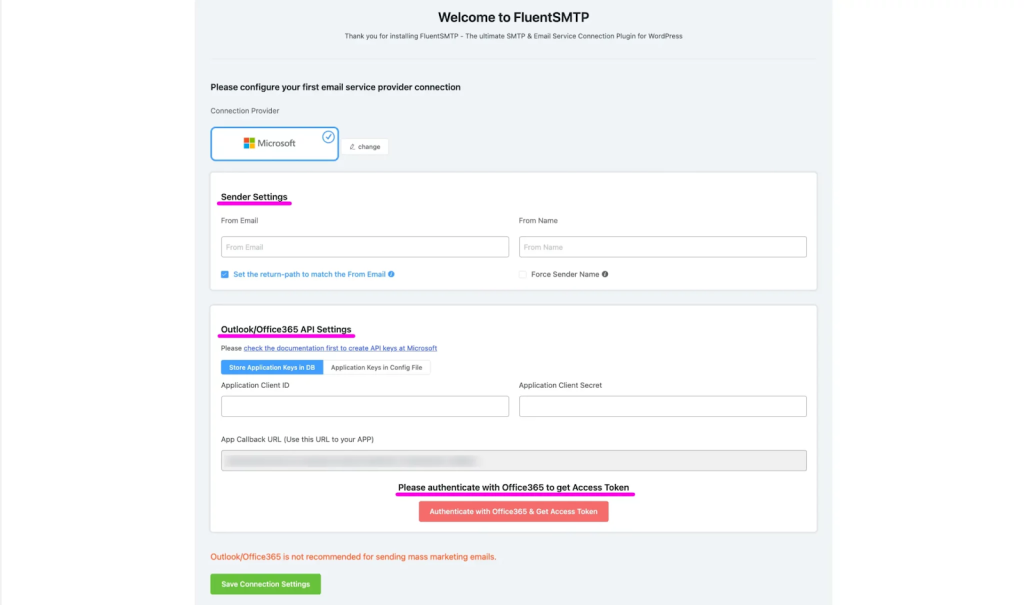
Configure Fluent SMTP with Outlook/Office 365 by providing the necessary credentials:
- Sender Details: Enter sender details in the sender settings option.
- Microsoft Outlook/Office 365 Credentials: Provide credentials from the respective application.
- Authentication: Authenticate your Office 365 account and get the Access Token.
Note: Copy the App Callback URL and keep it in your clipboard. We need this URL for App registration.
App Registration in Microsoft Azure Admin Center
To get the App credentials you need to create an App in the Microsoft Azure directory. Now go to your Microsoft Entra account and log in with your Microsoft Account.
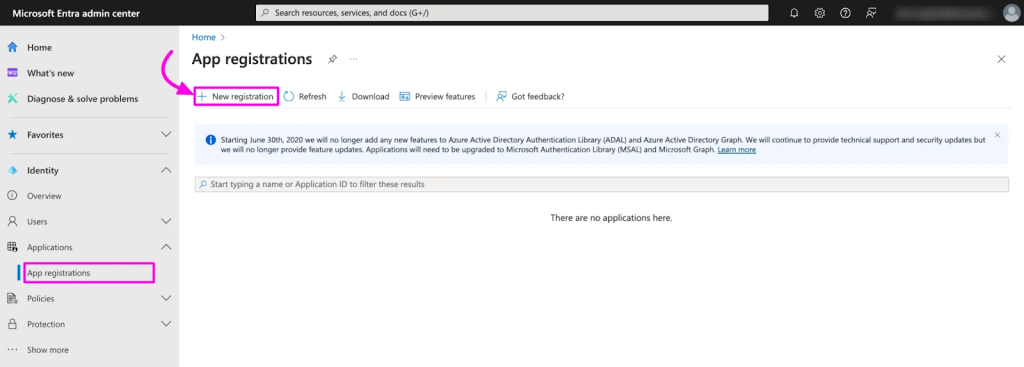
Go to the Applications from the left sidebar click on the App registration and select New Registration.
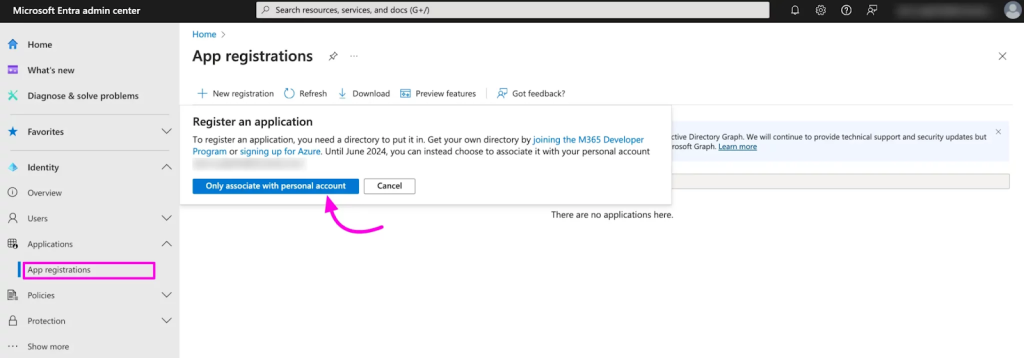
Associate with Personal Account and proceed.
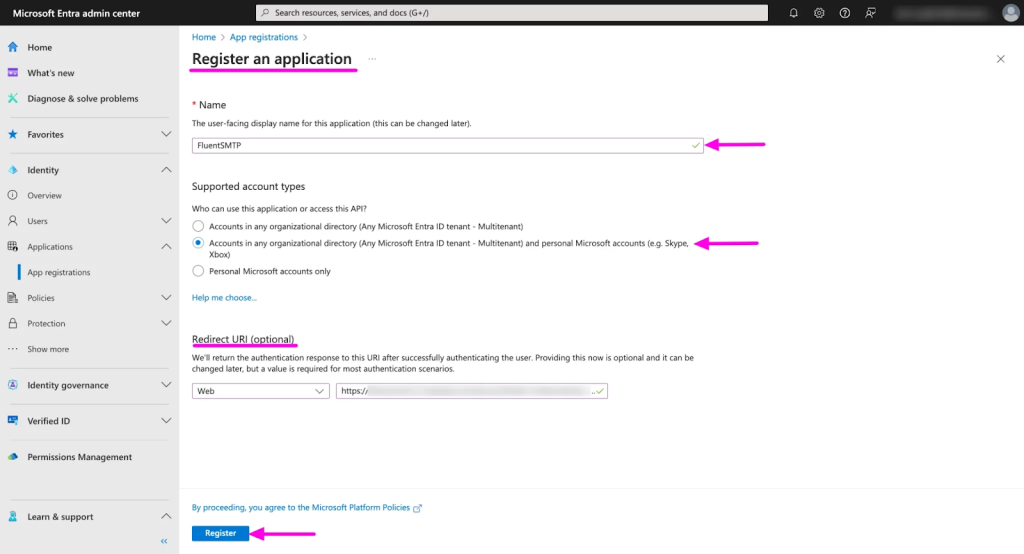
Fill out the Register an Application page with the App Name and other details.
- Give the App Name
- In the Supported account type select ‘Accounts in any organizational directory (Any Microsoft Entra ID tenant – Multitenant) and personal Microsoft accounts (e.g. Skype, Xbox)’ here.
- In Redirect URL settings select Web and then paste the redirect URL you have copied from the FLuent SMTP Microsoft Outlook Configure Page.
Click the Register button.
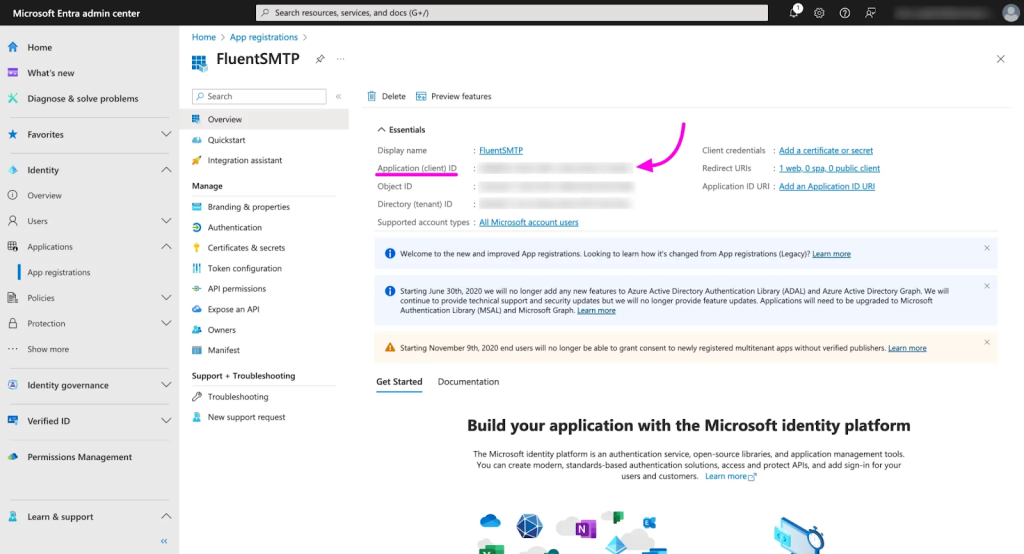
After that, you will be redirected to your App Overview where you can get the Application Client ID. Copy this Application Client ID for later use.
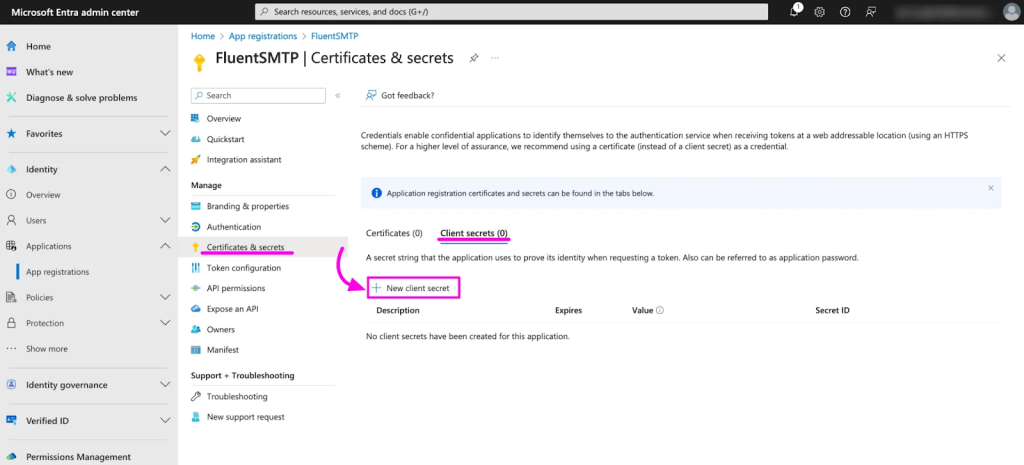
Then Click on the Certificate and Secret > Client Secret > New Client Secret button.
A pop-up will come to add the Client Secret Description and Expires. Give a description here, select the expiration date and click on the Add button.
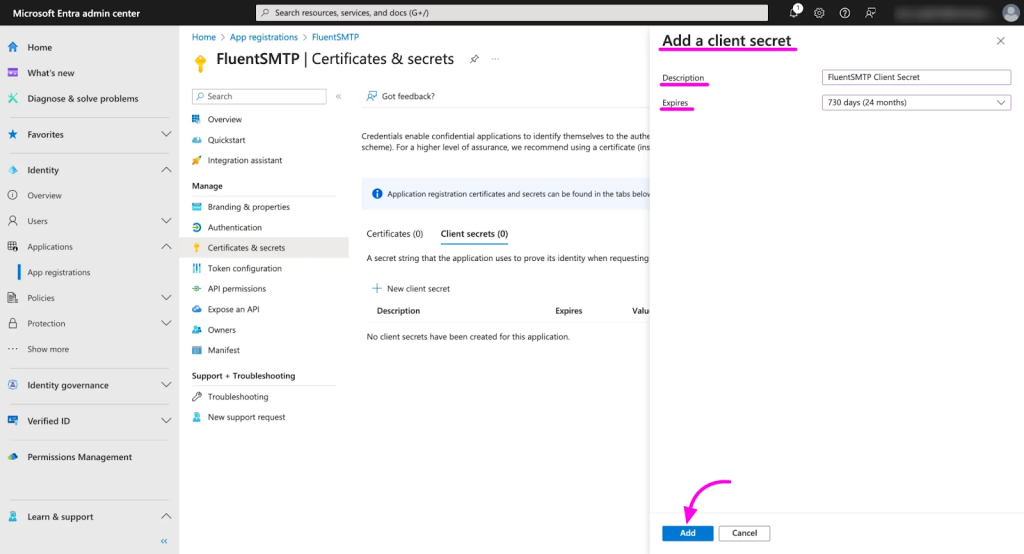
You will get the Client’s Secret now. Copy the Value from here.

Configuration Completion
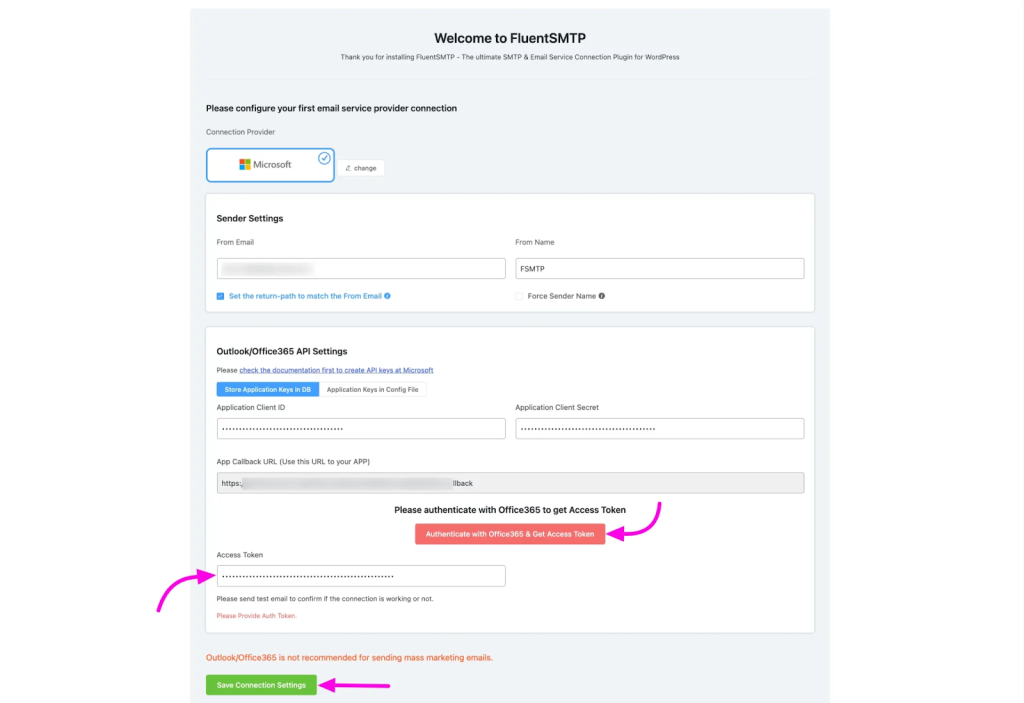
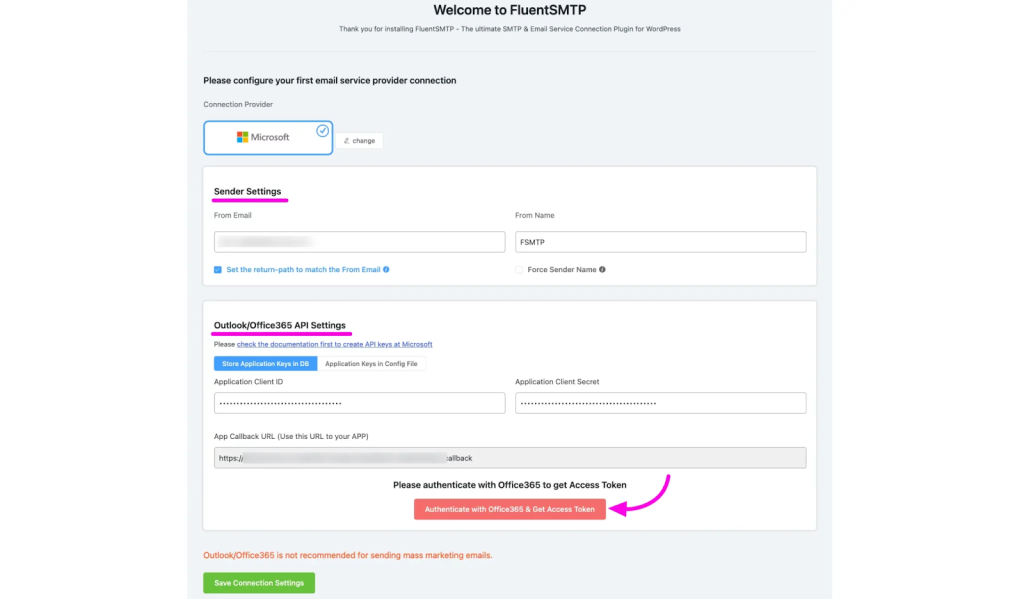
Go back to the Fluent SMTP Microsoft Outlook Configure page. In the sender Settings give your Microsoft Email Account and a Form name.
In the Outlook/Office 365 API Settings section paste the App Client ID and the Client Secret Value you copied earlier. To authenticate with Office 365 & get an Access Code click on the Authenticate with Office 365 & Get Access Code button.
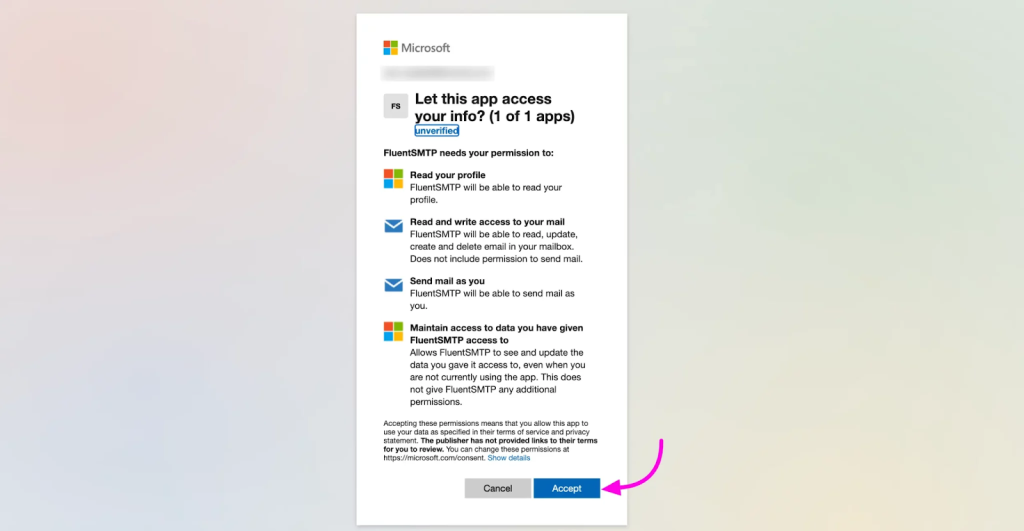
Accept permissions on the Permission Page of your Microsoft Outlook account.
After that, you will get an Access Code copy the code.

Paste your Access Code in the Access Token field and click the Save Connection Settings button.